The latest version of Kali Linux 2021.1 has been released. In this blog post I will show you how to install Kali Linux 2021.1 in VMware Workstation 16 which is the latest version of VMware Workstation. If you are using earlier versions of VMware Workstation, I recommend, you switch to the latest version of VMware Workstation which is Version 16.
- You can also install Kali Linux 2021.1 in VirtualBox 6, please follow my blog to here
- To Install Kali Linux using Kali Linux official Image, please follow my post here
- To Install Kali Linux 2021.1 in VMware Workstation Player 16, Please follow my post here
- To Install Kali Linux 2021.1 in Hyper-V, Please follow my post here
- If you want to install previous version of Kali Linux which is 2020 in VMware Workstation 16 Pro, please follow my post on here
Step 1 – Download Kali Linux ISO image
To install the Kali Linux, we will have to first get the installer ISO image file. You can get it by visiting the official download page. Please download the 64 bit or 32 bit image depending on the system you have.
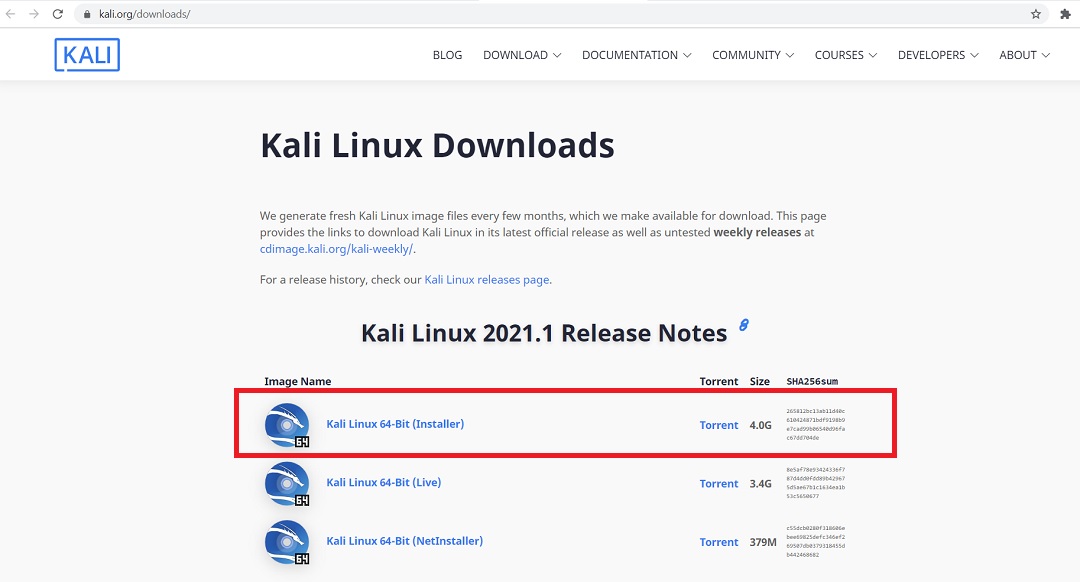
Kali Linux official download page
Step 2 – Locate the downloaded file
You can find the downloaded image file in the downloads folder, if you have not changed the default settings. The filename would be something like kali-linux-2021.1-installer-amd64.iso and would be around 4.0 GB. If you have downloaded through torrent, the ISO file will be downloaded in a folder, folder name would be something like kali-linux-2021.1-installer-amd64.iso.
Step 3- Open VMWare Workstation
Open VMware Workstation from Windows Start menu or from you desktop if you have VMware Workstation icon there.
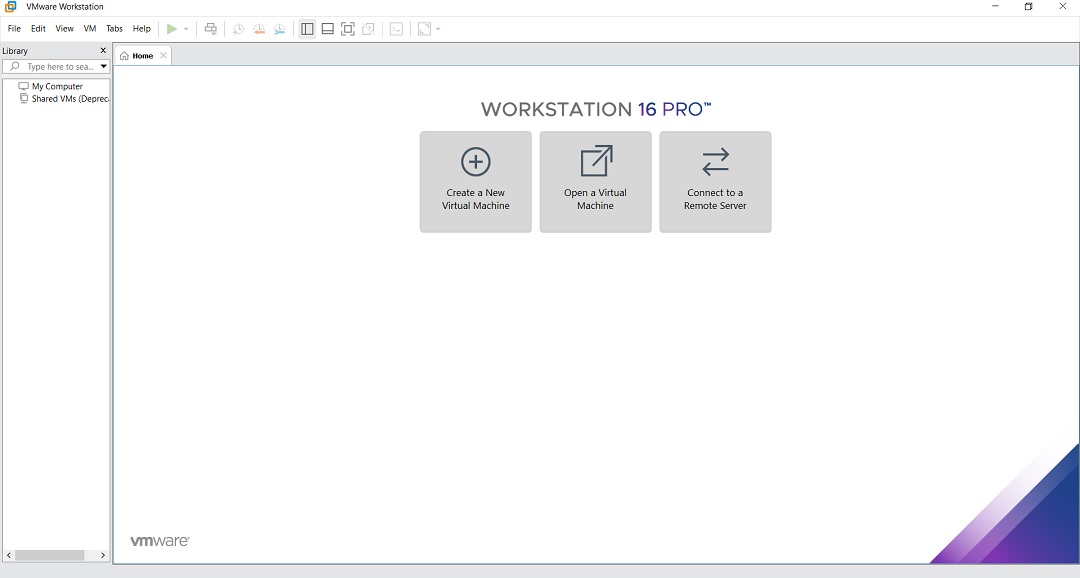
VMware Workstation 16 Pro Home Screen
Step 4 – Launch VMware Workstation New Virtual Machine installation wizard.
To launch the wizard to create a new virtual machine, Click on Create a New Virtual Machine or File -> New Virtual Machine. Welcome to the new Virtual Machine Wizard dialog box will open. Select typical and click on next.
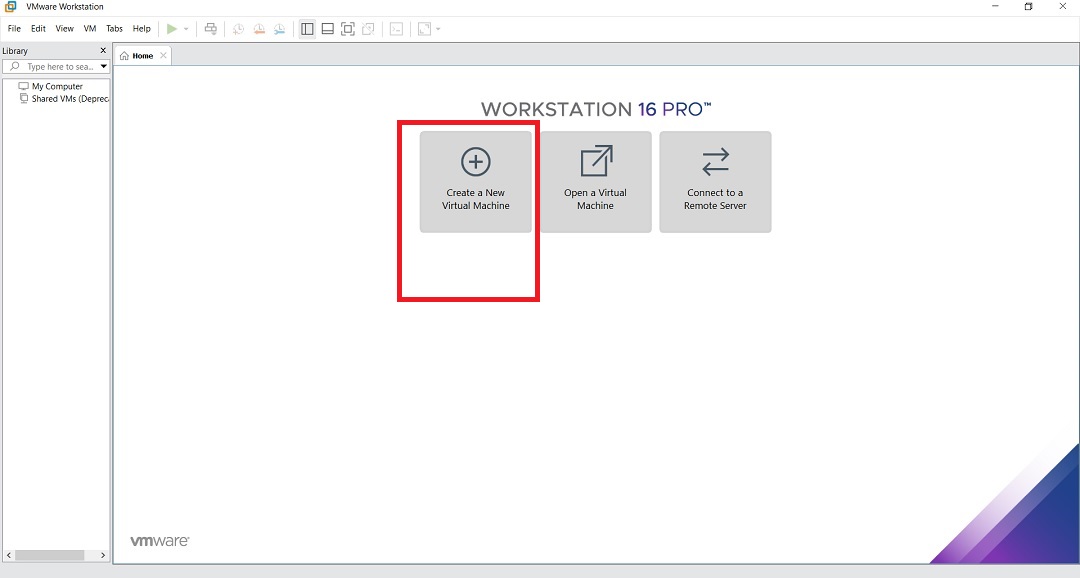
VMware workstation – create a new virtual machine screenshot
Step 5- Welcome to the new Virtual Machine Wizard dialog box appears
This is where you get a chance to select the way virtual machine will be created. Typical is predefined or mostly the defaults. Custom is where you get to set advanced options such as compatibility with older Virtual Machines, SCSI controller type, etc. We will go with the default options. Select Typical and click Next.
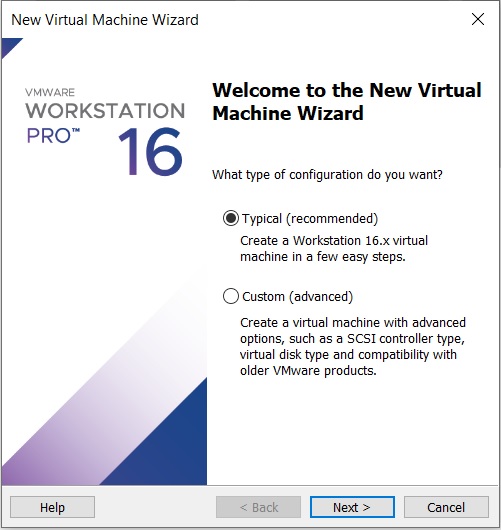
VMware workstation – create a new virtual machine wizard
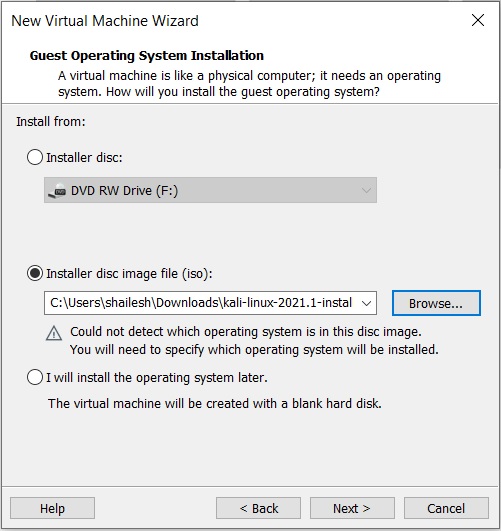
Step 6- Select installation media or source
In this dialog box you will have to browse to the downloaded ISO file and click next. Generally, VMware Workstation detects the OS automatically and initiates what they call as the Easy Install. But in the case of Kali Linux this is not the case and you will see a warning(yellow triangle). Please ignore that and click next to continue.
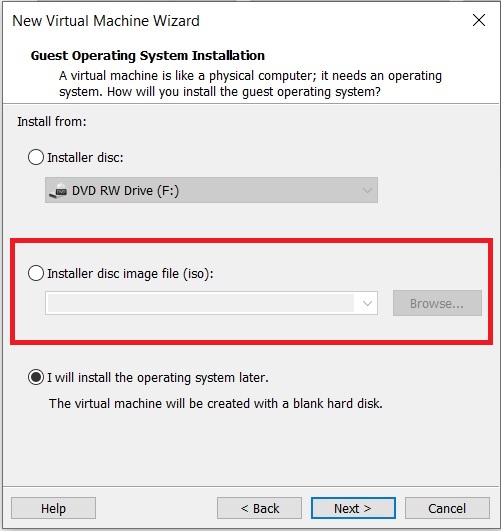
Kali Linux Installation – Select Guest Image
VMware Workstation Player 16 – Select Guest Operating System
Step 7- Select Guest Operating System
In this dialog box, you will be asked to select the Guest Operating System. Select Guest operating system as Linux and Version as Debian 10.x 64-bit or 32 bit depending on your system.
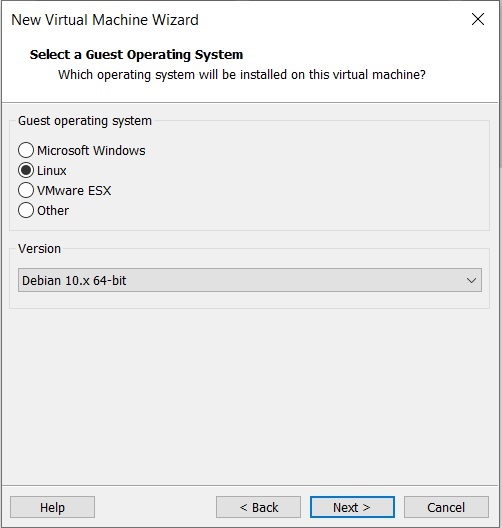
VMware Workstation Player 16 – Select Guest Operating System
Step 8- Provide Virtual machine name
In this dialog box, you will be asked to provide the name of the virtual machine. You can provide any name you like. You can also change the location of the virtual machine. By default it is place in the Documents/Virtual Machine folder. Leaving it as the default is also fine.

Kali Linux Installation – Name of VM
Step 9- Specify disk capacity
This dialog box asks you to specify the disk capacity. This is the maximum amount of disk space it will utilize once the Virtual Machine is created. You can leave it to the default but if you are running low on disk space, you can reduce it to 20 GB. This is generally sufficient if you are not planning to install heavy disk using software’s such as Photoshop. Such software’s reduce the performance of your Virtual Machine if your Computer is not powerful enough.
Check Split Virtual Disk into multiple files. This is the default option. Say if you specify 60 GB, all of 60 GB will not be utilized or say 60 GB will not be blocked at once. These Virtual Disks expand according to the usage with a Maximum size you specifed as the disk capacity. On a fresh install normally it takes 10 GB of space which will grow according to the software’s you install in the VM.
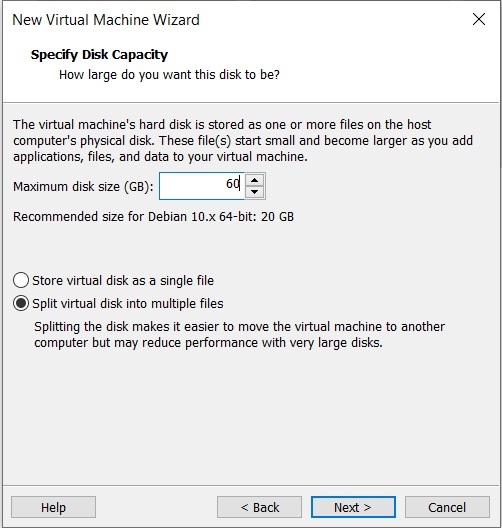
Kali Linux Installation – Specify Disk Space
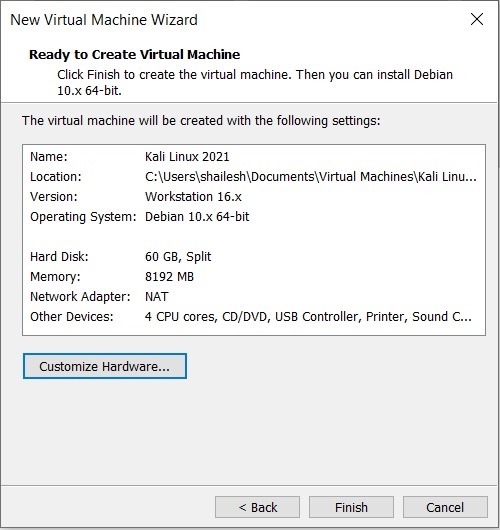
Step 10- Ready to create Virtual Machine Dialog Box
This is the final dialog box and what you see is all the options you have selected in previous dialog boxes.
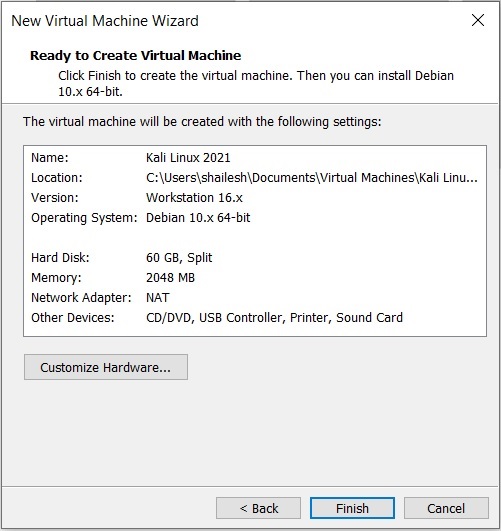
Kali Linux Installation – Ready to create virtual machine
Customise Hardware – Normally I increase the RAM and memory before clicking finish. This helps to finish the installation process faster. If you have sufficient RAM and CPU on your host Windows machine, I suggest even you should increase RAM and CPU. To increase the RAM, before clicking Finish, click on customise hardware. Increase the memory using the slider.
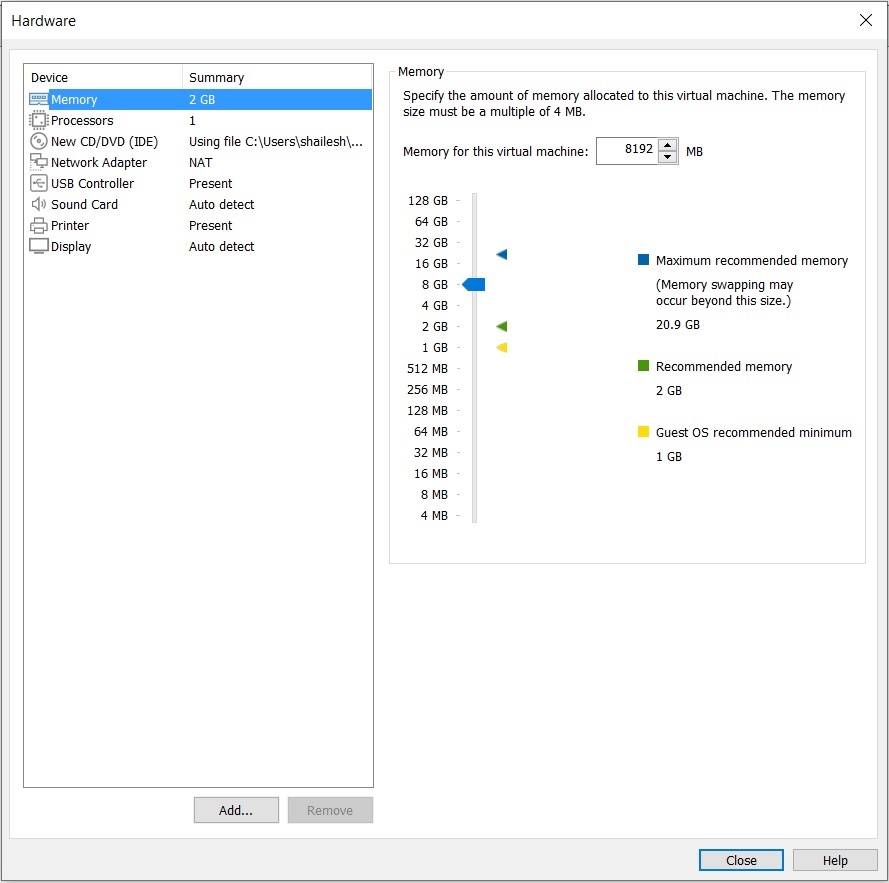
Kali Linux Installation – Customise Hardware – Memory
To increase the CPU, Enter the number of cores. I normally enter 4. Based on your CPU you can enter the number of cores.Click on Finish to start the installation process.
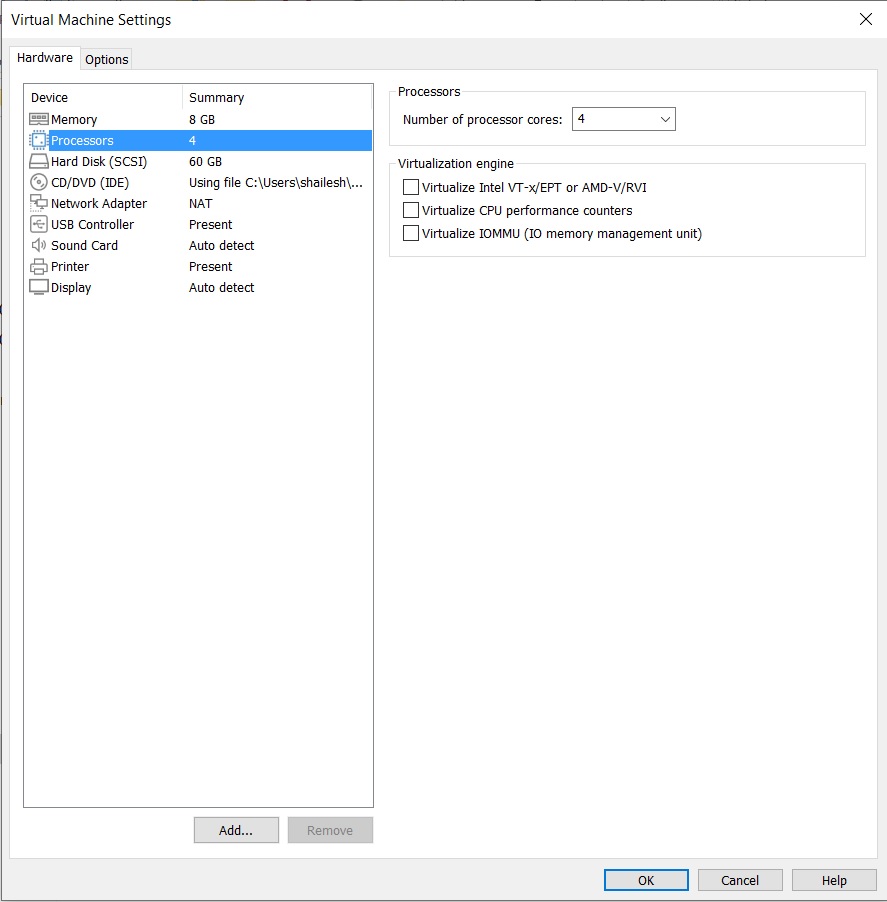
Kali Linux Installation – Customise Hardware – Processor
Click on Display to change the display settings. Check Accelerated 3D Graphics, Use host settings for monitor.
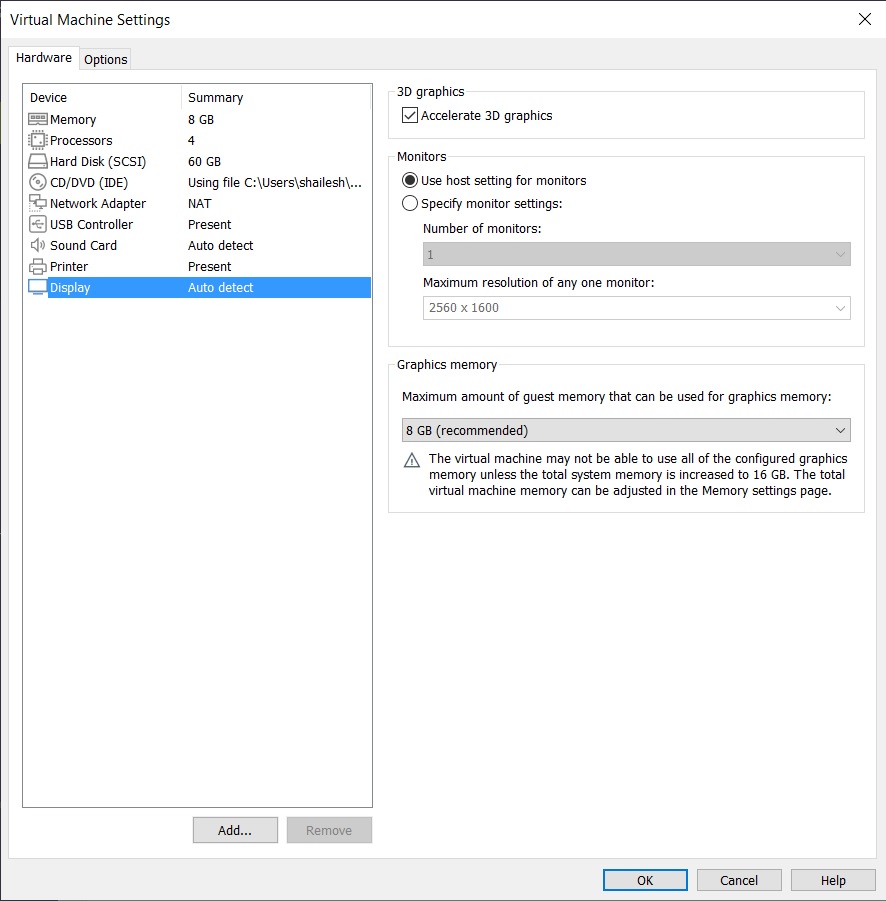
Kali Linux Installation – Customise Hardware – Display
Click on OK and Finish to start the installation process
Kali Linux Installation – Ready to create virtual machine
Step 11 – Power on Virtual Machine
Now you will have to click on play virtual machine to start the process.
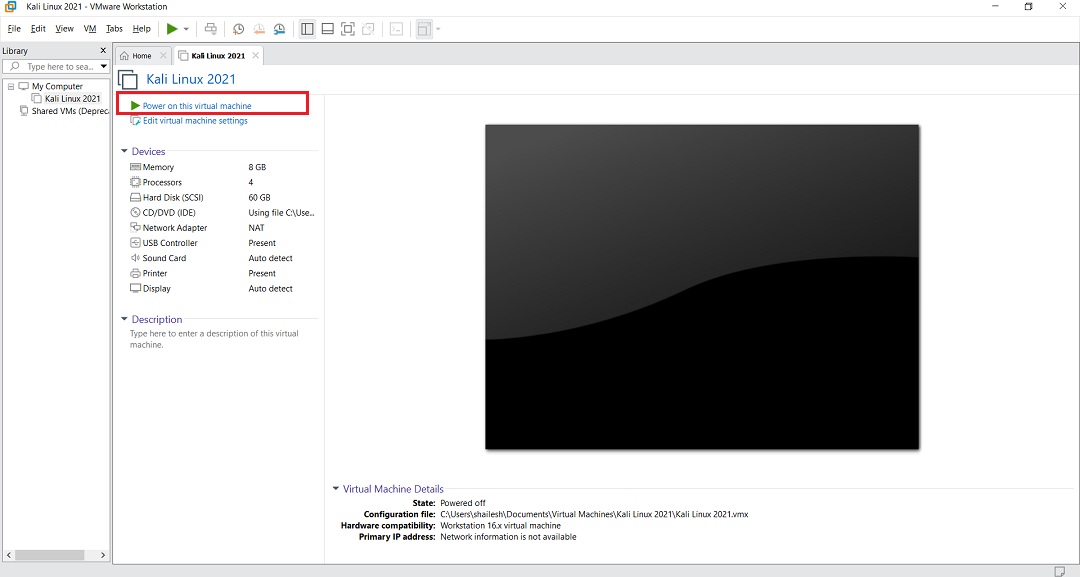
VMware Workstation – Power on Virtual Machine
Step 12 – Select Graphical Install from Boot Menu
Here you will see many options. Select Graphical Install using the down arrow key and click continue.
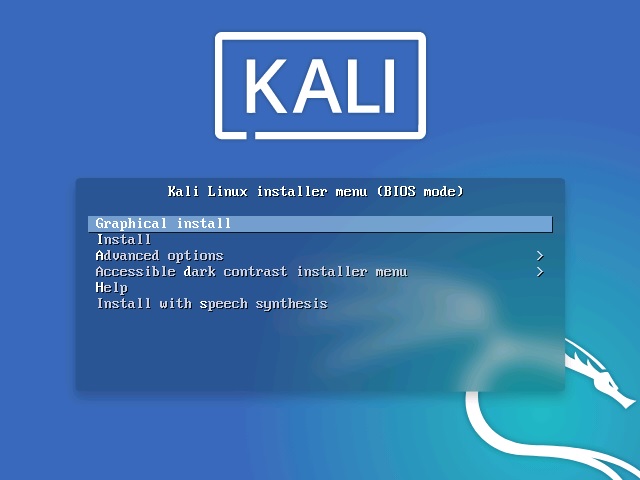
Kali linux installation boot menu screenshot
Step 13 – Select a Language
In this dialog box you will be asked to select a language. Please select a language and continue. This option sets your language in the Kali Linux Operating system. Default is English.
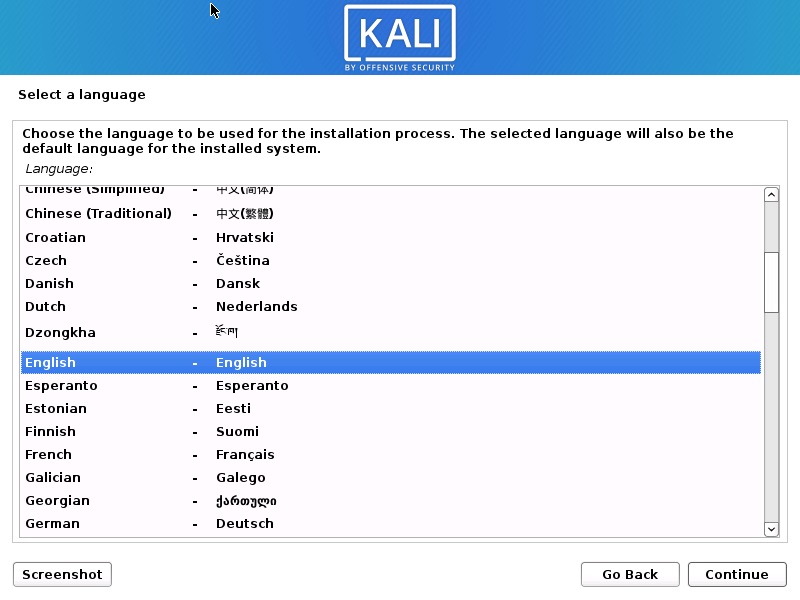
Install Kali Linux 2021 – Select a Language Screenshot
Step 14 – Select Location
In this dialog box you will be asked to select a Location. Please select a location and continue. This option sets your Location in the Kali Linux Operating system. later on, you will be able to set the time zone based on the location you choose here.

Install Kali Linux 2021 – Select Location Screenshot
Step 15 – Configure the Keyboard
In this dialog box you will be asked to select the keyboard layout. Please select a Keyboard layout using the arrow keys and click continue. This option sets your Keyboard in the Kali Linux Operating system. By default it is set to American English.

Install Kali Linux 2021 – Configure keyboard Screenshot
After you click continue, you will see the installation progresses for some them you see the Network Configuration dialog box, which is the next step.

Install Kali Linux 2021 – Installation progress Screenshot
Step 16 – Configure the Network – Enter Hostname
In this dialog box you will be asked to enter the hostname for your system. This being a home network, we can set anything. Enter any anything and click continue.

Install Kali Linux 2021 – Configure the Network Screenshot
Step 17 – Configure the Network – Enter domain name
In this dialog box you will be asked to enter the domain name for your system. This being a home network, we can set anything like example.com
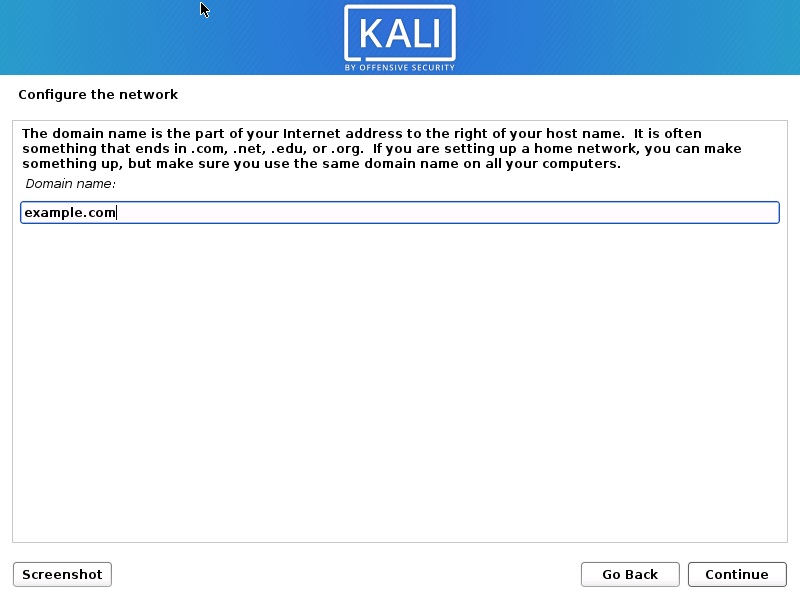
Install Kali Linux 2021 – Configure the Network- Enter Domain Name Screenshot
Step 18 – Set User account and password
In this dialog box you will be asked create an account other than the root user. Please note that this is the user other than the root user. Please type your name and click continue
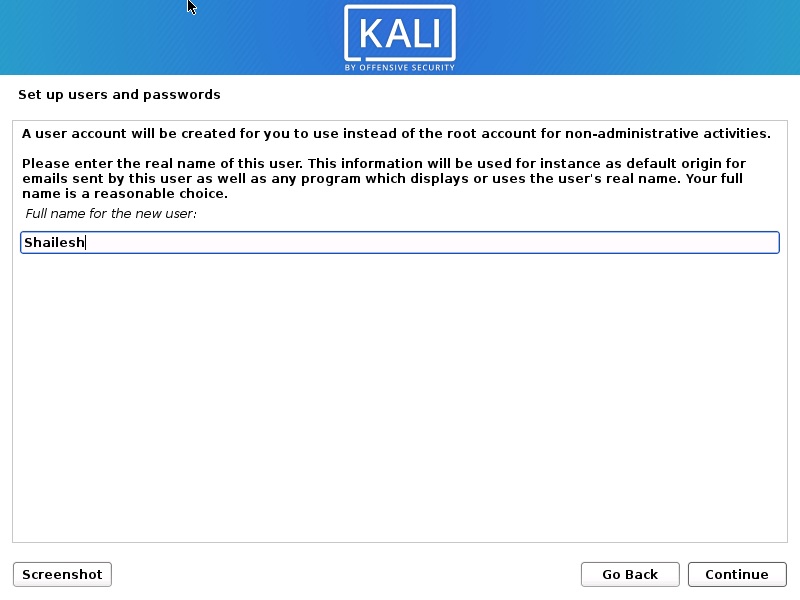
Install Kali Linux 2021 – Set up Users account Screenshot
Now you will be asked to provide the user name again. I use the same name as the account name in the previous screen.
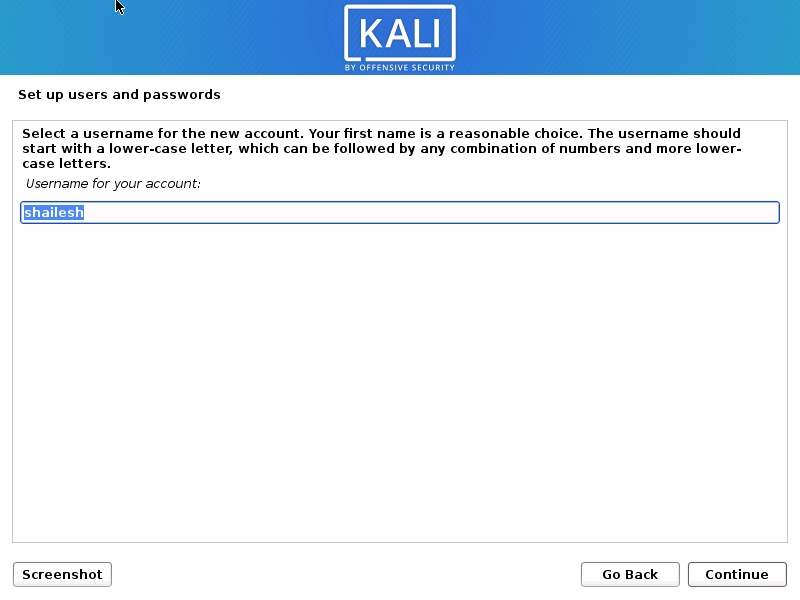
Install Kali Linux 2021 – Set up Users name Screenshot
You will be asked to setup a password of the user you created. Enter the password. We will login with this username and password once the installation completes.
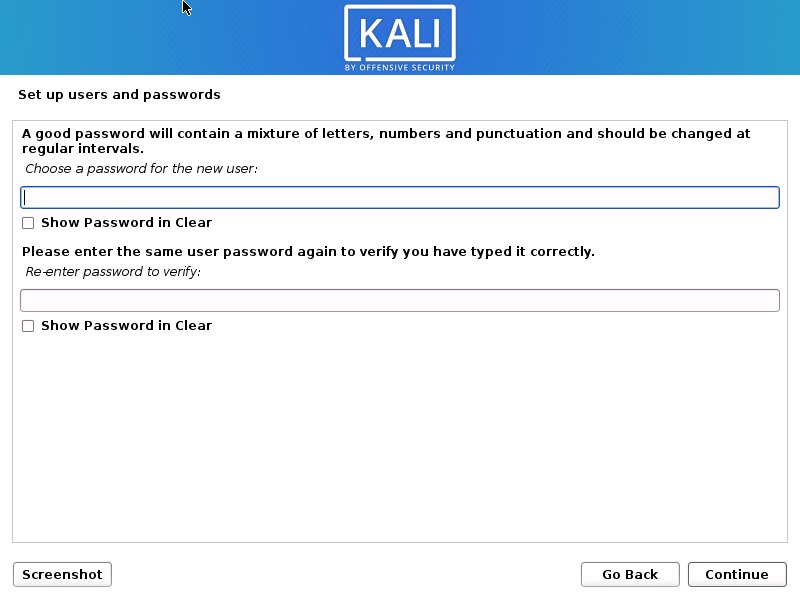
Kali Linux Installation – set user password
Step 19 – Partition Disk
In this dialog box you are asked how you would like to partition your disk. Select Guided – Use entire disk and click continue. This is the default option.
Install Kali Linux 2021 – Select Disk to Partition Screenshot
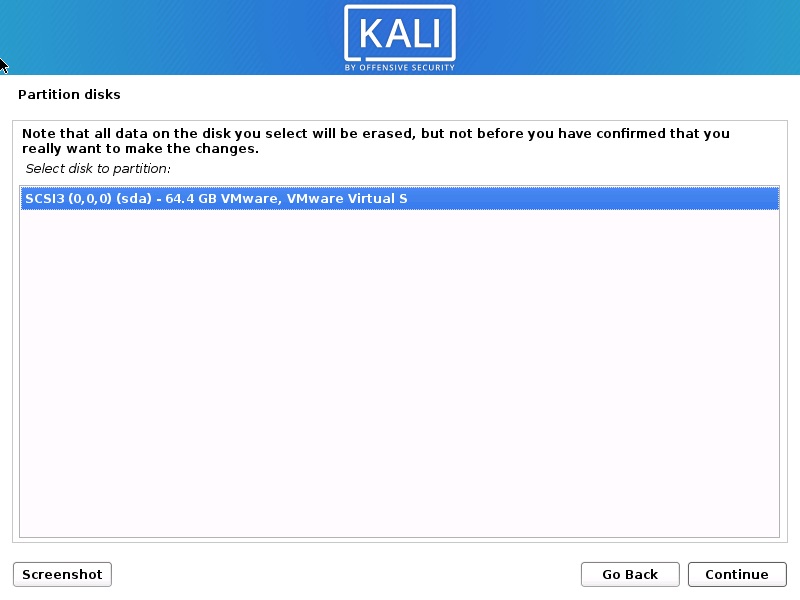
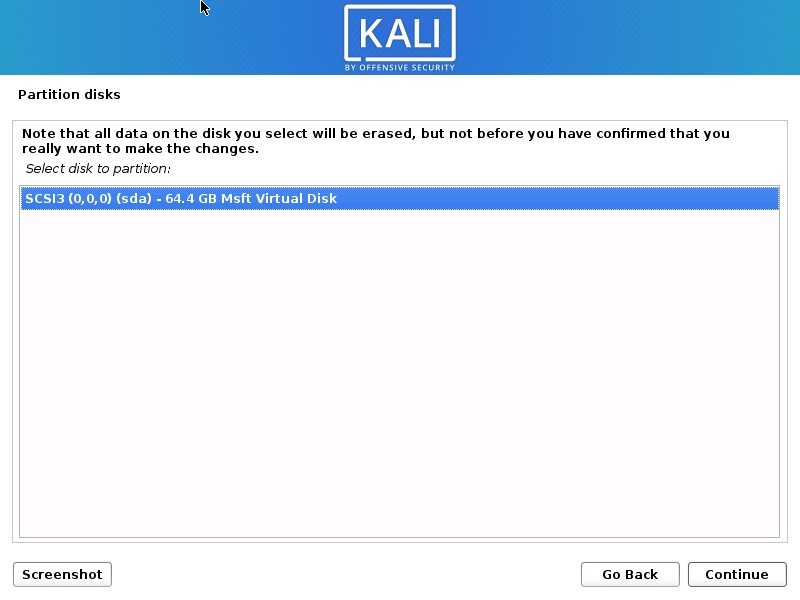
In this dialog box you are asked to select a disk to partition. Select sda, VMware Virtual disk. There should be only one option. Click Continue.
Install Kali Linux 2021 – Select Disk to Partition Screenshot
Step 20 – Select partition scheme
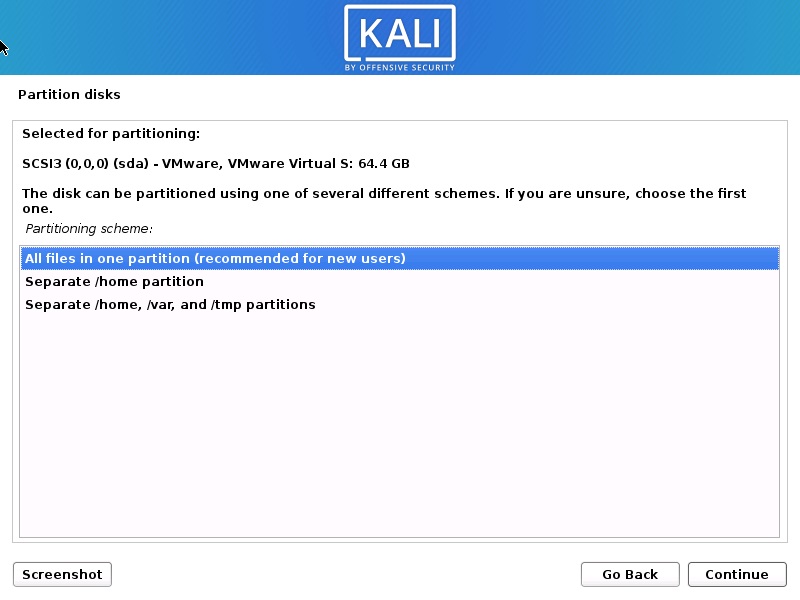
In this dialog box you are asked to select a scheme for disk partition. Select the default, All files in one partition and click Continue.
Install Kali Linux 2021 – Disk Partitioning Scheme Screenshot
Step 21 – Disk partition Overview
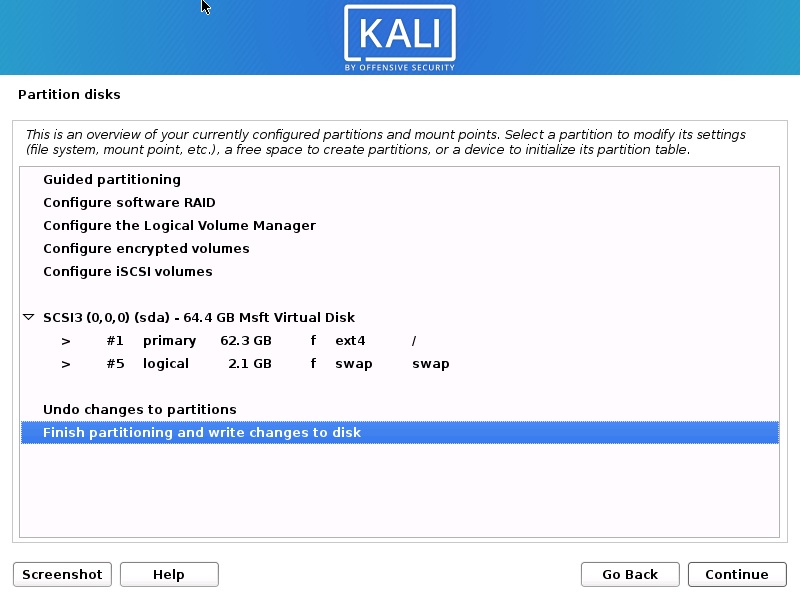
In this dialog box you are see the summary of your disk partition. Select the Finish Partitioning and Write changes to disk which should be selected by default. All you have to do is to click continue.
Install Kali Linux 2021 – Disk Partition Overview Screenshot
Step 22 – Disk partition Confirmation
In this dialog you are asked to confirm Write changes to disk. Select yes and click continue.
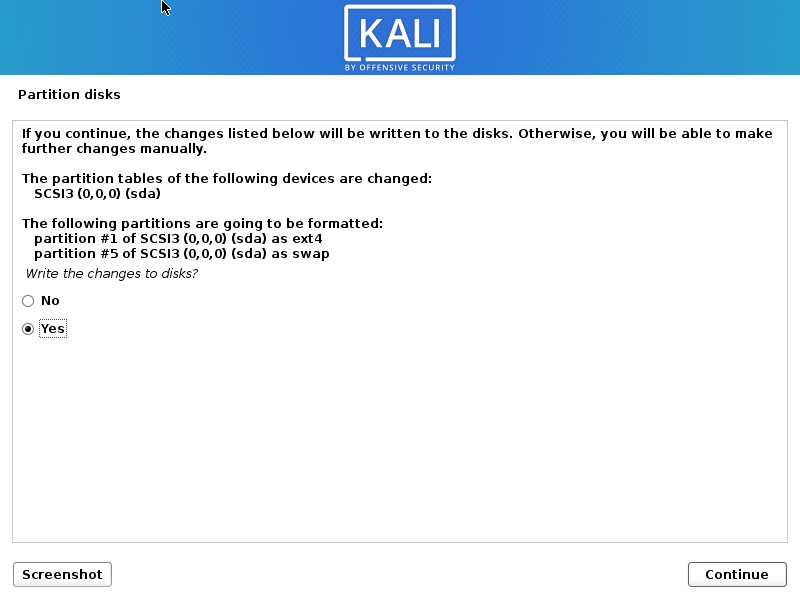
Install Kali Linux 2021 – Disk Partition Confirmation Screenshot
Step 23 – Installation starts
Now the actual installation starts. Wait for Configure the Package Manager Dialog box to appear.
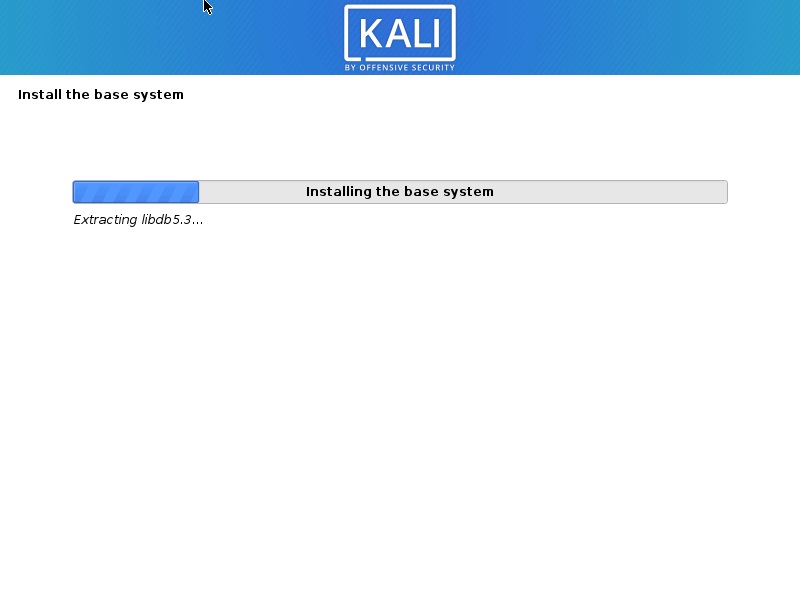
Kali Linux – Installation begins
Installation process will continue. Wait for sometime and let the process continue.
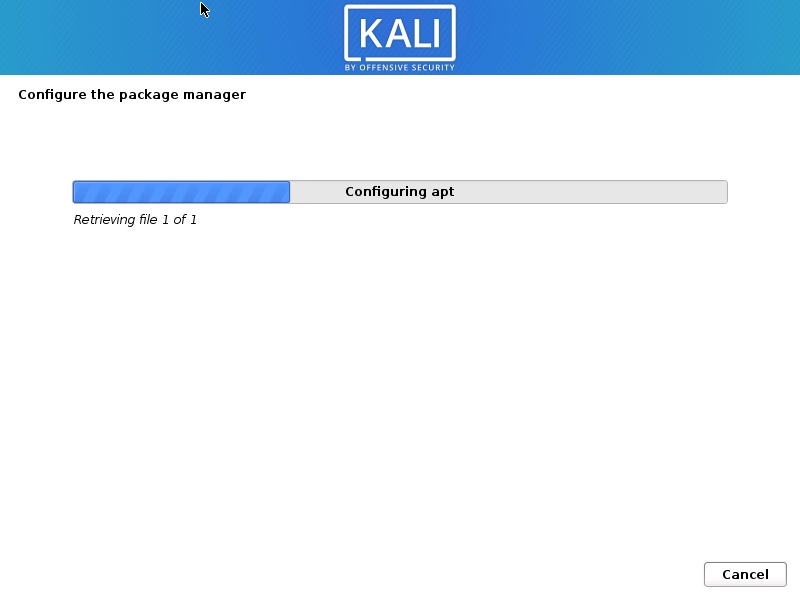
Kali Linux Installation
Installation will continue… please have patience.
Kali Linux 2020 Installation progress
Installation will continue. Wait for the process to complete. This can take a long time. So have patience.
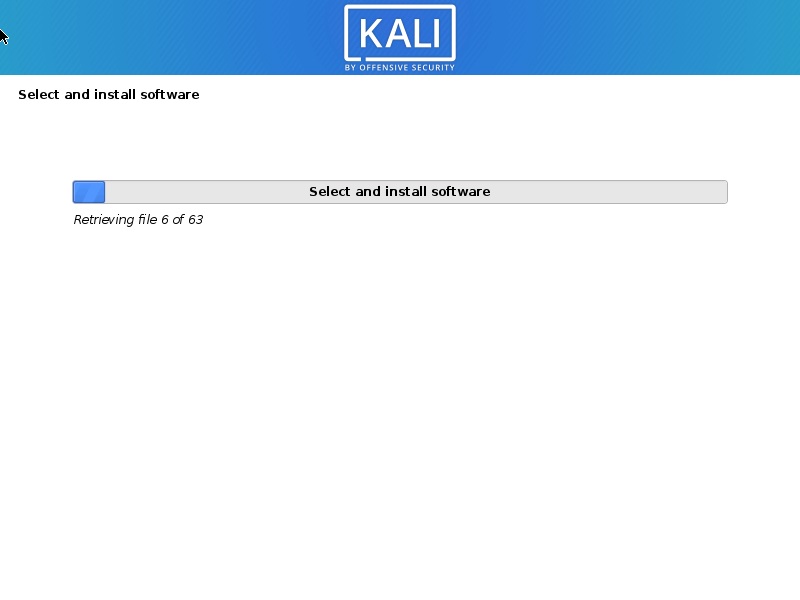
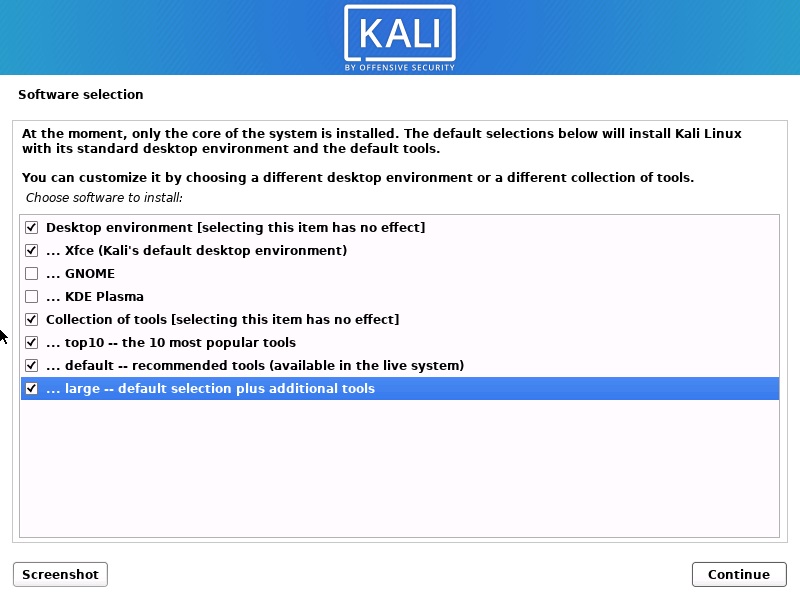
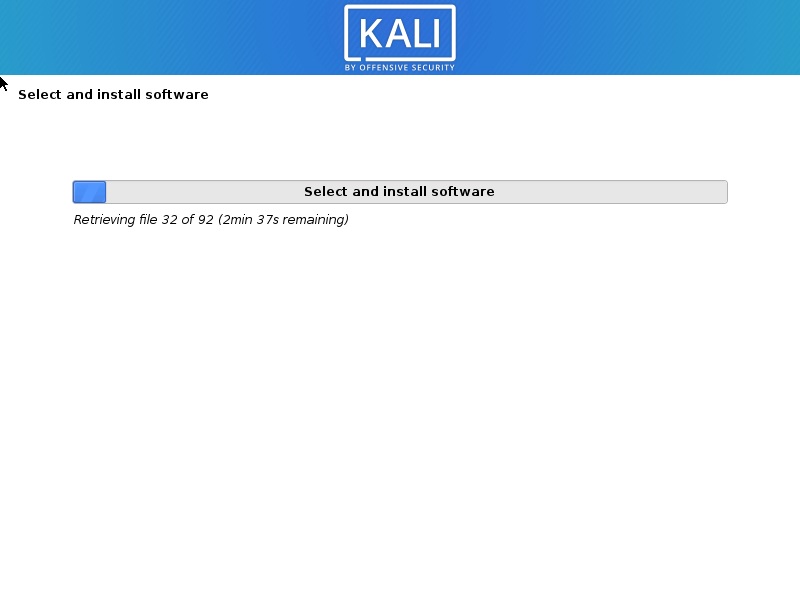
Step 24 – Software Selection
In this screen, you will have to specify what software you want to install. I accept the large, that is install all that is a part of default and additional tools. Click continue to proceed.
Kali Linux 2021 installation – Software selection
This step will take some time to complete. So have patience
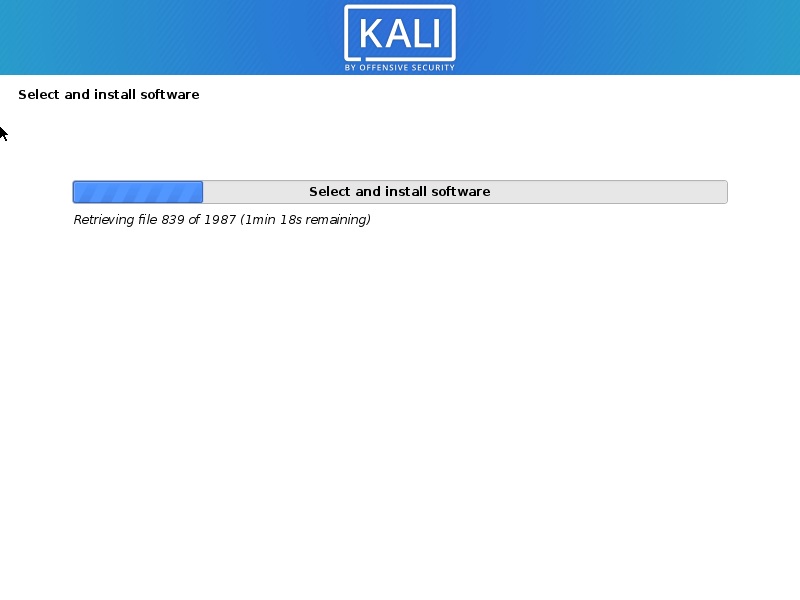
Kali Linux Installation progress
After all the files are retrieved, the installation will begin as shown in the below screenshot.
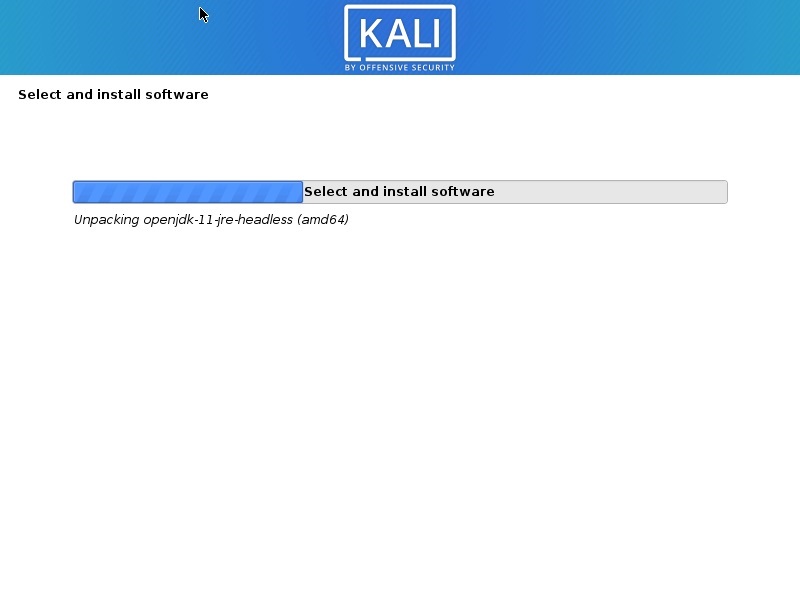
Kali Linux Installation progress
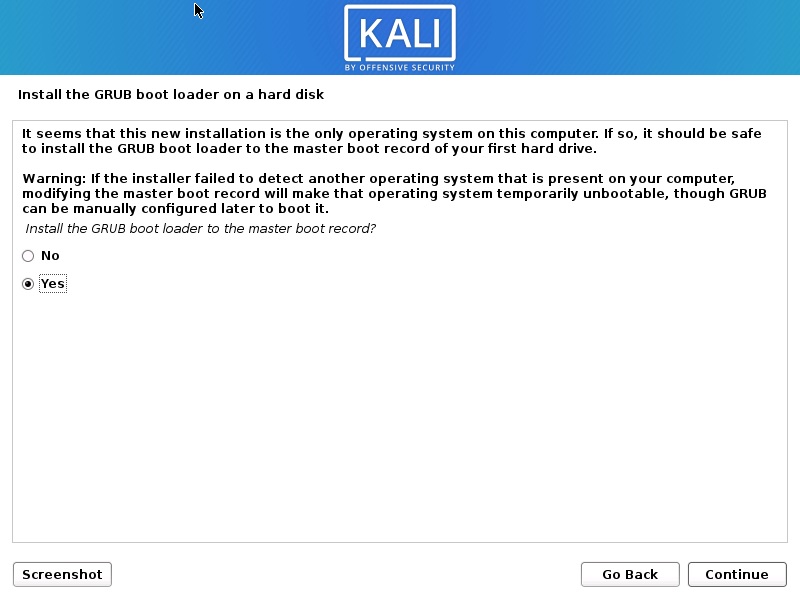
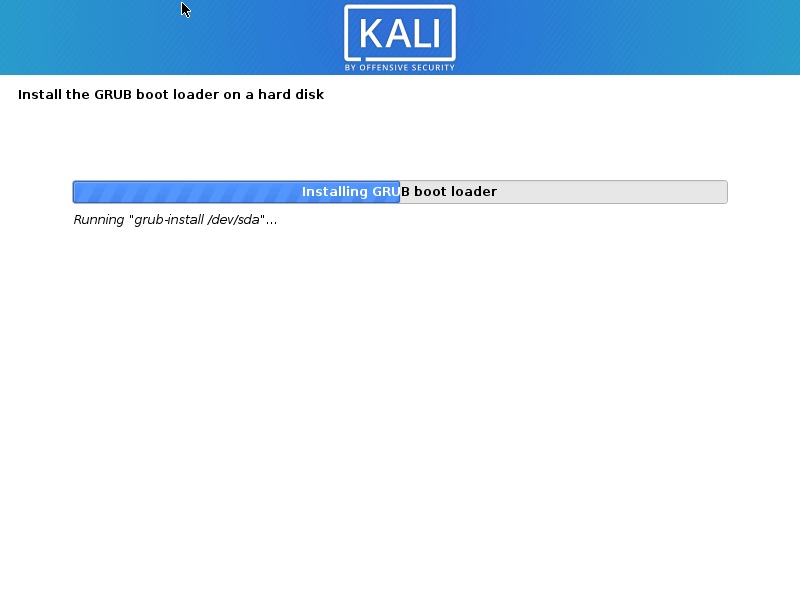
Step 25 – Install GRUB boot loader
In this dialog box you will be asked if you would like to install the GRUB boot loader. Select Yes and click Continue.
Install GRUB Boot Loader Screenshot
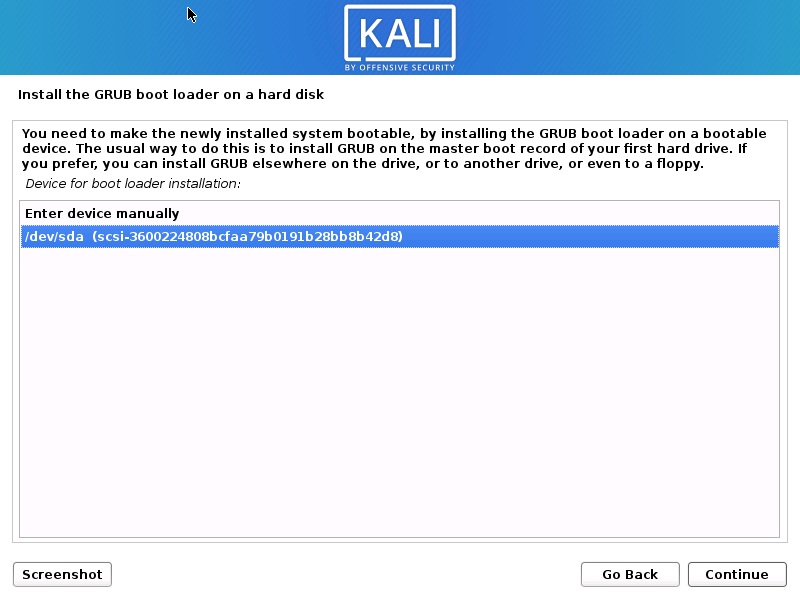
Step 26 – Select device for GRUB boot loader Installation
In this dialog box you will be asked to select boot loader device for GRUB installation. Select /dev/sda and click Continue.
Select GRUB Boot Loader Device
Installation will continue. Wait for the process to complete.
Kali Linux Installation progress
Kali Linux Installation progress

Kali Linux Installation progress
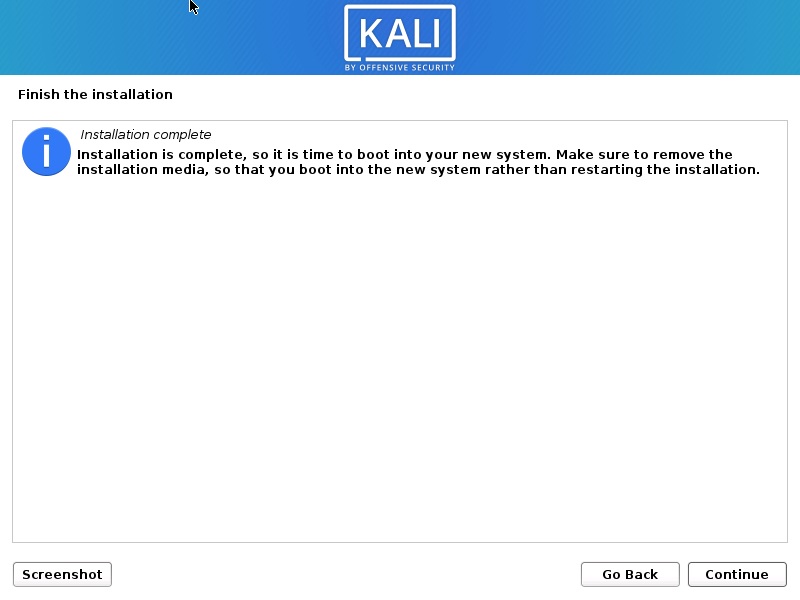
Step 27 – Installation Complete
Installation will continue and now you will see Installation complete dialog box. Click continue to finalize the installation and wait for the VM to reboot. After reboot you will see the boot loader screen.
Install Kali Linux 2021 – Installation Complete Screenshot
Process Complete
After the VM starts, you will see the Grub boot loader. Select Kali GNU/Linux.
Kali Linux – Grub loader
Login with your credential you created. Enter your username and Password
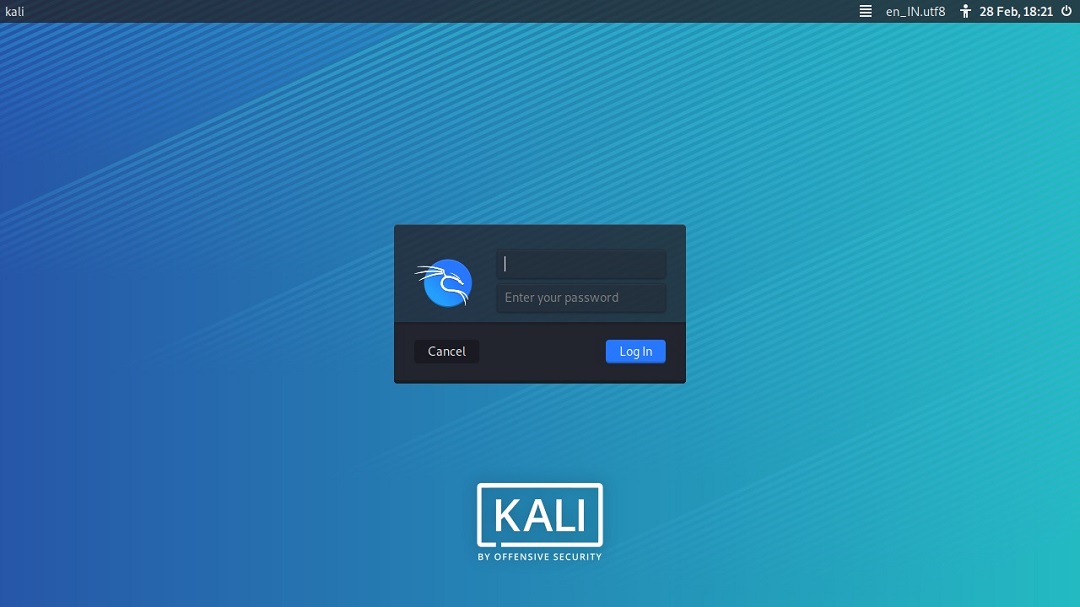
Kali Linux login screen
You will be logged into Kali Desktop 2021.
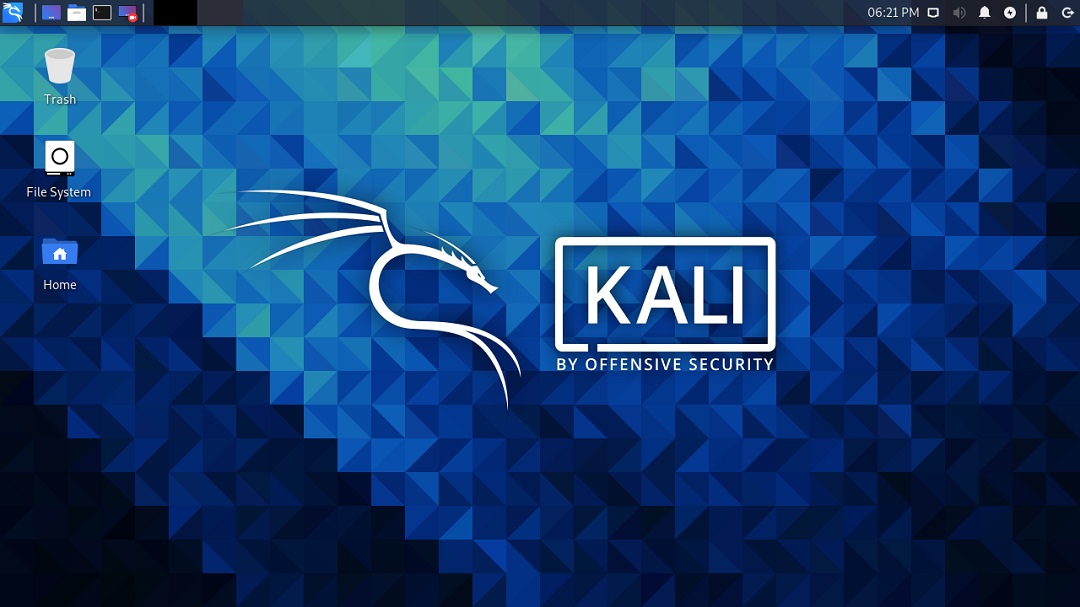
Kali Linux Desktop
Step 28 – Create root user
By default, only user account is setup during the installation stage. After installation you have to setup the root account by setting upa password for the root account.
- Open Terminal
- Type command
sudo suand enter password to gain root access - Type command
passwd rootand enter the password for the root user. You can set the password of your choice
That’s it, you should be able to login as root user.
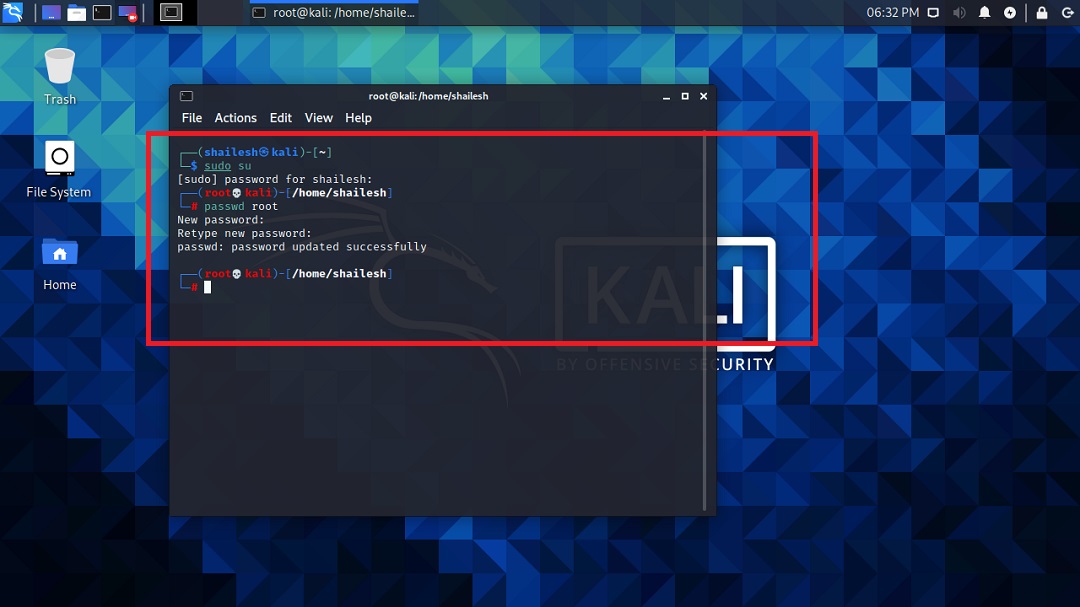
Kali Linux – change root password
Install VMware Tools (Optional for VMware 16 – Skip if you are able to switch to full screen automatically)
In VMware Player 16, VMware tools gets installed automatically. Manual steps for installing VMware tools is not required. You should automatically be able to switch to the full screen mode. Try to switch to full screen first. It should work, If not, follow the below steps, else ignore.
If you have internet connection, try this
Only this method of installing VMware tools will work for modern Operating systems. VMware now only supports Open VM tools.
- Open Terminal
- Execute the command
sudo apt-get install open-vm-tools-desktop fuse
- Enter your password
- Enter your password, if asked
- Enter Y to accept whenever asked
- Wait for the process to complete and restart. You are done. Login and now you will see the desktop in full screen mode
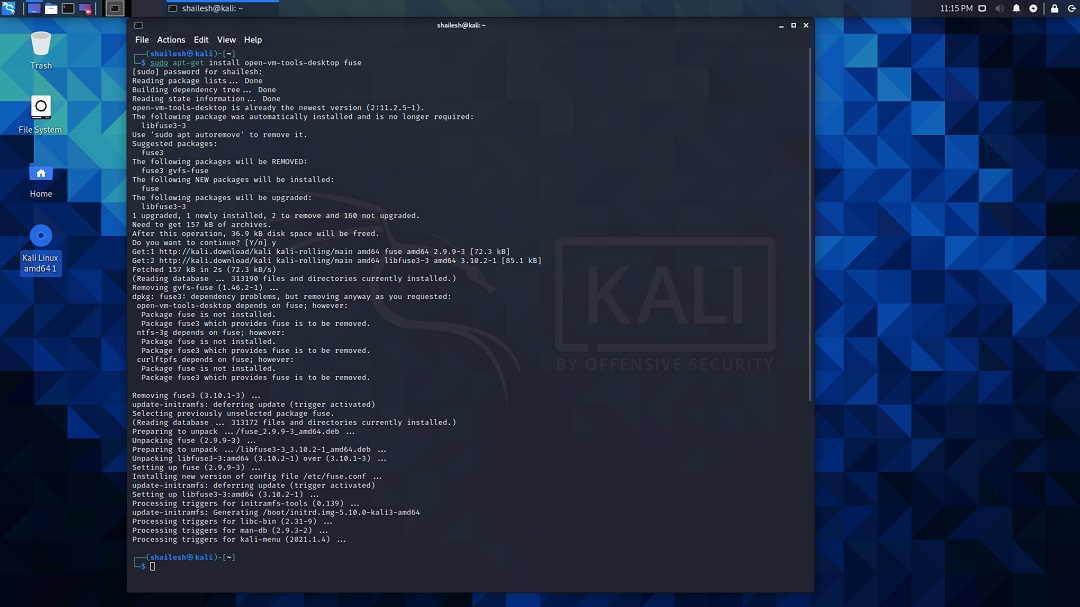
Install VMware tools
You can check the version of installed VMware Tools. In terminal, execute the command
vmware-toolbox-cmd -v
. This will show you the version number.
If you don’t have internet connection, you can install VMware tools directly from the VM. If you have internet connection, follow the next instruction which is easier.
VMware Tar Tool for Linux virtual machine is feature-frozen at version 10.3.10, so the tar tools (linux.iso) included in Workstation Pro is 10.3.10 and will not be updated. Due to this change, the Install/Update/Reinstall VMware Tools menu is disabled. Below steps worked in older versions of VMware Workstation. This will not work now for latest releases of Linux operating systems such as Redhat 8, Kali Linux 2021 etc… Please ignore the below steps for VMWare Workstation Player 16.
- Goto VM-> Install VMware Tools
- You will see VMware tools Icon on the desktop. If you don’t, then click on Places in the menu, Places->VMwre Tools. Double click to open.
- Copy the file with the file name something like this VMware-tools….tar.gz to the desktop.
- Right click on this file on the desktop and click Extract here. You will see that the file is extracted to the folder vmware-tools-distrib.
- Open terminal by going to System Tools -> terminal
- Goto the folder vmware-tools-distrib on desktop by entering the command cd /Desktop/vmware-tools-distrib
- Now run this command:
sudo ./vmware-install.pl -d
- Enter your password and press Enter. You will be asked if you want to proceed with the legacy installer. Enter Y and press Enter.
- Now you will be asked series of questions, just accept the default by pressing Enter for all and wait for the installation to complete.
- Wait for the installation to complete. You will see more prompts, except the defaults by clicking enter. Once completed, restart your VM by going to VM->Power->Restart Guest
- Once the system restarts, you will be prompted to login. Once you login, you can see the desktop in full screen mode which stretches up to the complete screen.
Process Complete
You are done, You can start working on Kali Linux 2021. Thanks for Visiting my blog.
Kali Linux Desktop

Excellent screenshots, Marvellous english, Outstanding simplicity, This article is TOP NOTCH. Great work Shailesh.
Thank you so much, I had no idea having kali would be easy again but with this article and the reply I am on the fast track. Once again, Thanks man.
Great article Shailesh, thanks for the simplicity. Anyways, I want to set up kali again but should I open kali ISO download before installing with VMware
If you have setup Kali Linux previously, just copy the folder to the new machine and open it in VMware. Login with credentials you setup earlier.
At the login page i am unable to login as root user.and only able to login as user,which was created previously as you shown.can you please help me sir
Hi, thank you for the comprehensive article
I translated your article into Persian along with several other articles and also mentioned the link to your source
نصب کالی لینوکس در VMware
best regard
Sir, I have virtual box latest version and kali linux latest version but i am not able to install kali on my laptop after following all the things. Please help me.
Sir, I installed Kali Linux on VMware workstation 15 player with debian 7.x 64 bit version. Can u please tell me the next step,what can I do after login to Kali linux sir.
I’m stocked at where it can’t copy file from Component CD. What should I do? I’m installing with an iso I downloaded from kali website.
Hi Godwin,
Its not easy to fix these issues. Try to setup Kali using the official image. Please follow my blog post: https://shaileshjha.com/use-kali-linux-official-image-to-install-kali-linux-in-vmware-virtualbox/
Thanks,
Shailesh
hi there
i have installed kali on vmware and its working fine thanks to you i got a notification that there is a new update available
should i update or there is an other method
Yes you can update it. Also, to be on the safer side, please make a copy of the Kali Linux VM machine folder. Its the same you provided during installation. if anything goes wrong, you will have a backup copy. To can open the VM from the backup, open the .vmx file.
hello sir . i install kali but i cant acces to internet . i tried both NAT and Bridge .i am using kali on vmware workstation pro 15 . can you please give me any suggestion ?
Great! Thanks.
Thanks man…………………..i have been looking for this for all over the internet
Great tutorial very helpfull ! Thanks a lot!
Great tutorial, I enjoyed it and everything is running fine!
how to fix load installer components from cd ..
Thank you, really appreciated for the detailed step by step tutorial on Kali OS Installation process _/\_ _/\_.
Thanks a lot
Hi,
After i installed kali linux i couldn’t install any softwares. i am getting errors on every time. i guess repository file content are wrong because while run this cmd “apt-get update” some url’s are not connecting and also getting error. so kindly help me to resolve these problem .
And, I need some guidelines to use kali linux.
Are you connecting to Kali Linux using wifi or Cable. WiFi can be a problem some times. Connect through cable and check the internet connection in Kali. Open the browser and open some page to see if it loads.
Lets check if you have the repository correctly setup.
Go to terminal and enter: vi /etc/apt/sources.list
Vi editor will open up and show you the contents of the file sources.list. Do you see this entry or is it blank?
If it is blank add the following lines: deb https://http.kali.org/kali kali-rolling main non-free contrib
Save and quit.
Now try to run apt-get update. It should update.
Let me know how it goes.
Try this book. Officially released by Kali.org
https://kali.training/downloads/Kali-Linux-Revealed-1st-edition.pdf
Thankyou so much it’s very helpfull for me my scalling issues is done:). but in the middle of process i want login after install using:
username:root
password:toor
still can’t login
but after try some keyword finally i can login:
username:root
password:(password when input in the process of installation)
just sharing my experience 🙂
HI,
I tried to install Kali Linux as u said. I followed the steps exactly. I got an error showing GURB boot loader is not installing. Please give any solution.
Hi,
I installed the VM after the login page with correct credentials given i get a black screen. what would be the problem?
i have vmware 9and windoes 7 32bit os …and when i set a password while installing kali-linux-light-2017.2-i386 at the last step of installation again a pop up windows appear asking for username and password but error is occuring saying that wrong password..
VMware 9 is too old. Start using VMware 14, the latest one. Try to login as user root and password you set during installation. if you have forgotten the password, you will have to start the process again.
Failed to launch Settings. Failed to Fork (Cannot Allocate Memory)
Hi,
I follwed all the instructions on your blog as regards installing Kali Linux.
I installed Kali-linux-2017.3-amd64 on VMWare Workstation 14 Player.
Debian 9.x 64-bit
The tools do not open when I try to launch them.
I clicked Settings and I am receiving this error message “Failed to launch Settings. Failed to Fork (Cannot Allocate Memory)”
Could you advise of what I can do to resolve this error?
Thank you
I am not sure about the exact cause. Something is eating your memory and system is running out of it.
How much memory did you allocate while turning on the Kali VM. Can you increase it to 2GB and try again.
Have you enabled Inter VT in your system?
Try that and let me know how it goes.
I have Kali 2007-1 installed on VMware workstation. I want to upgrade to Kali 2017-3(latest version)
How can I do it without having to remove the Kali or the VMWare.
I am sure there is a line of code I can use to upggrade.
Thanx
Brad
Hi Brad,
Use the command as the root user. Kali will upgrade to the latest version.
apt update && apt full-upgrade
Power on this virtual Machine
This host supports Intel VT-x, but Intel VT-x is disabled.
Intel VT-x might be disabled if it has been disabled in the BIOS/firmware settings or the host has not been power-cycled since changing this setting.
(1) Verify that the BIOS/firmware settings enable Intel VT-x and disable ‘trusted execution.’
(2) Power-cycle the host if either of these BIOS/firmware settings have been changed.
(3) Power-cycle the host if you have not done so since installing VMware Workstation.
(4) Update the host’s BIOS/firmware to the latest version.
This host does not support “Intel EPT” hardware assisted MMU virtualization.
Module ‘CPUIDEarly’ power on failed.
Failed to start the virtual machine
So please help me
Hi Kishor
Looks like Intel VT-x is disabled in BIOS. Follow my post on how to enable it.
https://shaileshjha.com/step-by-step-guide-to-enable-intel-vt-x-or-amd-v-in-bios-or-uefi-in-windows-10-and-windows-8/
Intel VT is required for 64 bit OS. You can try to download 32 bit version of Kali Linux instead of 64 bit. 32 Bit Kali should work fine. But first try to enable Intel VT and see what happens.
i installed it but there was no username and password tab…so after installation i can’t sign in. what should i do?
username root
password toor
Hmm still having window scaling issues after installing vmware tools. Was able to scale/Drag the guest window to whatever size, now after the dist upgrade it can only be set in the system display settings. Anyone have a fix plx respond.
May be you are not using the latest version of VMware tools. Kali Linux 2017 is based on Debian 8. Please check the version of installed vmware tools by using the command vmware-toolbox-cmd -v in terminal. Reinstall the latest version of VMware tools using the command sudo apt-get install open-vm-tools-desktop fuse
error is comming
I dont know what I enjoyed more, the tutorial or your bio paragraph. Haha. Thanks for breaking it down in a simple and easy to follow format. I have been playing arou d with Kali for a little over a month through a live usb boot and also on my android through vnc. Both have their advantages and disadvantages. Thought I would give this a shot and see if it fixes the issues I am having with the other 2 before I just go ahead and run a dual boot install on my machine. Thanks again man. Be heard but not seen.
Great tutorial. Thank you