In this blog post I will show you how to setup Java JDK version 14 on Windows 10.
- To install Java 8 JDK SE, please follow my post here.
- To install Java 11 JDK SE, please follow my post here.
Please note that Java SE is available only in 64 bit version and not in 32 bit version. Oracle has dropped the support for 32 bit version of Java.
For Windows, you will see two options, one is the .zip file and the other is .exe executable file. I will show you how to install Java using both.
Please note that JRE will be installed automatically when you install JDK. You don’t have to do anything extra to install JRE. Oracle has stopped providing a separate JRE installer. Now JDK and JRE is a part of Standard Edition (SE)
Download Java 14 – JDK
You can download Java JDK 14 from here.

Java 14 JDK download page
Scroll down and you will see the two download options for windows which is an installer (.exe) and Compressed Archive (.zip). For this blog, we will be downloading both.

Java SE 14 Download Page
Once you click on download, you will be asked to accept a License agreement before the download begins. Accept the license to download the file.

Java 14 SE Download – License Agreement
Oracle does not allow you to download older versions of Java such as Java 8, 9, 10, 11 etc. without registering with Oracle. That is you will have to create an account and login to be able to download.
Since Java JDK 14 is the latest release, you don’t have to login to download.
Its better to have an Oracle account because for a lot of downloads, Oracle has stated asking users to login to download the files
There are Two options to install Java JDK 14. We will see all the options one by one.
and after you install Java JDK 11 using either of the Options, you will have to
Add Java Path to the environment variable
Option 1- Install using Windows installer
I normally prefer to use this method.
Step 1- Run the installer (.exe file)
Lets get the process started by executing the installer by double clicking the .exe executable installer file that you have downloaded from the official website.
You will see the the following windows.

Windows Installer – Preparing to Install

Java 14 Installation – Setup Wizard
Click on next to continue
Step 2 – Specify Destination Folder
You can change the installation directory if you want by clicking on change or accept the default. I generally accept the default. Click next to continue.
Please remember the installation directory path. This will be required to set the environment variables

ava 14 JDK Installation Wizard – Specify Destination Folder
Click Next to begin the installation
Step 3 – Installation begins
You will see that the installation begins. Please wait for the process to complete.

Java 14 JDK Installation progress
After sometime you will see installation complete message.

Java JDK 14 Installation Complete
Click on close to complete the installation.
Earlier, Java installers used to add Java to environment variable also. But in Java 14 JDK, you have to add Java to the environment variable manually.
After the installation process completes, run java --version command in command prompt. If you see an error message, end of the blog has the steps required to add environment variables to your computer.
Option -2 – Install using extracting the .zip file
This is pretty straight forward process.
Step – 1 – Download the zip file
Download the .zip file from the official site.
Step – 2 – Unblock the file
Windows 10 blocks the files you have downloaded from internet by default for security reasons. Sometimes when you extract these blocked files, all the extracted files are also blocked and will not execute. Its better to unblock it before extracting it.
Right click on the downloaded zip file and click on properties. Check unblock at the bottom and click OK.

Java 14 JDK – Unblock Zip File
Step – 3 – Extract the downloaded file
Extract the download .zip file which will have the name something like , to any folder such as c:/jdk-14.
You can use 7zip or Windows default unzip program. To use the windows default unzip program, right click on the zip file and select Extract All.
Step – 4 – Execute java command from command line
Now you can execute java code using the command line. For this you will have to go to the extracted file root folder. for example C:\jdk-14 and execute Java commands from command line.
cd C:\java
java --version
Step – 5 – Add Java to Path
Follow the below steps to add Java to Path.
Add Java Path to the environment variable
If you want to run the Java command from anywhere, its better to add it in the path variable. This is how you would do it.
Step 1- Go to advanced setting
Search advanced setting in the taskbar search pane. Click on view advanced system settings.

Windows 10 taskbar search – advanced settings
You will see System properties window. Click on Environment variable.
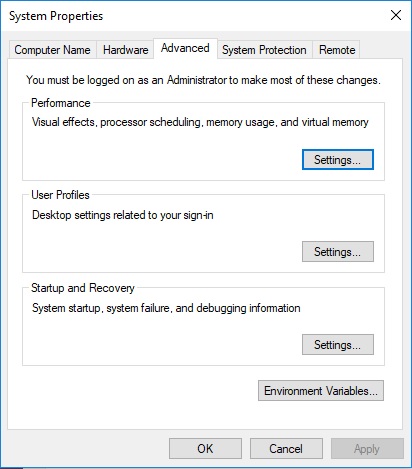
Windows OS – System properties window
Step 2- Add to Environment path variable
Under System variable – click on path and click edit
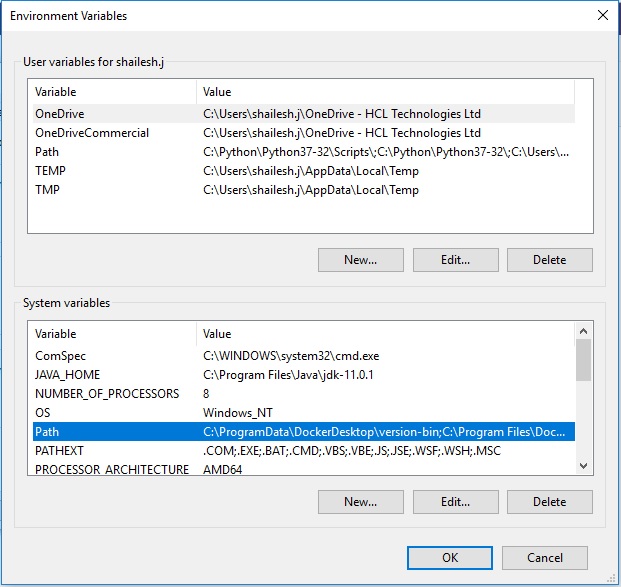
Windows 10 – Environment variable
Click on New, and add the java directory’s bin folder path such as c:\java\bin or C:\Program Files\Java\jdk-14\bin. This will change based on where you have extracted the .zip file(option 2) or installed java(option 1). If you have used the default settings, Java will be installed in the C:\Program Files\Java\ folder.
Click on Ok continue and exit.

Windows 10 – Java 14 JDK Environment Variables
Now you can run Java command from any where.
Step 3- Check the version of Java installed
Go to windows terminal cmd or powershell and run the command
java --version to check the version of Java installed.

Command Prompt – Check Java Version
That’s it, now you have Java JDK installed on your system.
Thanks you…