If you are looking forward to developing application in PHP, first thing you want is to set up a development environment. On Windows, WAMP is a popular choice. Let me show you how to install WAMP 3.2.0 which was released on 20th Feb 2020 on Windows 10 in this blog post.
In this blog we will see:
- How to Install WAMP Server in Windows 10
- How to start, stop and restart services
- How to change default database from MariaDB to MySQL and Vice Versa
- How to change PHP version
- How to access phpMyAdmin
- How to create new database user and password
WAMP is not the only choice you have for windows. You can also choose XAMPP which is also stable and good. For Linux you can try LAMP and for Mac, MAMP. Please don’t waste your time in comparing various alternatives available to you. They are all good. All I can say is that get yourself a development environment quickly and start coding. WAMP is a very good choice and is very stable. Go for it.
- XAMPP is another popular choice for setting up PHP development environment in Windows OS. To see how to install XAMPP in Windows 10, Please visit my blog on how to install XAMPP in Winodws 10
- Prerequisites: In order to successfully install and run WAMP server make sure that you have VC++ Redistributable installed on your system. Please follow my post and install all the versions of VC++ Redistributable using the link provided in the post at the bottom of the post. This article also tell you why VC++ Redistributable is important and why you should have it to avoid future problems on Windows Platform.
- After the installation if you get the error message that some dll files such as msvcr110.dll, msvcr100.dll, msvcp110.dll, msvcp100-dll is missing, make no mistake, it is because Visual C++ Redistributable is missing. I have written a blog on it. Here is the link.
Here are the installation steps.
Prerequisite – Install Visual C++ Redistributable
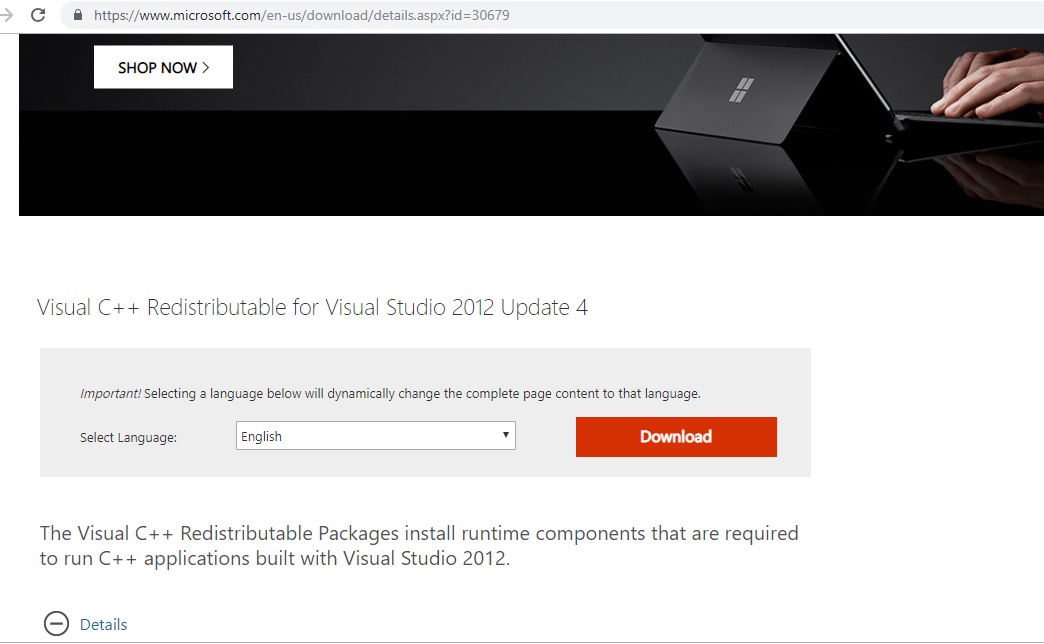
Before you begin installing WAMP Server 3.2.0, you will have to install Visual C++ Redistributable for Visual Studio 2012 Update 4. It’s a simple installation process. Download both 32 and 64 bit versions and install.
Lets start installing WAMP Server:
Steps to install WAMP Server
Please follow the below steps to install WAMP Server in Windows 10.
Step 1- Download Wampserver from the official website
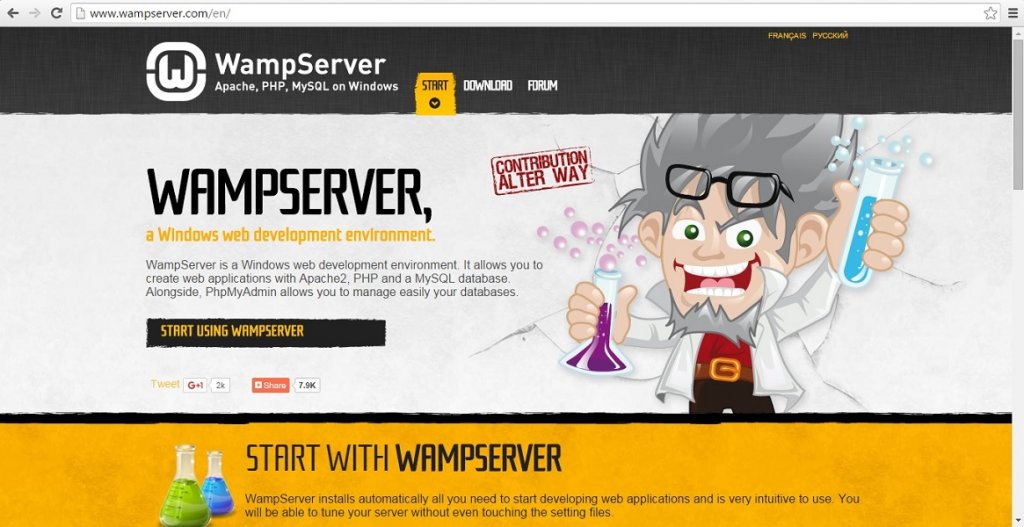
You can download the WAMP installer from the official WAMP server from the WampServer website.
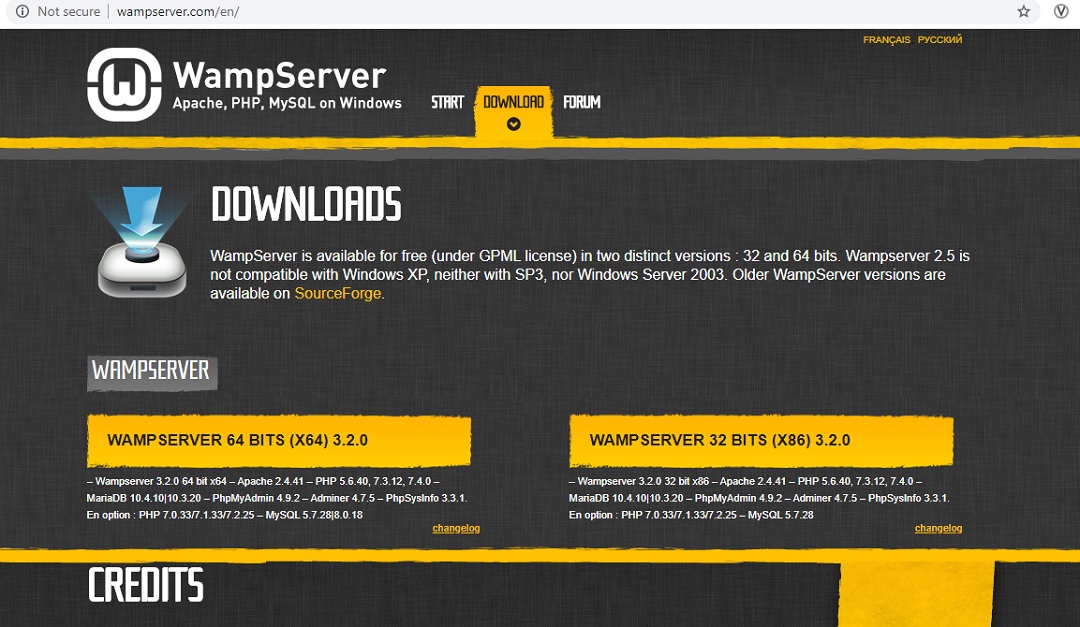
Step 2- Scroll down to the download section of the WampServer Home page.
Based on your system, choose 32 bit or 64 bit version of the installer. I choose 64 bit, PHP 7 version because this is the latest release of PHP.
These screenshot will not be the same as it will change based on the release of the updated version of the WAMP server. Currently the latest WAMP version is 3.2.0 as on March 2020.
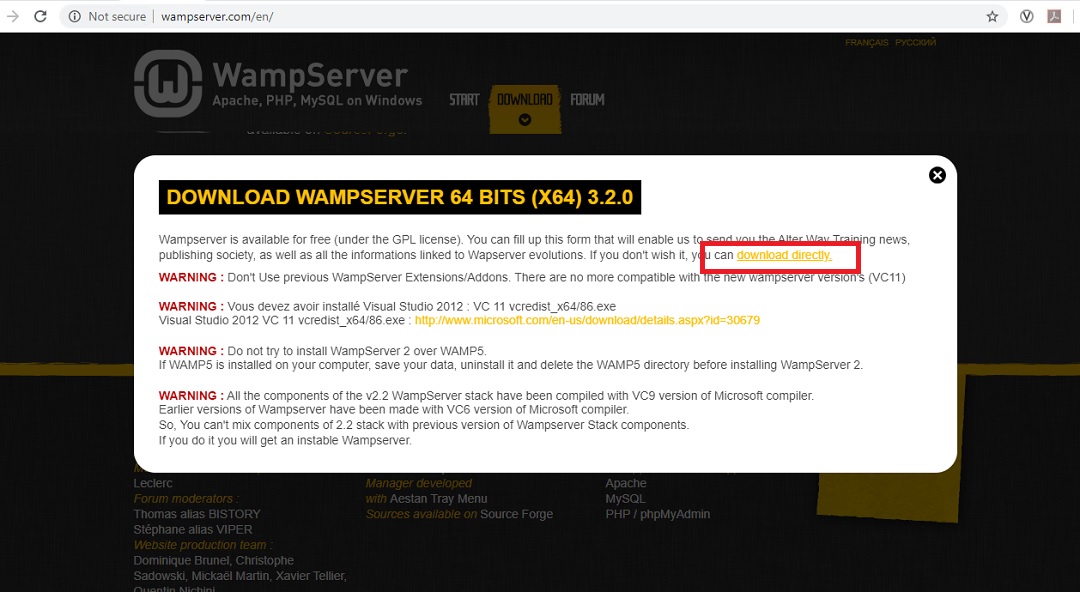
Step 3- Click the appropriate link to download the Installer.
You should see something like this. Click the download directly link to start download. Currently the latest WAMP version is 3.2.0 as on March 2020.
Step 4- Locate the downloaded file.
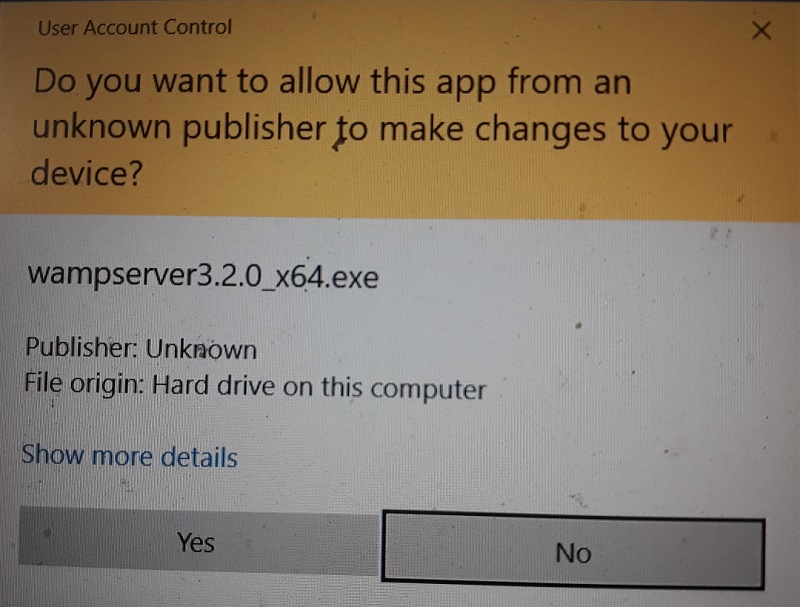
By default the downloaded file should be in your downloads folder if you have not changed the default settings. The name of the file would be something like wampserver3.2.0_x64.exe and would be 530 MB in size
Step 5- Double click the installer to begin the installation.
You should see something like this.
Click yes to proceed. Now you may or may not should see Windows User access control dialog box. Click Yes to continue if you see it, else move to the next step.
Step 6- The dialog box that appears will now ask you to choose your language for installation.
Select your preferred language from the drop down list and click OK. We will be using English for this demonstration.
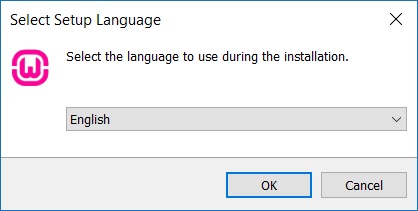
WampServer installation select language for installation screenshot
Step 7- You should see WampServer Licence agreement dialog box.
Click “I accept the agreement” radio button and next to continue.
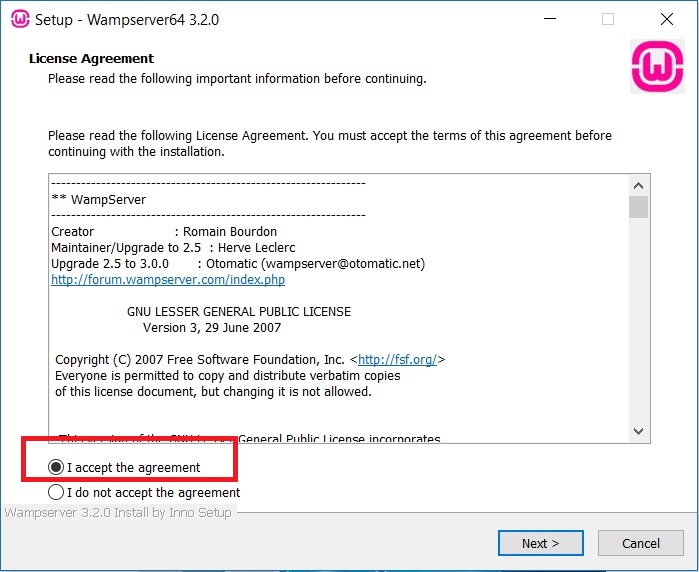
WampServer installation Licence agreement Screenshot
Step 8- Now you should see an information dialog box.
This informs you about the prerequisites, or the required component that must be present on your windows machine for the WampServer to function correctly. What’s required is the appropriate version of Microsoft VC++ re-distributable package. You can still continue to install WampServer without issues. But after installation when you start the wampserver and get error message complaining about a missing file, please follow my post which tells you about the error and what should be done to resolve it.
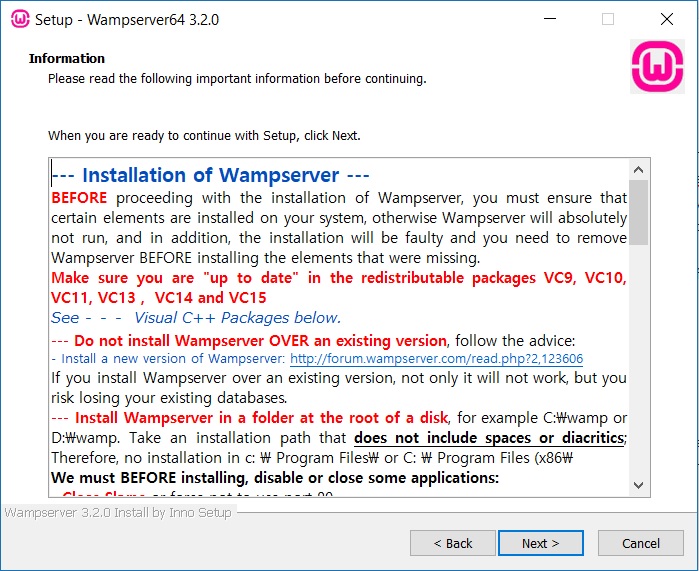
WAMP Server Installation – Information
Step 9- Select the location where you want to install WampServer.
You can accept the default and click next.
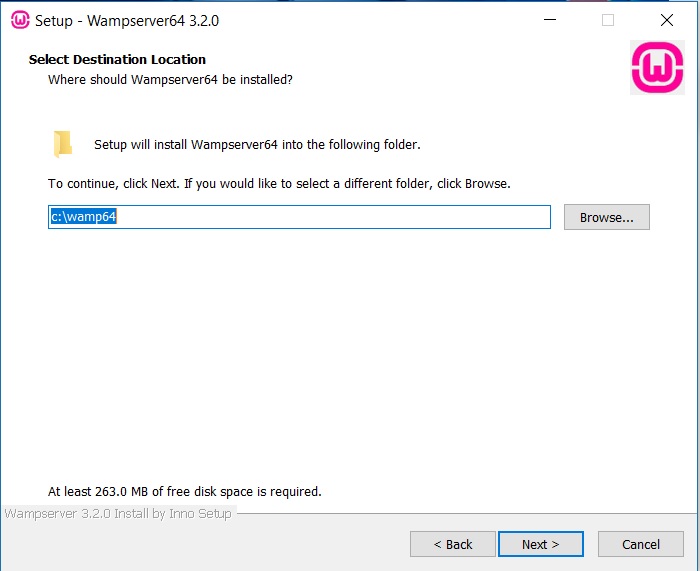
WampServer Installation- Select destination folder dialog box
Step 10- Select Components
In this dialog box, you have to select the components that you want to install. I select all the versions of PHP so that I have flexibility in application testing because the hosting providers may not offer the latest version of PHP. I also select both MYSQL and MariaDB. This again provides me with a larger development options as hosting providers offers both MariaDB and MySQL.
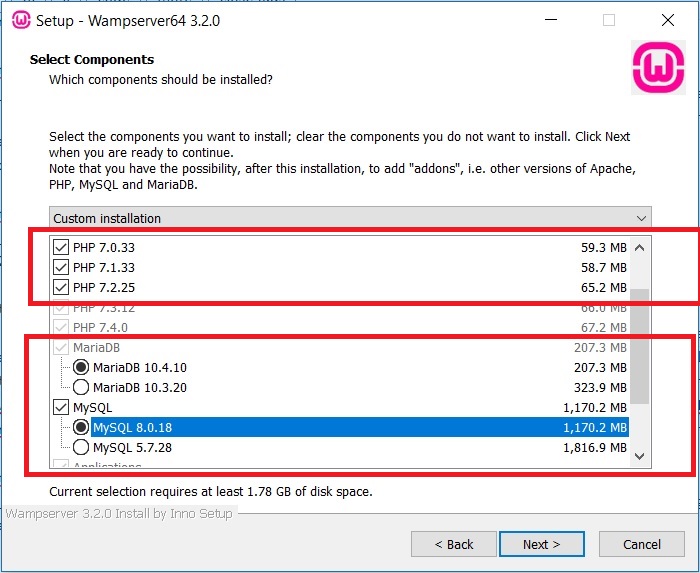
WAMP Installation – Select Components
Click next to continue.
Step 11- Select Start Menu Folder
In this dialog box you have to select the folder in which the program shortcuts should be placed. If you select the default, it would be placed in C:\ProgramData\Microsoft\Windows\Start Menu\Programs\Wampserver64. This folder content is accessible from the windows start button, all apps in windows 10. If you place in any other folder, the shortcut will not be visible from the start menu.
You can change it to something else but accepting the defaults is perfectly good. The 64 at the end of Wampserver64 is tell you that you will be using the 64 bit version of the application. If you dont see 64, then you will be using the 32 bit version of the application.
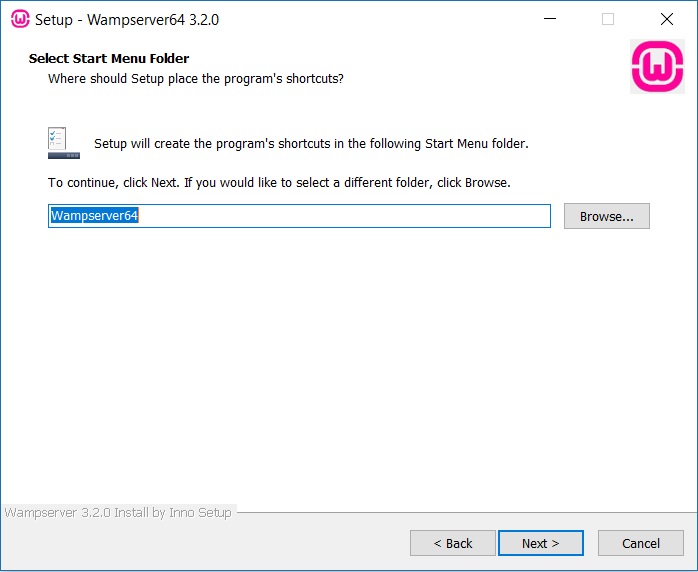
WampServer Installation select start menu folder screenshot
Step 12- Finally you see the Ready to install dialog box.
You can review the details of the components that will be installed and make the changes by going back by clicking the Back button. Once you click Next, installation begins.
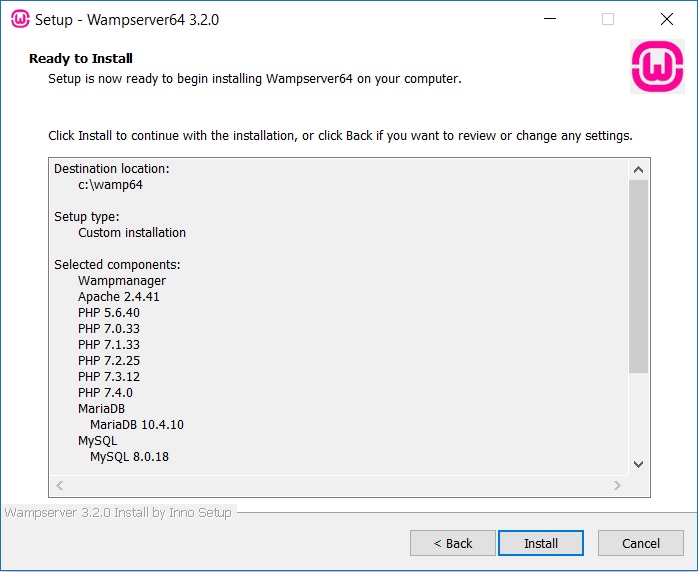
WampServer Installation Ready to Install Dialog box
Click Next to begin Installation. Now you will see installation begins. Below is the screenshot.
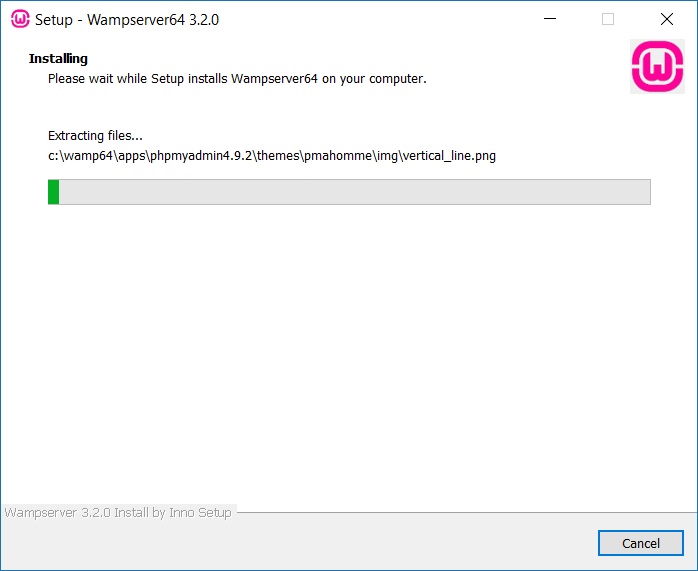
WampServer installation progress screenshot
Step 13- Select default browser dialog box
Now you should see a dialog box asking you if Internet Explorer should be made the default browser and asks you if you want to change the default browser to something else. Click NO to accept Internet explorer as the default browser.
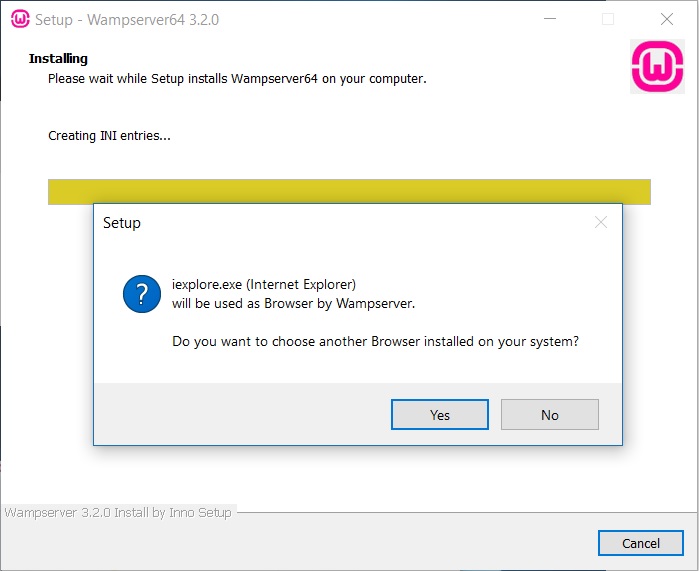
Wampserver installation choose default browser screenshot
If you want to change the default browser to say Google Chrome, click yes and you will be asked to specify the path of the execuatble of the browser say Google Chrome.:
In Windows 10, Google Chrome executable is located in C:\Program Files (x86)\Google\Chrome\Application folder by default. Go to this folder and select chrome.exe and click open. If you click cancel, it would again default to Internet Explorer.
Again the choice between Internet Explorer and Chrome or anything else is purely personal and I don’t see any issue in accepting the default and leaving it as Internet explorer.
Step 14- Select default Text Editor
I would suggest you can accept the default, which is notepad by clicking No. Its just that if you want to edit apache or PHP config files such as http.config or php.ini, it would open in notepad. Still if you want to change it you can click Yes and navigate to the executable .exe file of your preferred text editor. But, as I said, the default notepad is perfect.
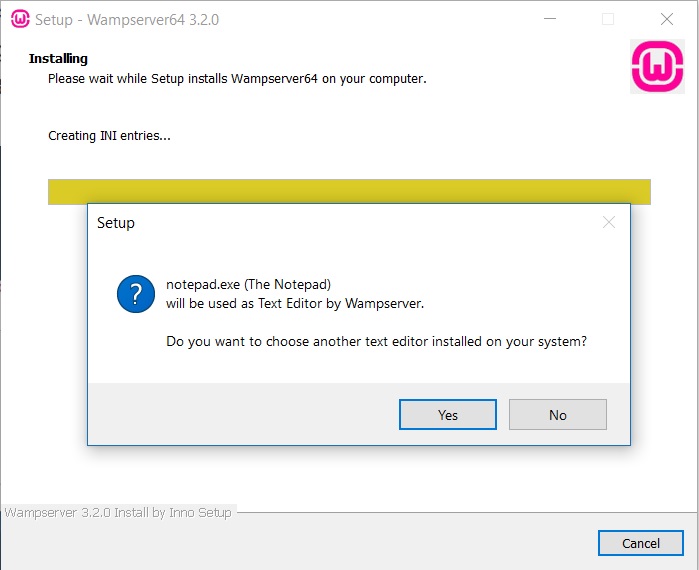
WampServer Installation choose default text editor dialog box screenshot
Installation will continue. Wait for the process to complete
Step 15- WAMP startup warning
This is the most common issue with WAM which is that the WAMP server does not start after installation. It continues to show the status red. This dialog boxprovides you the path to the help document in this happen with you. These files will be placed in your WAMP installation folder which is C:/wamp64 in my case and will have the filename instructions_for_use.pdf
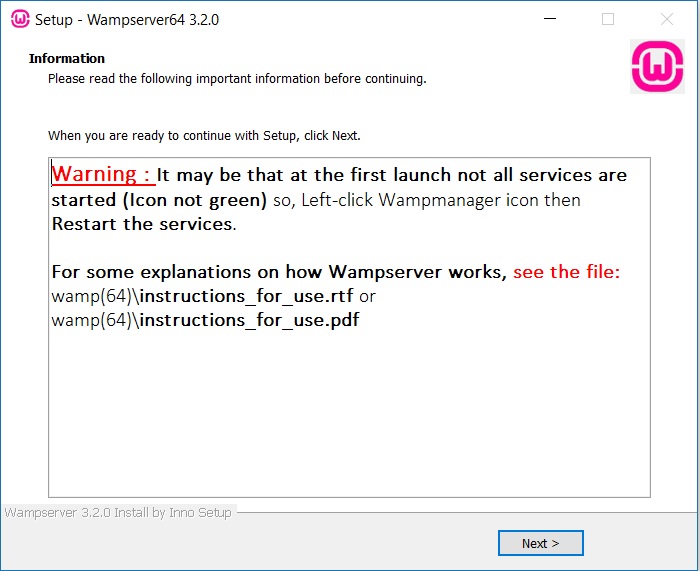
WAMP server startup warning
Click Next to continue.
Step 16- Installation Complete
You should see installation complete. Click finish to exit the Wamp Server installation wizard. WampServer should now be installed on your system.
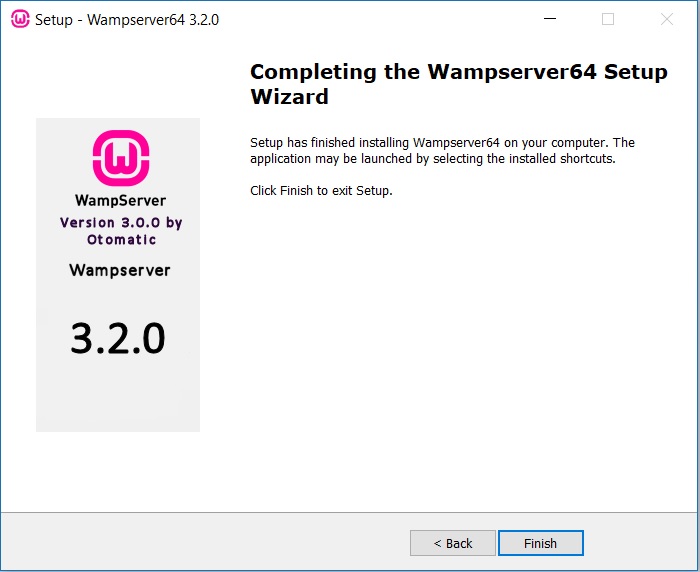
WAMP Server Installation Complete
Step 17- Start WampServer
You can now start the WampServer by double clicking on the shortcut wampserver icon on your desktop or alternatively launch it from the start menu. After the WamServer starts, you can see the Green icon on the taskbar as shown in the screenshot. Initially it will be Red, then turn amber and then Green. When it turns green, it means all the services are now running. Else, the WampServer has not started. Please note that you will have to give administrative privileges for the Server to start. That is just click Yes when you see UAC confirmation dialog box when you click the WampServer icon to start the server.
When you left click on the icon, you can see the options to start, stop and restart the WampServer along with other option which I leave for you to explore. If you face any problem, please leave the question as a comment, I will answer them.
WAMP Services
If you see the red button and it does not turn green, try to restart it as a first trouble shooting step. If the issue still persists, it mean that the correct version of VC++ redistrubutable is not installed. Please follow my post here to install VC++ redistributable if the issue does not resolve
If the WAMP icon turns green, all is good and you can follow the below steps.
Enter the following URL in the browser.
http://localhost
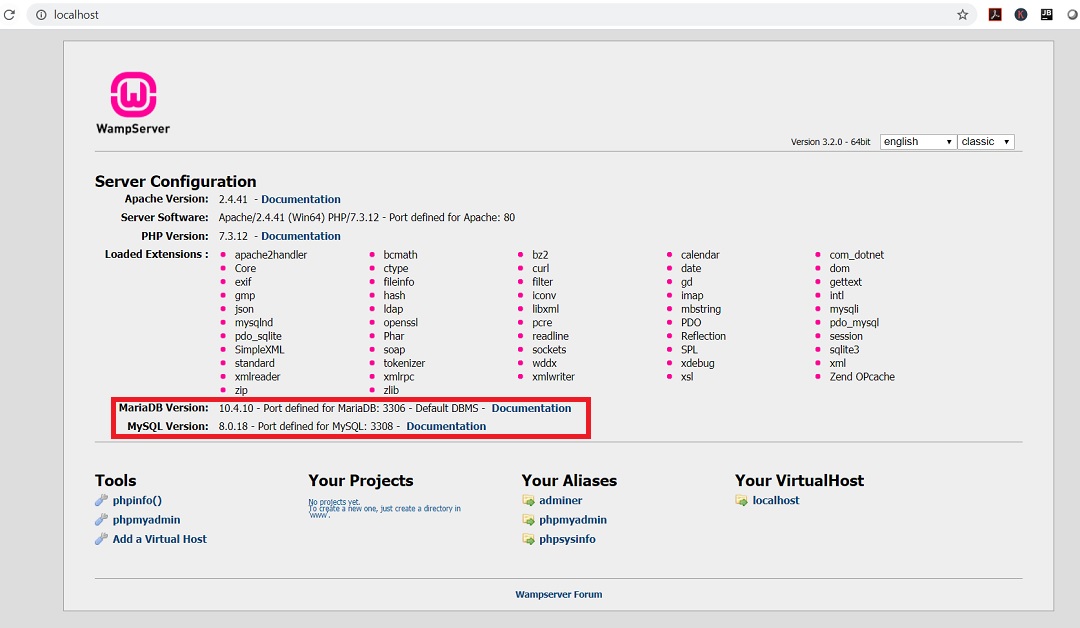
Now you should see the WAMP Server page.
By default, WAMP used MariaDB as the database which has become popular now as MySQL is no longer free after it was acquired by Oracle.
How to start, stop and restart WAMP services
You can start, stop, restart WAMP services by left clicking on the WAMP icon in the taskbar. You can also view other information from here.
WAMP Services
How to change database to MySQL from MariaDB and Vice Versa
Since we have installed both MariaDB and MYSQL during the installation, we can change the default database to MySQL by following the below steps.
Right Click on the WAMP icon in the taskbar
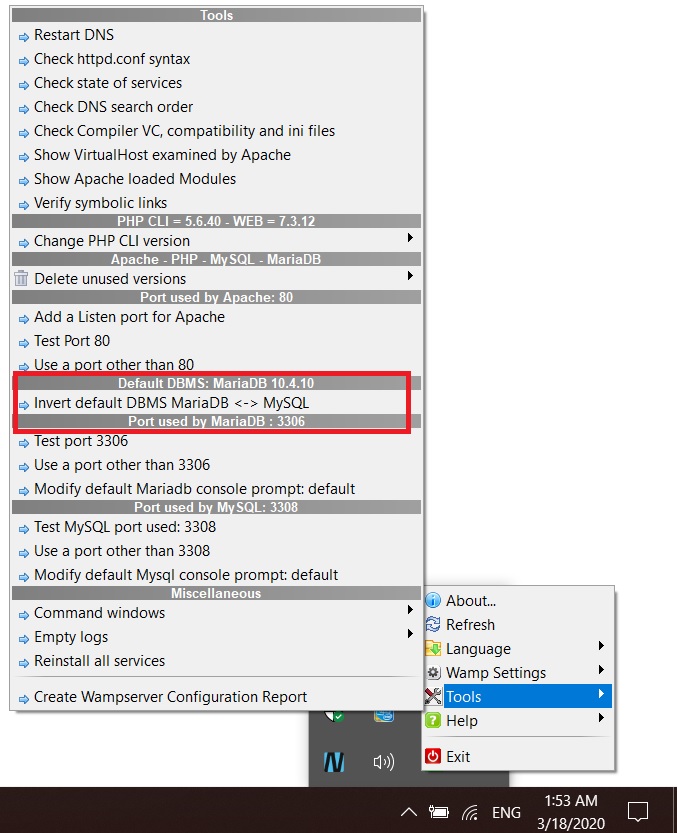
When the WAMP icon turns green, right click on the WAMP icon to open the tools dialog box.
Select Tools
Hover your mouse on tools and click on Invert default DBMS MariaDB <-> MySQL
WAMP Server will automatically restart again. Wait for the WAMP Icon to turn green.
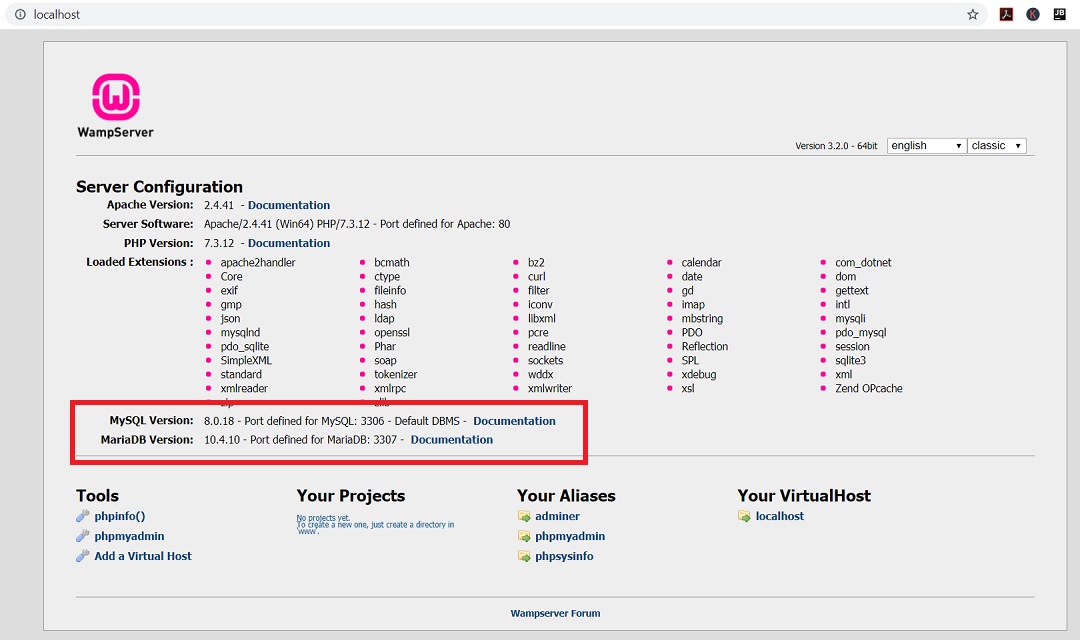
Now if you go to the page http://localhost, you will see MySQL as the default DBMS.
To revert back to MariaDB, you will have to follow the same steps.
How to change PHP version
You can change the PHP version to use for your project by following steps:
Right Click on the WAMP icon in the taskbar
When the WAMP icon turns green, right click on the WAMP icon to open the tools dialog box.
Select Tools
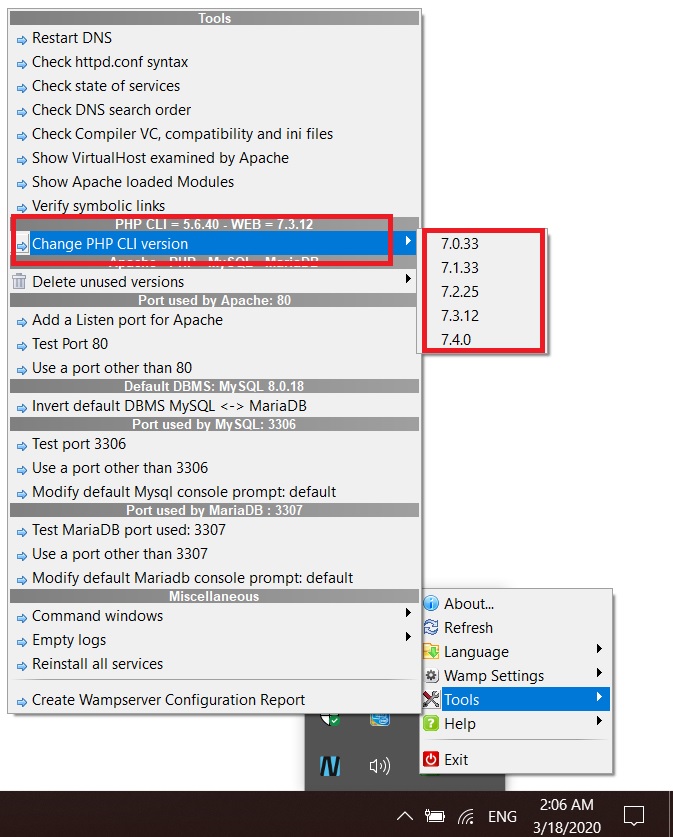
Hover your mouse on tools and Change PHP CLI version and click on the PHP version you want.
Now if you go to the page http://localhost, you will see version of PHP changed.
How to access phpmyadmin
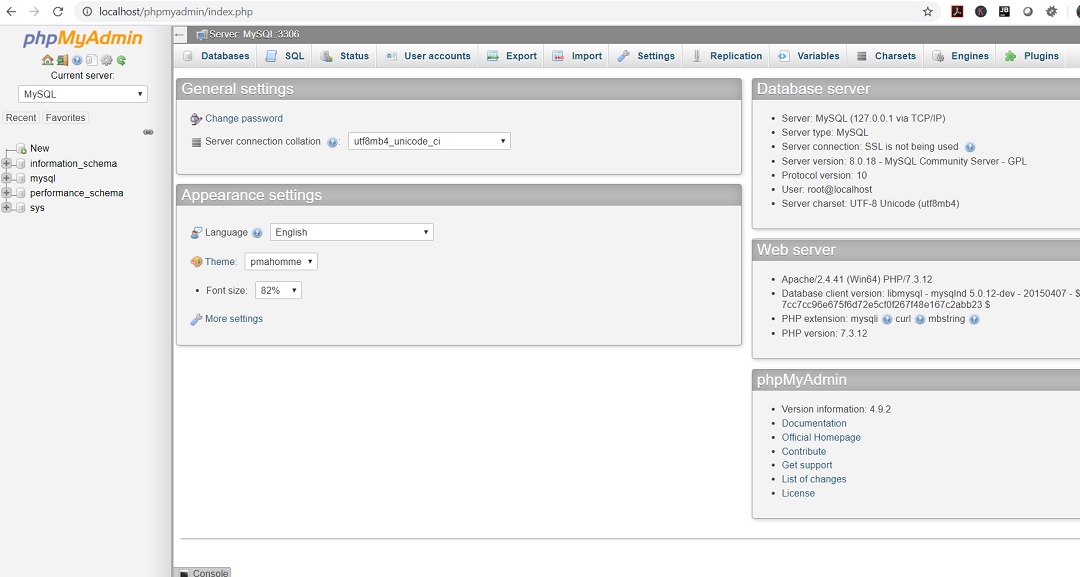
phpmyadmin is a web based database application that allows you to perform database operations such as create, delete, user management and so on.
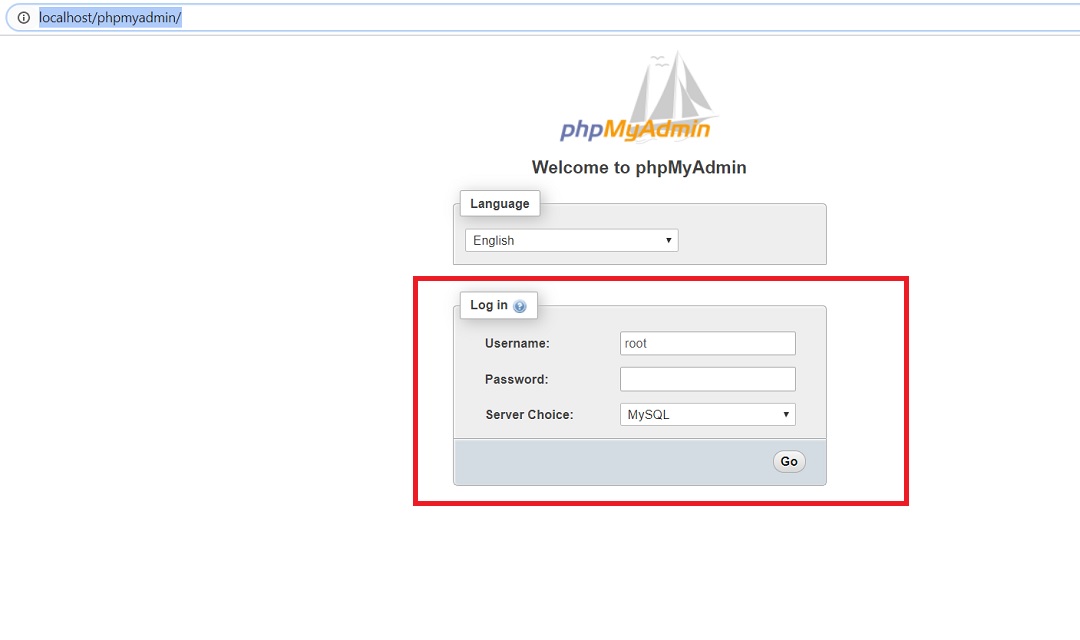
You can access phpMyAdmin by going to the url http://localhost/phpmyadmin/
By default, the username is root and password is blank. Enter username as root and click on login to login to phpMyAdmin console.
How to create new database user and password
To create a new user and password using phpMyAdmin, Please follow my blog

Very good post, I will recommend it to my colleagues, thanks!
Tanks you so much for your help Shailesh. All works good now.
As a beginner I offer may many many thanks for your web help for installing WAMP mr.Shailesh…
: ): )
: ): )
: ): )
your article is helpful. I did fix the php.exe file missing problem. thank you .
but now, the wamp icon get green color, but when left click i cannot see any options. could u please help?
Thank you very much for creating this post, most excellent 👍😊
I launched the wampserver, it was working…but my php files won’t load…it just shows the raw links l, images and others without the styling
Installed wamp 64 and phpmyadmin works, localhost works. phpinfo etc works all like a charm. But when I try to open an old drupal site, or make a new one it say “PDOException: in lock_may_be_available()” or cannot connect to mysql db even all settings are correct. user, db, password etc. So… it can´t connect with mysql.
wamp logo is green, skype processes killed, ISS killed, msdepend.exe killed.. so nothing is using port 3306
Any idea where to look?
Hi Gunie,
Looks like a DB configuration issue. I set up drupal 8.8.5, the latest one, and it installed successfully
Can you please check the settings.php (sites->default folder) file and see that Database configurations is correct.
Look for database (scroll to the end of the file), it would look something like below. This is what settings.php file shows for me. This will differ based on your db configuration. Make sure that host is set to localhost and remaining entries are correct. I did not provide table prefix, so it is an empty string for me.
$databases[‘default’][‘default’] = array (
‘database’ => ‘drupal’,
‘username’ => ‘admin’,
‘password’ => ‘admin’,
‘prefix’ => ”,
‘host’ => ‘localhost’,
‘port’ => ‘3306’,
‘namespace’ => ‘Drupal\\Core\\Database\\Driver\\mysql’,
‘driver’ => ‘mysql’,
);
Please let me know if it worked.
Thanks,
Shailesh
Hi, can anyone help me locate where is the function “Menu item: Online / Offline”?
Hi Riche,
If I am not wrong, this feature has been deprecated and no longer available.
Regards,
Shailesh
I installed WAMP but when I try to open WAMP it appear the message below. Can you help me to solve, please?
php.exe system error
The program cant start because MSVCR110.dll is missing from your computer. Try reinstalling the program to fix this problem.
But at the same time wamp icon will shown in green color but I can not open it.
hello sir,
I have installed the wamp server 32bit as per instructions but after installation i got the icon red then amber and after that green in color. When i place the cursor near the icon “all services running” is written but when i do either left click or right click on that icon nothing happens…..no options will be open. Now, what next i have to do?????
Please revert back..
Are you able to access the WAMP page http://localhost ? if yes start learning PHP. You can access MYSQL from http://localhost/phpmyadmin. Place the PHP files in the wamp/htdocs folder and access the page in the browser using http://localhost/filename.php. I recommend you create a project folder in htdocs folder and keep all the files there.
Ex c:/wamp/htdocs/myproject/index.php. Access the file in the browser using localhost/myproject/index.php.
I am not sure why the issue you are facing is happening. Let me try to figure out in my system and will let you know.
Tell me how it goes.
Regards,
Shailesh
Hi SJ
I followed every step in installing Wampserver64 for windows 10. But it refuses to be green Icon. I actually installed visual studio 2019.
thanks a lot.
Make sure that you have installed visual studio redistributable package. If you dont install the correct version, WAMP will not work. Visual Studio 2019 is different from visual studio redistributable package. You have to install visual studio redistributable package. In step 2 screenshot, warning number 2 is the required package. Download that and install.
Great article.
The prerequisites section is invaluable and often missed out on other sites.
Something in my setup was using “port 80” so I had to make changes to httpd.conf switch from port 80 to port 8080 & restart.
Then when you start localhost you have to use localhost:8080
I installed WAMP Server, however it’s showing 2 out of 3 services running. As you mentioned, right side icon is not green in color. It’s orange. http://localhost in opening in my browser, but I can’t see anything. Please help. Thanks !
VC++ redistributable is not installed on your system. Please follow my post on how to do it.
https://shaileshjha.com/what-is-visual-c-plus-plus-redistributable-package-and-how-to-install-uninstall-or-reinstall-visual-c-plus-plus-redistributable-on-windows-10/
I installed WAMP following your instructions but when I try open the web page (file:///C:/wamp64/www/index.php) appear the message below. Can you help me to solve, please? Many thanks
// Arno Esterhuizen // and Romain Bourdon // and Hervé Leclerc // Icons by Mark James // Version 2.5 -> 3.0.0 by Dominique Ottello aka Otomatic // 3.1.2 – verify strip_tags and trim on $_GET and $_POST // // // $server_dir = “../”; require $server_dir.’scripts/config.inc.php’; require $server_dir.’scripts/wampserver.lib.php’; //chemin jusqu’aux fichiers alias $aliasDir = $server_dir.’alias/’; //Fonctionne à condition d’avoir ServerSignature On et ServerTokens Full dans httpd.conf $server_software = $_SERVER[‘SERVER_SOFTWARE’]; $error_content = ”; ………….
Hi Maria
It’s php code. You will have to run it through a web server. Make sure that WAMP server is running, then enter http://localhost in your browser. You should see a WAMP server page. If you see that, it means all good.
Try it and tell me how it goes. You cannot open the file directly in browser by entering the path file:///C:/wamp64/www/index.php
Result that you see is the php code. When you enter http://localhost you see the actual index.php page parsed by the apache server using php.
Hello,
I have some problem with step 17, it showing “php-win.exe-system error.The code execution cannot proceed because MSVCR110.dll was not found”.I unable to identify where the problem is ?? can u please help me.
Hi Pragyan,
VC++ Redistributable is missing from your system.
Please go through my blog for the next steps.
https://shaileshjha.com/what-is-visual-c-plus-plus-redistributable-package-and-how-to-install-uninstall-or-reinstall-visual-c-plus-plus-redistributable-on-windows-10/
At the bottom of the page you will see the links to download the required files to install. Install them one by one and you should be good to go.
Hello,
I have a problem with Wamp, after the install in the “Step 17” show me a message under everything “Error c:wamp64 or PHP in PATH”. How Can I solve it? Help me, please.
Tanks!
Looks like there is PATH conflict in the environment variable.
Open Command prompt as Administrator and enter the command path. You should see some entries related to PHP. Something like C:\Program Files (86)\php\v5.3. You have to remove those entries from path variable.
To do this in Windows 10, search for environment variable in search bar. You will see Edit the Environment variable option. Click that to open.
In the System properties dialog box that appears, you will see environment variable at the bottom of the screen. Click on that, under System Variable you should see path, click on path -> edit and remove those entries and click on OK
Restart your Computer and start wamp server, you should be good to go.
Hi.
while click on “download direct” i re directed to “https://sourceforge.net/projects/wampserver/files/” page but in the sourceforge website i am getting the below message as “The “/WampServer 3/WampSe..php5.6.25-7.0.10.exe”file could not be found or is not available.Please select another file.” Please advise me.And finally ended up with “Thank you for downloading WampServer “.But actually nothing downloaded in my system.Can you give direct download link to my mail id?
There could be some problem with the portal. Try different mirror while downloading. Click on problem downloading and select a new mirror. File should download fine.
I did exactly the same while installing the wampserver as mentioned. But I am unable to log in to myphpadmin.
It gives the error access denied for user ‘root’@’localhost’.
Please give the solution ……. as soon as possible.
HELLO SHAILESH SIR !
I HAD TRIED TO INSTALL WAMPSERVER WITH THE HELP OF YOUR STEPS BUT IT IS NOT INSTALLING. IT IS NOT WORKING AFTER STEP 10. NOW PLEASE TELL ME WHAT I HAD TO DO. PLEASE REPLY AS SOON AS POSSIBLE BECAUSE I HAD TO SUBMIT MY FILE.
THANK YOUY FOR THE STEPS
I think you are installing the wrong file. In the screenshot I can see “Setup – WampServer3 addon MariaDB 10.3.7”
This is the addon pack and will install only when you already have WampServer installed.
This is not the way to do it.
Download the installer from here. Choose 32 or 64bit Based on our system.
https://sourceforge.net/projects/wampserver/files/WampServer%203/WampServer%203.0.0/
Try to install again.
How can I remove mariadb from my wamp server?
Thanks!
Hello your instructions are helpful but can u tell me once when wampserver is installed next how can i open my server ?
I tried downloading wamp from wampserver website, but wamp for window 10 32 bit is not available. Its only available for 64 bit. Tried xampp den dat gave me some USer acc error and warned not to save file in c: prog file so i saved it in c:xampp . Now when i save file wid php extension in htdocs folder and use local host to run its gvn me “object not found” error . In xampp control panel it says mysql and apache is running fine. Not sure what to do next.
Localhost/htdocs/test.php didn’t wrk tried localhost/xampp/htdocs/test.php and all d combination. Still same error. Plz help
Hi Shailesh, I’ve done everything you suggested and it installed fine. However the icon does not change from amber to green even when refreshed. It says 2 of 3 services running. I did installed the vcredist_x86 and _x64 filed as well.
This blog was very helpful, thank you for contributing to a newbie’s success! One question, Now that my WAMP server is installed, I assume that PHP is installed and that I can execute PHP programs by typing them in to the notepad in the PHPadmin? If I just want to learn PHP is that the proper way to go about it? In the PHPadmin Docuementation it includes the following:
•You need PHP 5.5.0 or newer, with session support, the Standard PHP Library (SPL) extension, JSON support, and the mbstring extension.
•To support uploading of ZIP files, you need the PHP zip extension.
•You need GD2 support in PHP to display inline thumbnails of JPEGs (“image/jpeg: inline”) with their original aspect ratio.
•When using the cookie authentication (the default), the openssl extension is strongly suggested.
•To support upload progress bars, see 2.9 Seeing an upload progress bar.
•To support XML and Open Document Spreadsheet importing, you need the libxml extension.
•To support reCAPTCHA on the login page, you need the openssl extension.
•To support displaying phpMyAdmin’s latest version, you need to enable allow_url_open in your php.ini or to have the curl extension.
•Performance suggestion: install the ctype extension.
Where do I locate those extensions and how are they loaded?
Your info is incomplete. Wamp also requires Visual Studio Redistributable files that don’t come on vanilla Win 10.
Thanks Adrijana,
Thanks for your information. I am not sure if VS Redistributable comes shipped with Win 10. Problem with VS Redistributable is that people don’t realize this issue until they face the problem. If it is not available in vanilla Win 10, I think it should be made available by default. This will safe a lot of trouble.
Shailesh , Your link to download is not working above. I downloaded a copy and it installed on another site, but I still cant get a webpage from my default IE. I had four major problems configuring it and listed on this forum under fresh install https://www.apachelounge.com/viewtopic.php?p=35290#35290
Shailesh , I have the server loaded but it was a little different and didn’t ask about MySQL and php. My problem is now it is installed but on test server 80 and I cant open any pages to my default browser IE. Lastly, I had 4 more problems listed in this forum on the commands not working in cmd dialog. https://www.apachelounge.com/viewtopic.php?p=35290#35290
I just want to get to web because I don’t have one on my computer.
Thanks, Jim
Hi ! your post is very helpful.
I tried to install wamp server ( 32 bit) in my computer with windows 10 but its denied.
I installed VC++ 2010 sp1 ( x86) before i installed wamp according to your instruction.
The massage coming like this ” this programme can only be installed on versions of windows designed for the following processor architectures x64
please help me out.
Rajarshi Manna
9732848683
Thanks Rajarshi, Please use 32 bit or 64 bit installer based on the architecture of your computer. To check the CPU architecture(64/32 bit) of your system, go to Start Menu->Settings->System->About. There you will see system type. If you see 64 bit, download 64 bit version of WampServer. Also the latest version of Wamp server requires Visual C++ Redistributable for Visual Studio 2012 Update 4 which you can download from here. Download and install both x64 and x86 versions if you have 64 bit processor. If you have 32 bit processor, install x86 version. Since you are using Windows 10, you system should most probably be 64 bit.
I would recommend installing all the versions for Visual C++ Redistributable to avoid future problems. To do this please follow my post here.
It’s truly a great and helpful piece of info. I am happy that you shared this helpful information with us. Please keep us informed like this. Thank you for sharing.
Thanks