In this blog post, I will show you how to install and setup Ubuntu Server 2018.04 LTS in Hyper-V. Since Hyper V comes shipped with Windows OS (Except Home Edition), chances are that you already have Hyper V available in your system, ready to be used.
Please note that you can install only LTS version on Hyper-V. I tried to install non LTS version and it did not work.
Download Ubuntu Server
You can download Ubuntu Server from here. Download LTS version.
What is Hyper-V
Hyper V is a virtualization software from Microsoft which allows you to run multiple Operating system on your Windows Machine. Hyper V is exactly like VMware Workstation or Oracle VirtualBox, except that Hyper V is from Microsoft and is available for free for almost all the versions of Windows except Home version.
Which Windows Version Supports Hyper V and how to Enable it
Since Hyper V is a part of Windows OS, separate installation is not required. But Hyper-V is not enabled by default and to use it, it needs to be enabled. To enable Hyper V, the following requirements must be met.
- Windows 10 Enterprise, Professional, or Education
- 64-bit Processor with Second Level Address Translation (SLAT)
- CPU support for VM Monitor Mode Extension (VT-c on Intel CPU’s)
- Minimum of 4 GB memory.
- The Hyper-V role cannot be installed on Windows 10 Home.
For detailed discussion please go through my blog on how to enable Hyper V in Windows.
Enable Virtualization Technology either Intel VT-x or AMD-V
To enable Hyper V, system must have Virtualization Technology Enabled in BIOS. For AMD processors, Virtualization is enabled by default, but in the case of Intel, VT-x may not be enabled by default. So, there are steps to be followed to enabled Intel VT in BIOS or UEFI. Please follow my post on Step by step guide to enable Intel VT-x or AMD-V in BIOS or UEFI in Windows 10 and Windows 8.
Before you start installing Ubuntu Linux, we will have to create network connection switch first. Please follow the steps below
- Open Hyper-V Manager
- Click Virtual Switch Manager under action on the right pane in Hyper-V Manger screen
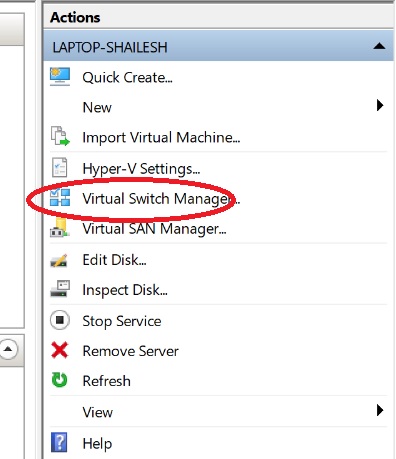
Hyper V- Virtual Switch Manager
- Select External and click on create virtual switch.
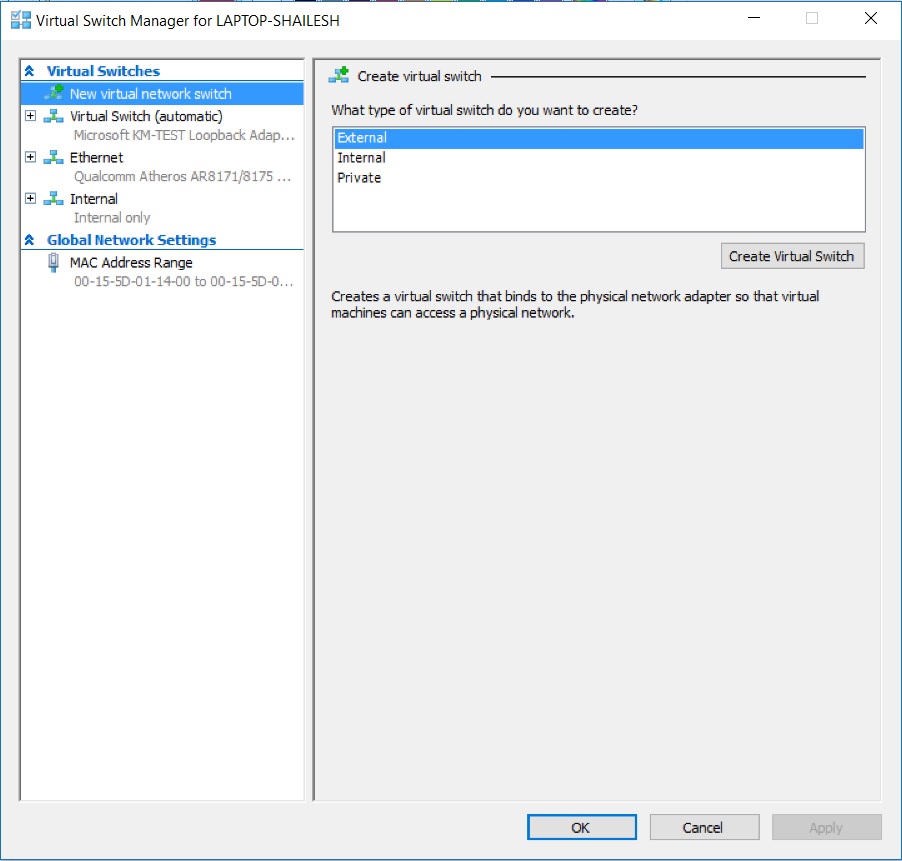
Hyper V Manager – Create New Virtual switch
- In the Virtual Switch properties dialog box, specify the name of your choice of the virtual switch and under Connection Type -> External Network, select your system Ethernet card and not your WiFi card. Click on OK to complete the process.
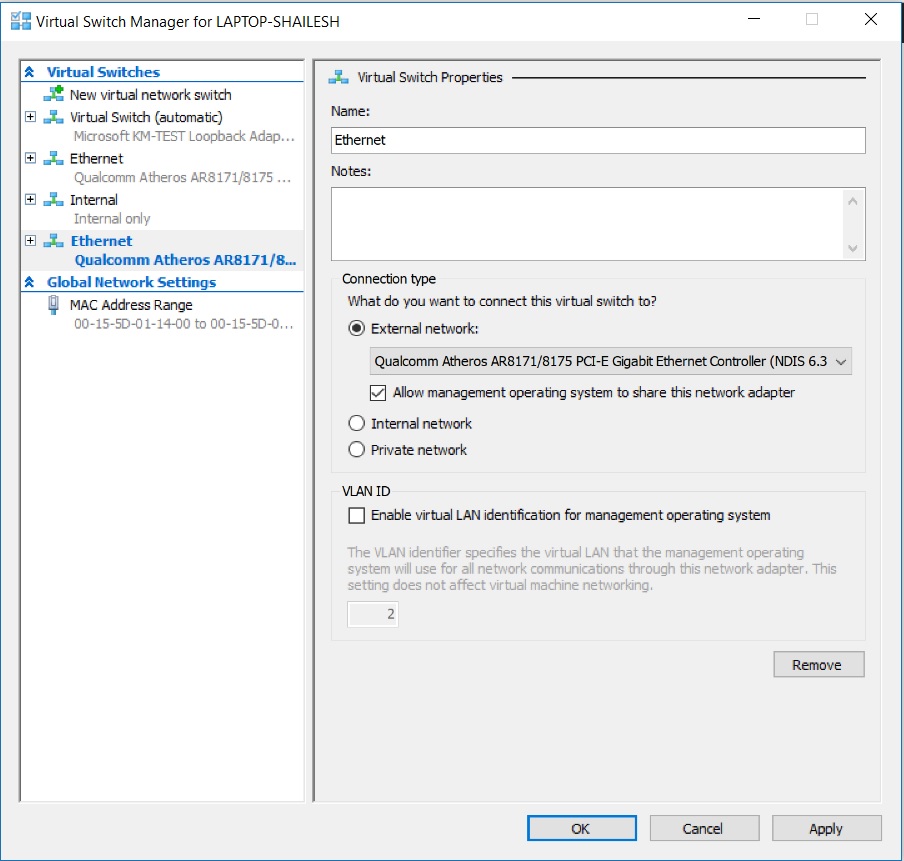
Hyper V Manger – Virtual Switch Properties
Once you have Hyper V setup successfully, Please follow the below steps to Install Ubuntu Server
Step 1 – Open Hyper V Manager
First step is to open Hyper V manager. If you have setup everything correctly, you can search for Hyper-V Manager in Taskbar or you can find the shortcut in Start Menu under Windows Administrative tools.
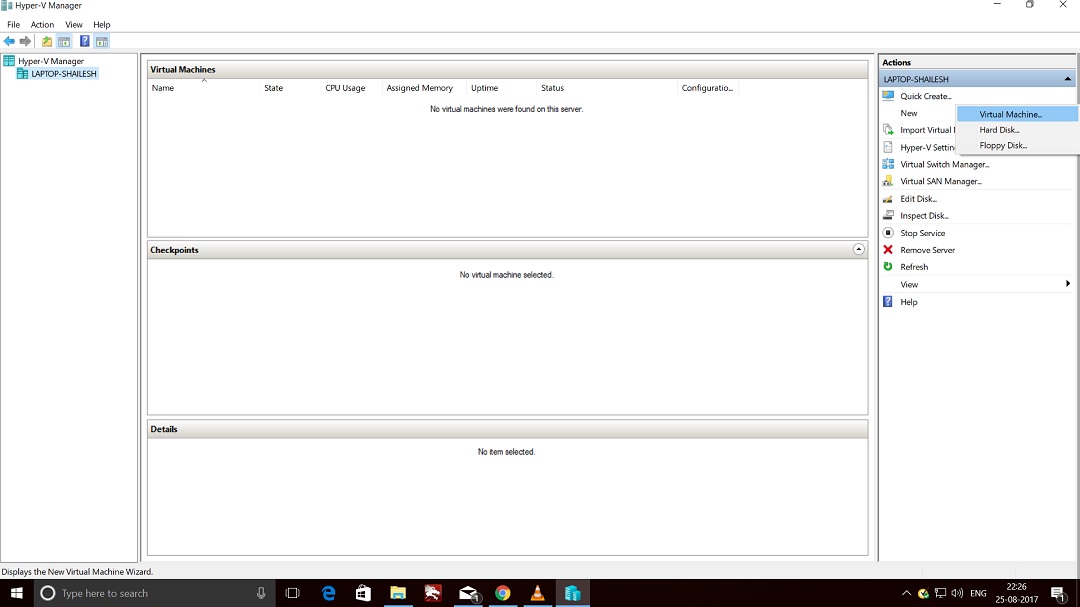
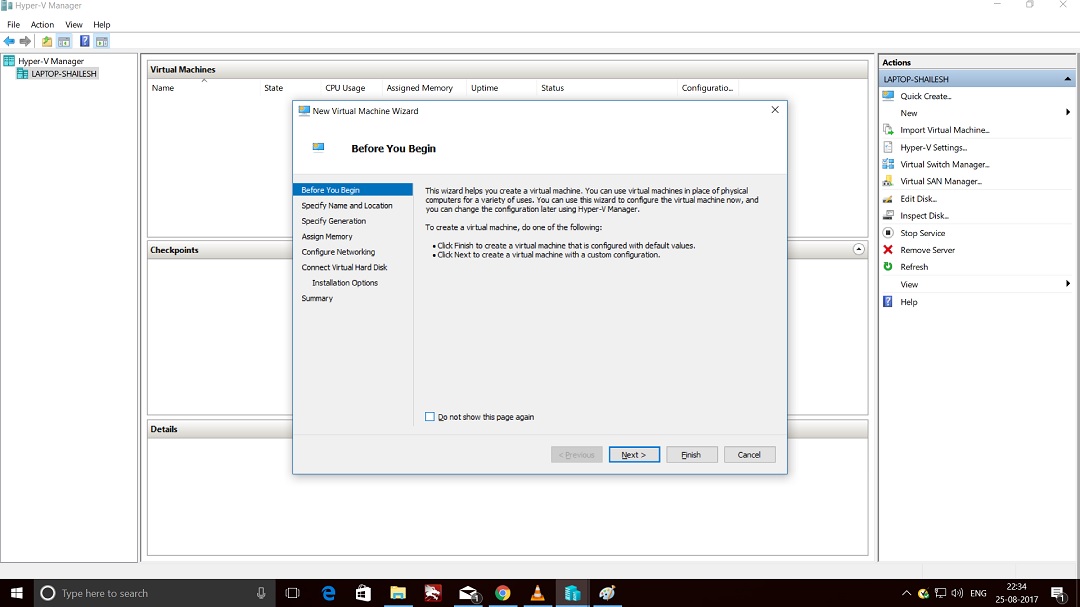
On the right hand side you will see New-> Virtual Machine. Click on Virtual Machine to launch New Virtual Machine Wizard and click Next.
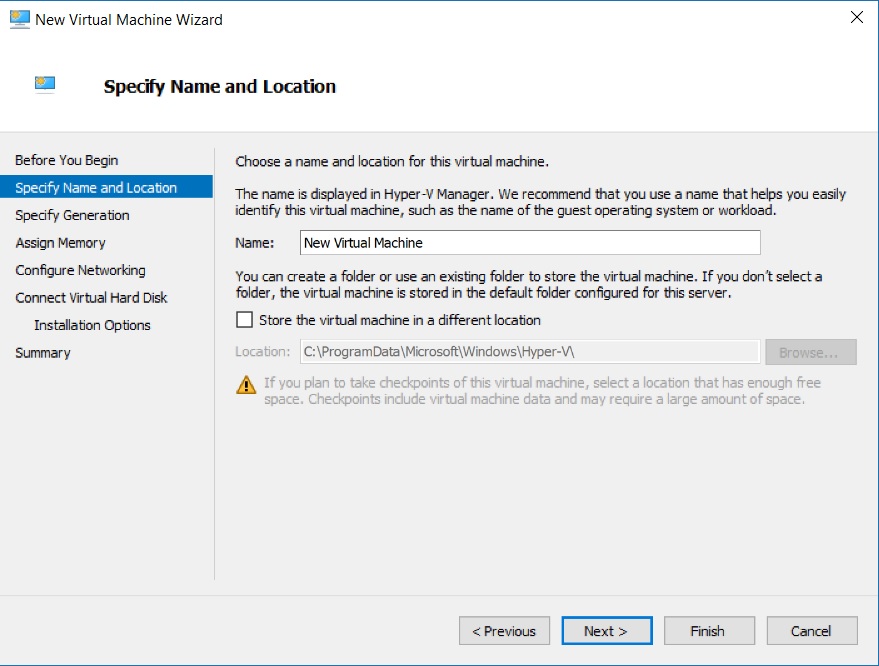
Step 2 – New Virtual Machine Wizard – Specify Name and Location
In this dialog box, please enter the name of the Virtual Machine. In Our case, we can name our Virtual machine as Ubuntu Server. But you can specify anything according to your preference. There is a checkbox to chnage the location where the Virtual Machine Files will be created. If you leave this unchecked, default location will be used. Else Check the box to change the location. I normally leave it as default. But if you have disk space constraints, it better to specify the location in a different disk drive.
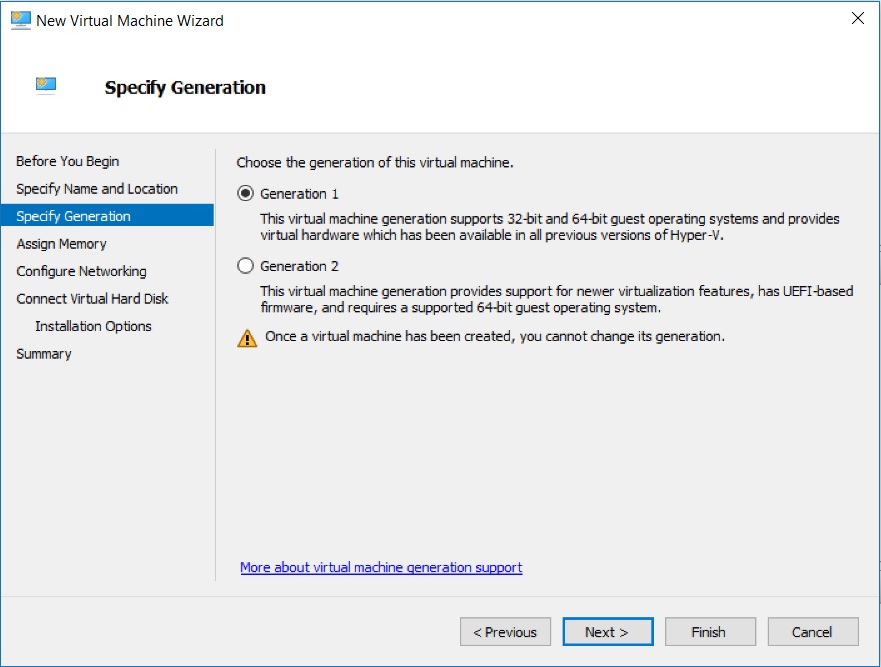
Step 3 – New Virtual Machine Wizard – Specify Generation
These days you can create two versions(Generation) of Virtual Machines. The latest one is Generation 2. Before generation 2 type virtual machines came into existence, there was nothing like generation 1 virtual machines. All virtual machines were the same. But from generation 2 virtual machines, older virtual machines were called generation one virtual machines. Generation one virtual machines supports legacy hardware. Generation 2 Provides the following new functionality on a virtual machine:
- PXE boot by using a standard network adapter
- Boot from a SCSI virtual hard disk
- Boot from a SCSI virtual DVD
- Secure Boot (enabled by default)
- UEFI firmware support
But lets not complicate things for ourselves and choose Generation 1 and click next.
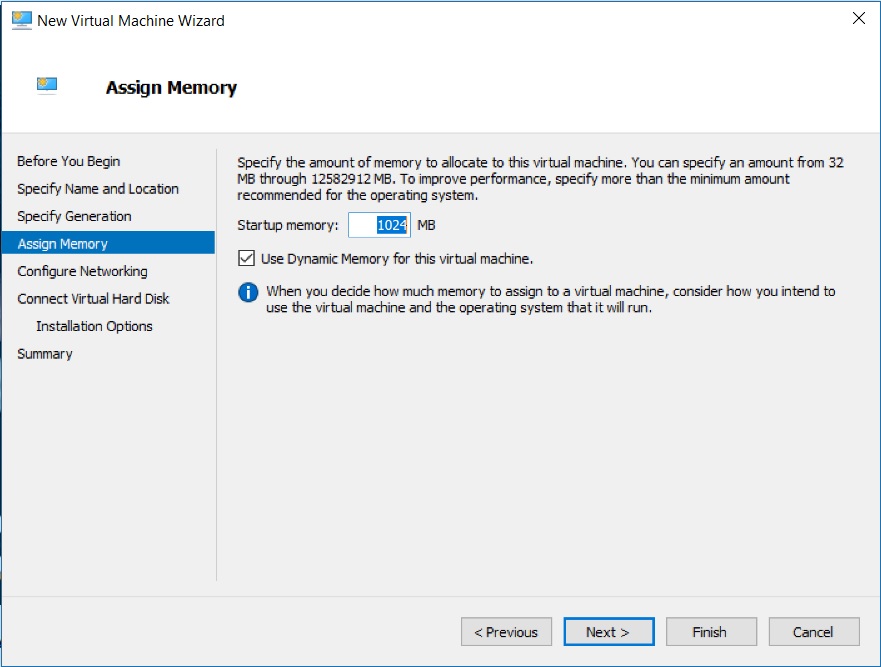
Step 4 – New Virtual Machine Wizard – Assign Memory
In this dialog box you will have to specify the amount of RAM you want to allocate to the virtual machine once the virtual machine is turned on. By default it is 1GB(1024 MB), but I normally prefer 2GB(2048 MB). Also, check Use Dynamic Memory for this Virtual Machine. This will allow Hyper V to adjust RAM according to the requirement of the Virtual machine.
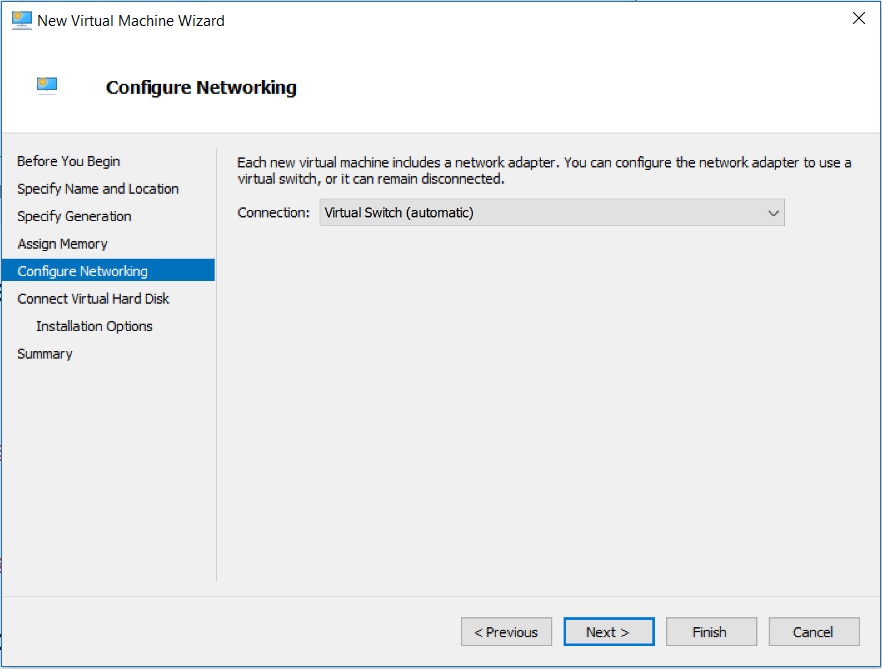
Step 5 – New Virtual Machine Wizard – Configure Network
For virtual machines to be be able to communicate with other virtual machines or internet, it should have a network adapter. In this dialog box you will have to specify the network adapter. Please choose connection(external virtual virtual switch) from the drop down menu and click on next.
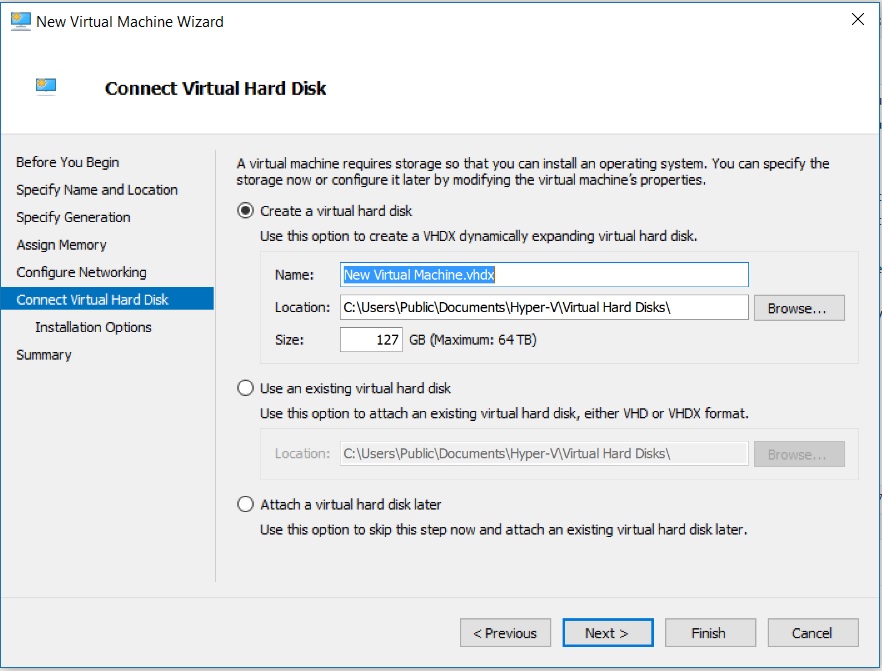
Step 6 – New Virtual Machine Wizard – Connect Virtual Hard Disk
Virtual Machines require hard disk space. This is the place where you decide how much disk space you want to allocate to the virtual machine. For Ubuntu, its recommended to select around 60 GB of disk space. Give Virtual disk a name of your choice. Please note that, not all of the allocated disk space will be used during the installation process. It is dynamically created, that is it will expand as the usage grows with the maximum limit of what you specify as the virtual disk size. Give the name of the virtual hard disk, specify the disk space and click next.
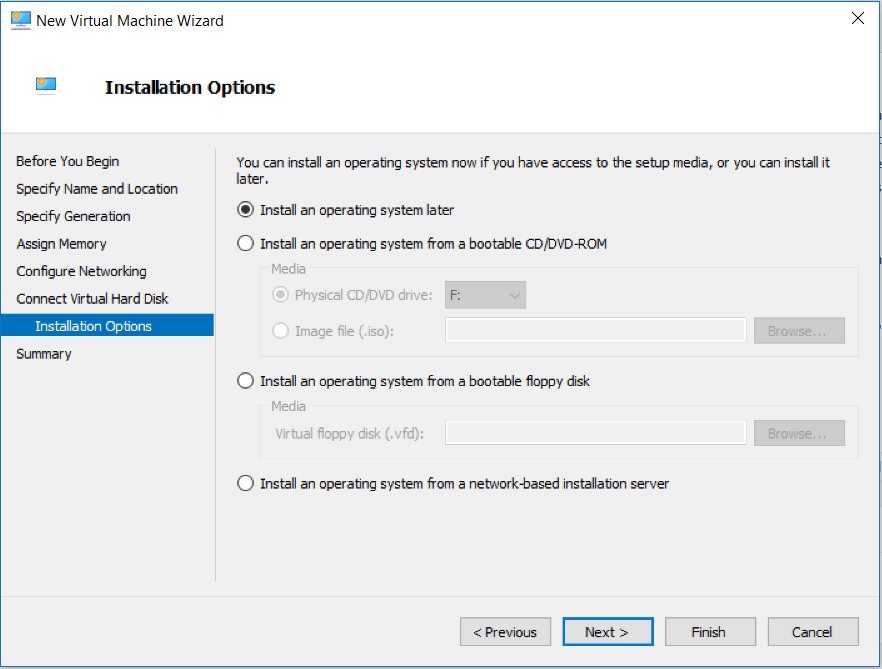
Step 7 – New Virtual Machine Wizard – Installation Option
In this dialog box you will be asked to specify the setup media. Check Install an operating system from bootable CD/DVD-ROM -> Image File. Browse to the downloaded ISO image file and click next.
Step 8 – New Virtual Machine Wizard – Completing the New Virtual Machine Wizard
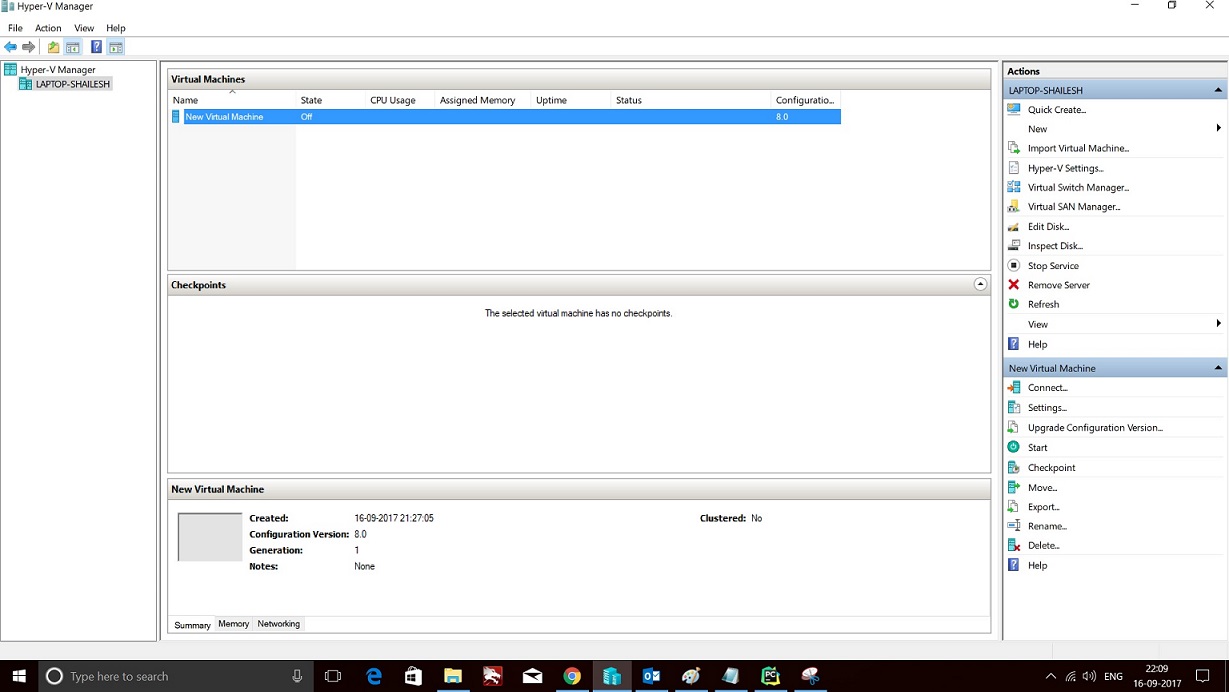
This dialog box will show you the summary of the options you have selected. Click Finish to create the Virtual Machine. You will see the process for creating new virtual machine will begin. At the end end you will see Hyper-V Manager with the newly created virtual machine under Virtual Machine Box.
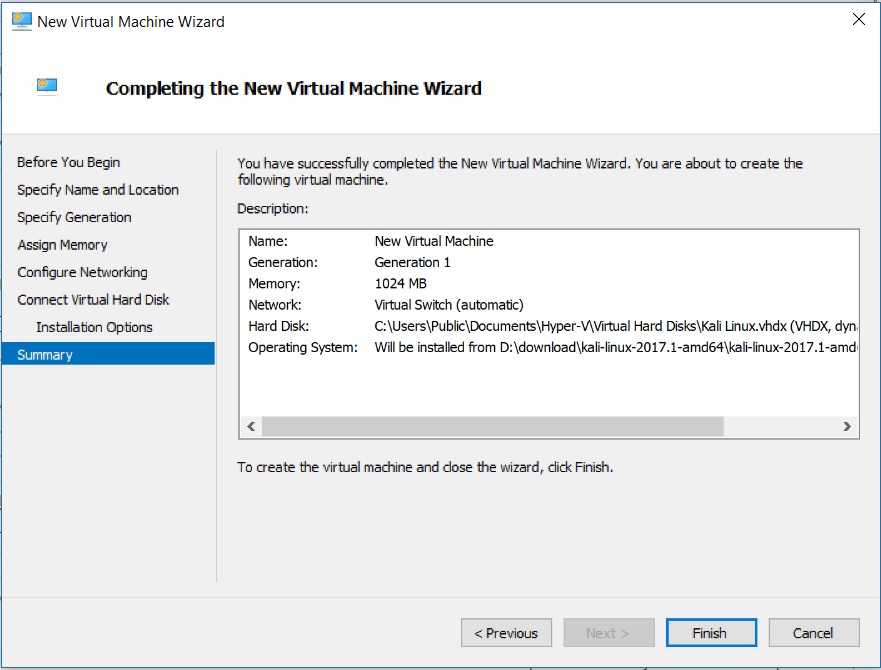
Hyper V Manager – New Virtual machine Wizard – Completing the New Virtual Machine Wizard dialog box screenshot
Step 9 – Hyper-V Manager- Virtual Machine Settings
After the virtual machine is created, you will see the name of the virtual machine listed under Virtual Machines.
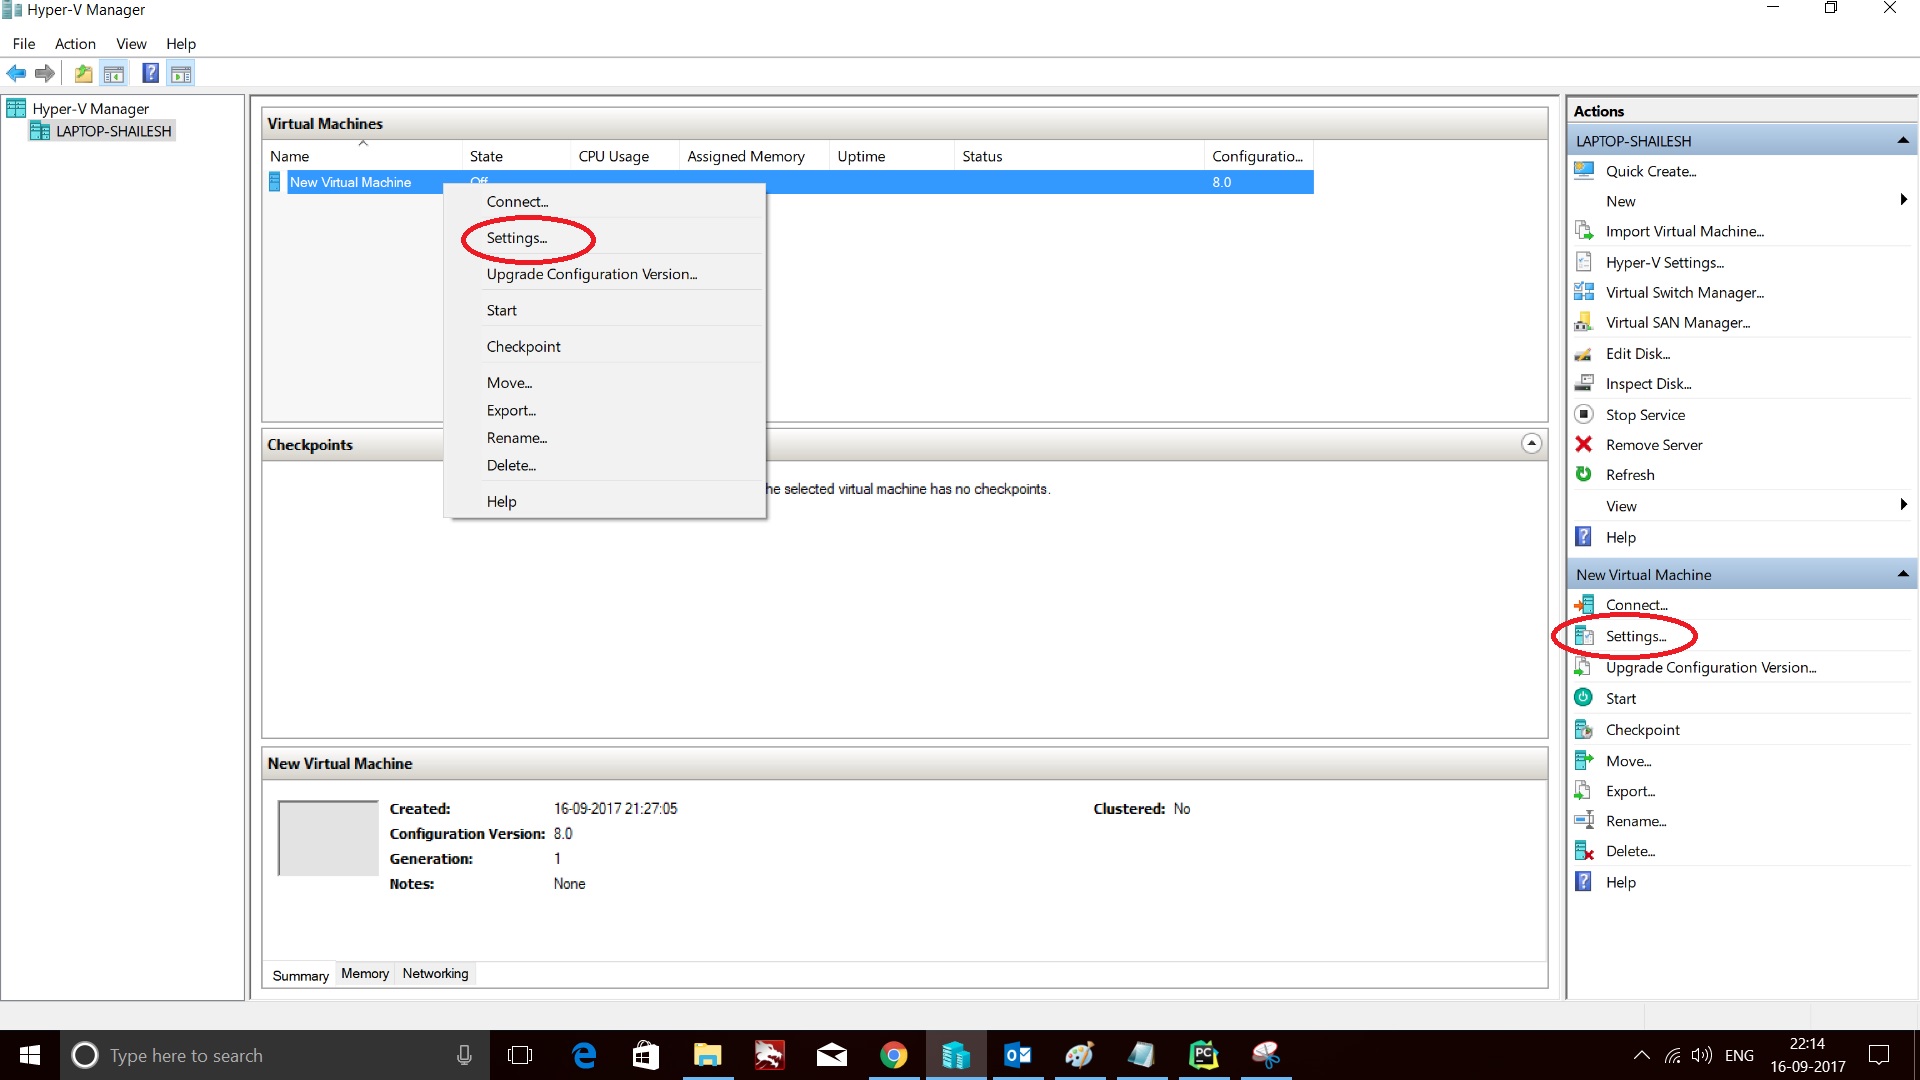
Right click on the name of the virtual manager and click on settings to change Virtual machine Options. You will also see settings option on the right hand side, as shown in the screenshot below.
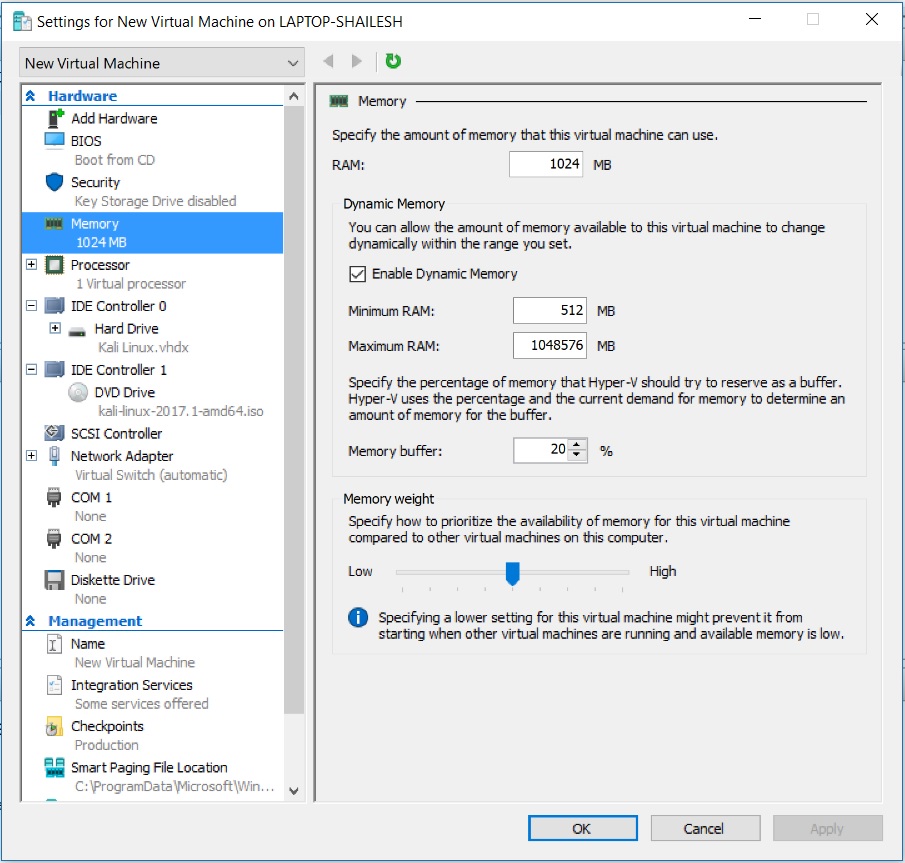
You can change the following most common virtual machine startup settings such as memory, network, CPU and so on…
-
Change Allocated Memory
here you can specify the memory with which the Virtual machine will start or boot. I normally choose 2048 MB(2 GB) and always check Enable Dynamic Memory.
-
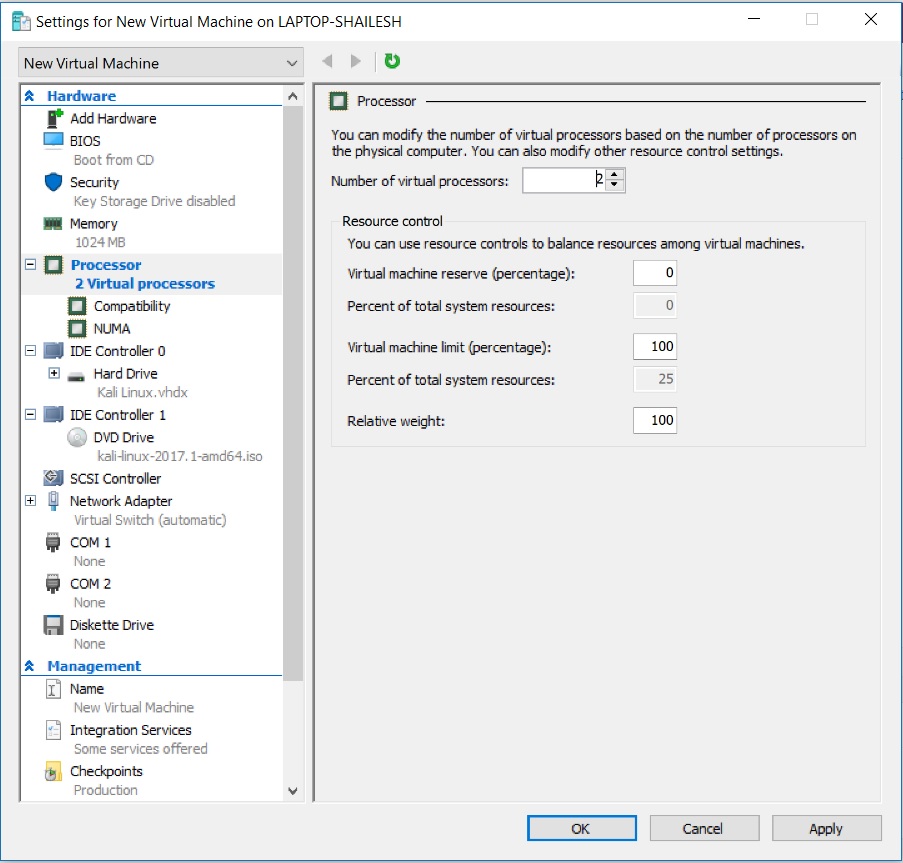
Change the number of Virtual processor
Here you can specify the number of Virtual processors. Normally I set it to 2. It depends on the actual CPU your system has. Since I have i7 CPU (Which has 8 cores), I Normally allocate 2 core to the Virtual Machine.
-
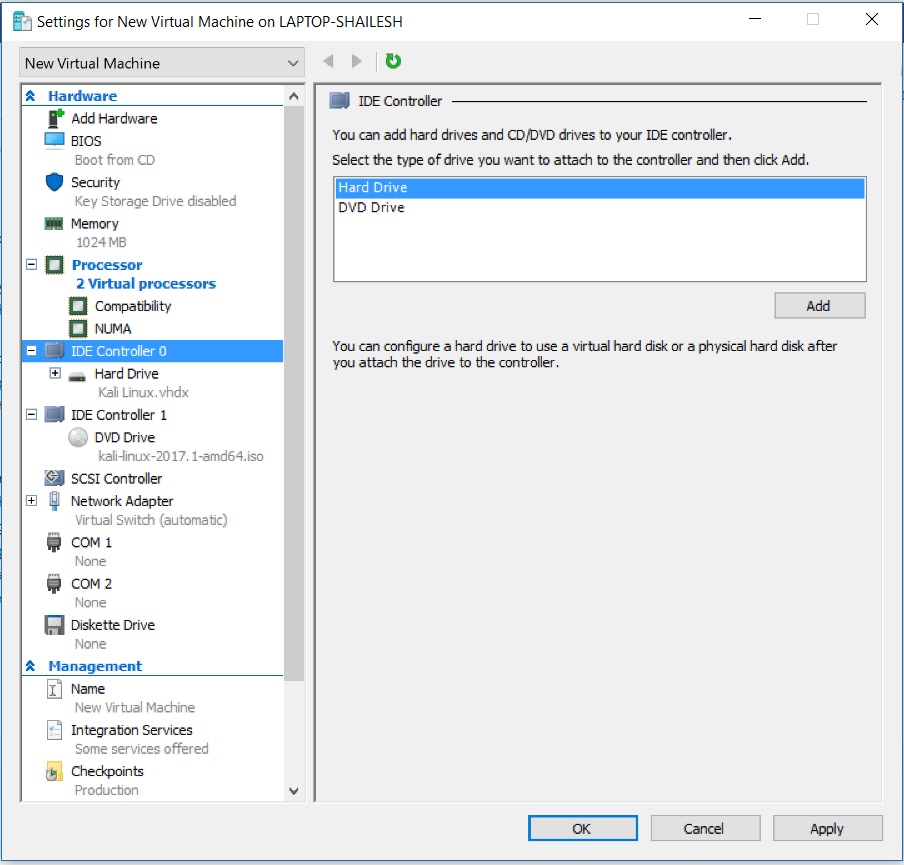
IDE Controller
Here you can create virtual Hard drives and DVD drives. By default, one Hard Disk and one DVD drive is created. If you want additional ones, you can create it here.
-
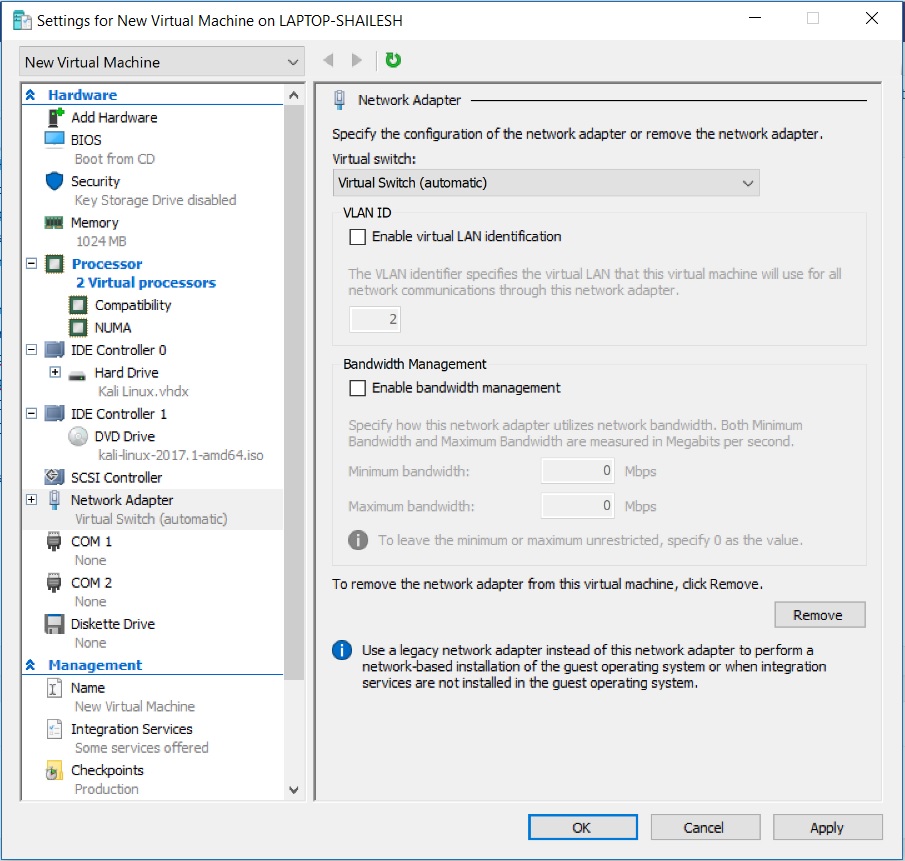
Network Adapter
Here you can specify the network adapter to use for the Virtual machine.
-
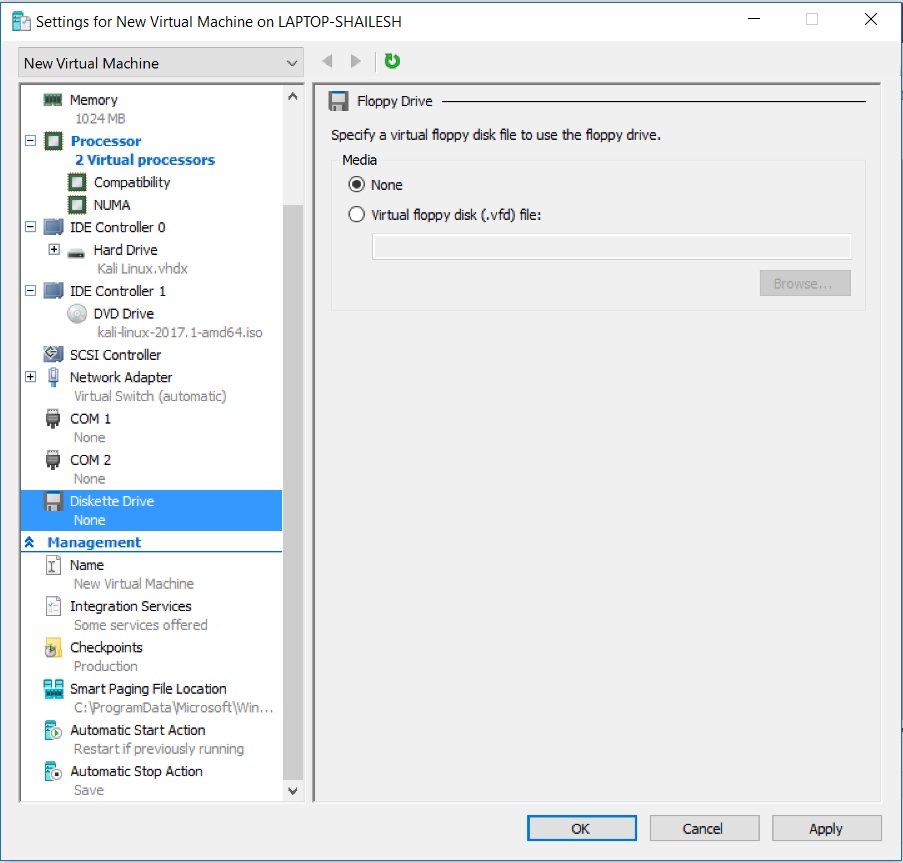
Floppy Drive
Here you can specify the floppy drive. Floppy drives and things of the the past and almost extinct. You can leave it as default which is none.
-
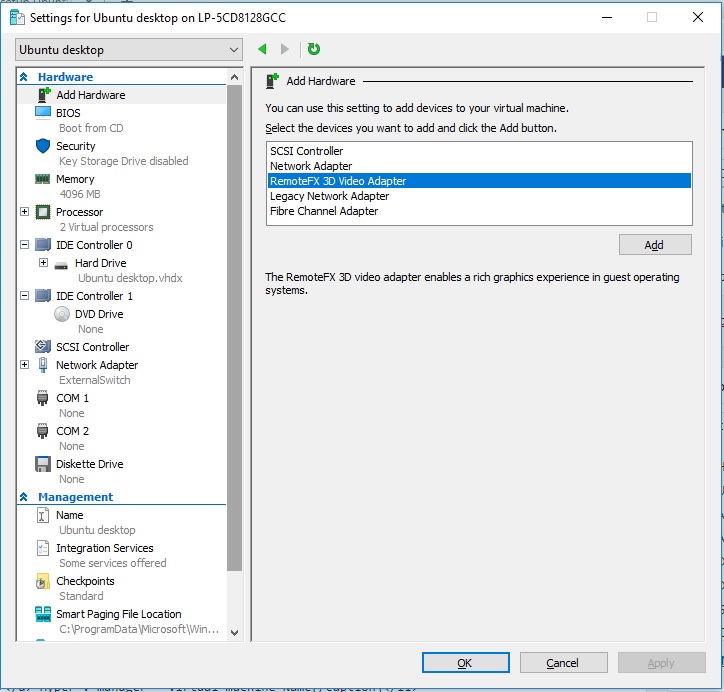
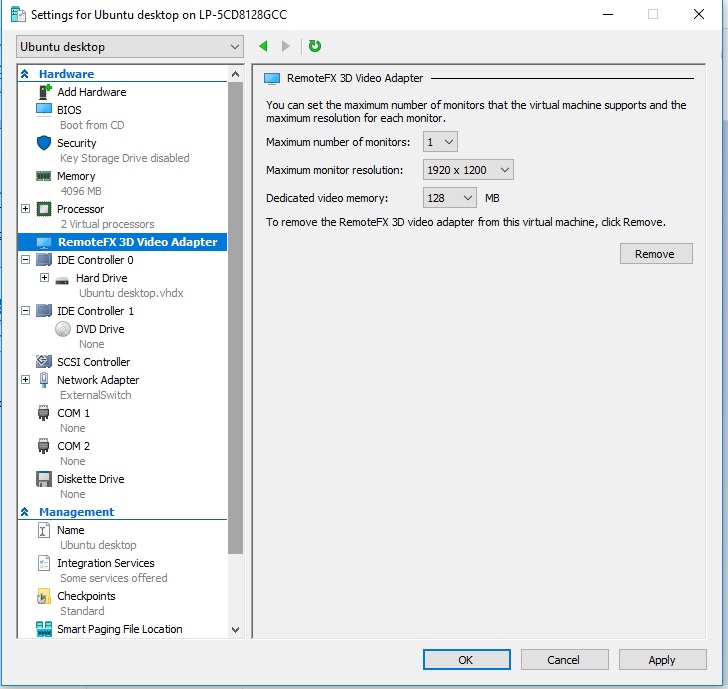
Enable RemoteFX 3D Video Adapter
Enabling RemoteFX 3D Video Adapter give you access to rich graphics such as enabling full screen mode. This step is optional, but recommended.
Go to settings and click on Add hardware. You will see RemoveFX 3D Video Adapter. Click on that and click Add.Make your selection from the drop down boxes and click OK.
-
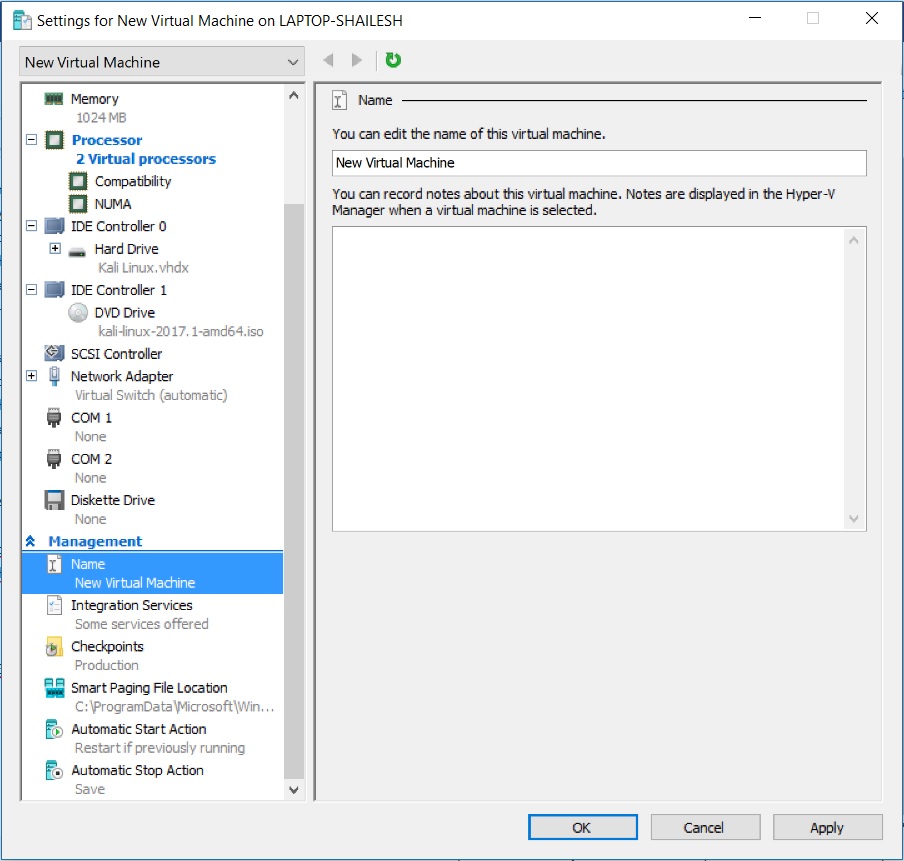
Change Virtual machine name
If you wish to change the name of the virtual machine, you can do it here.
Step 10 – Connect to virtual machine
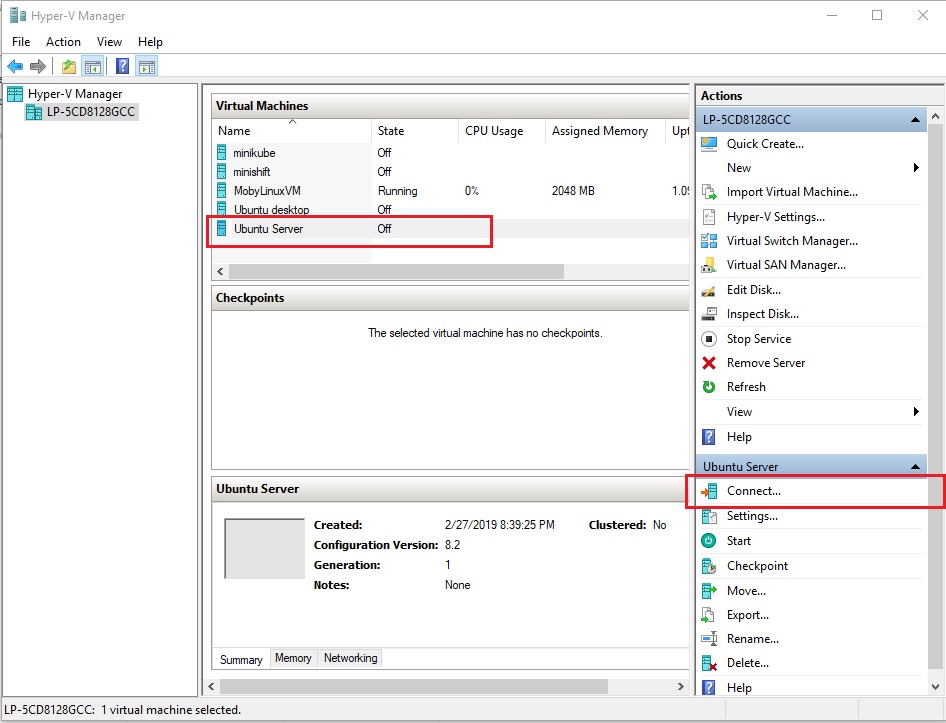
Now lets get started with the installation process. Click on the Virtual machine name you have created and click on start. This will start the Ubuntu VM. If you don’t see a new window popup, select click on connect. You will see the Virtual Machine window.
Step 11 – Start virtual machine
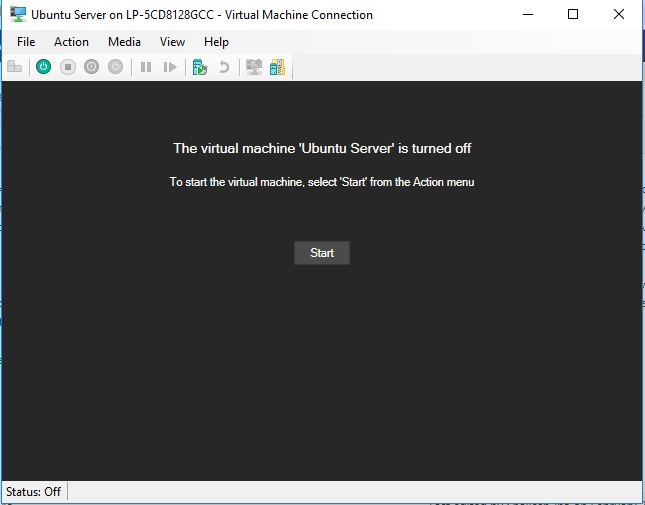
If you have clicked on Connect, you will see the screen below. You will have to click start to start the VM. If you have clicked start first, VM will start but you will not see the below window. In that case you will have to click on Connect.
Click on Start to start VM.
Ubuntu installation process should start.
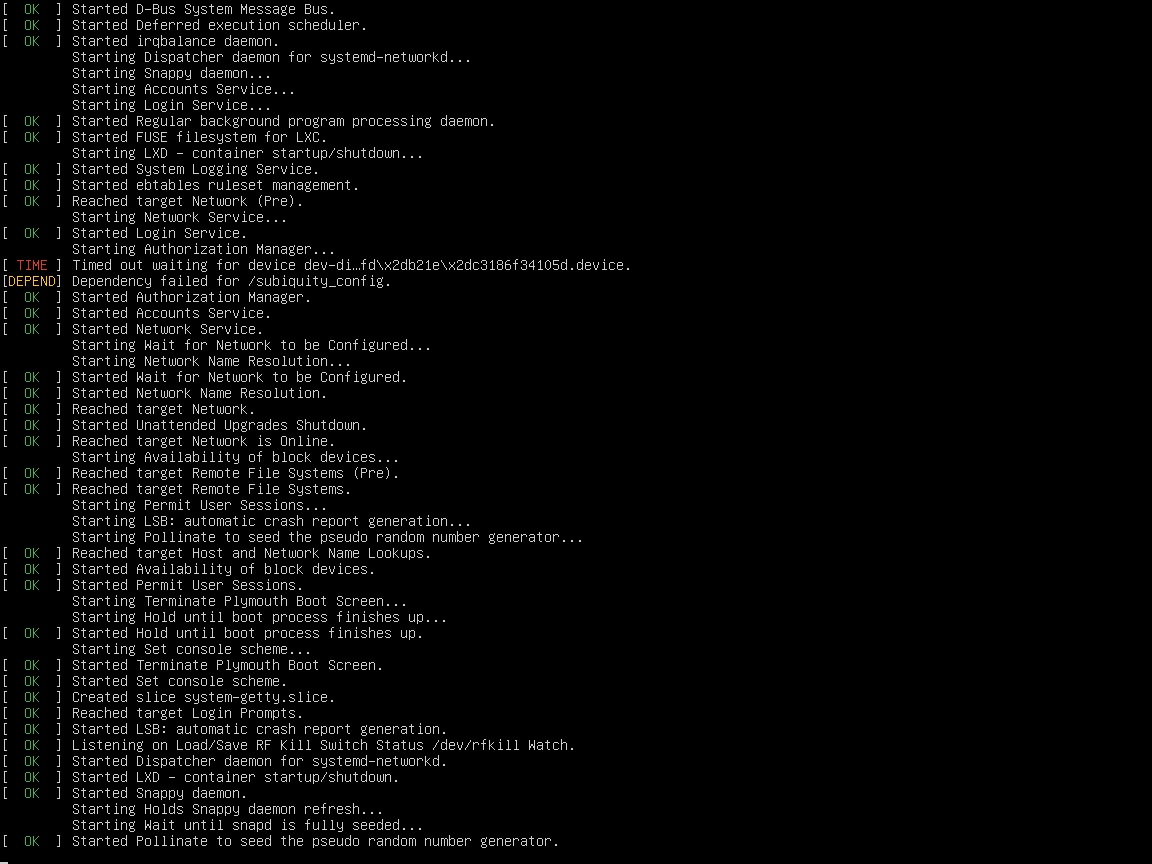
You will see a lot of activity such as the below screenshot before the Ubuntu Server Installer window shows up. Please be patient.
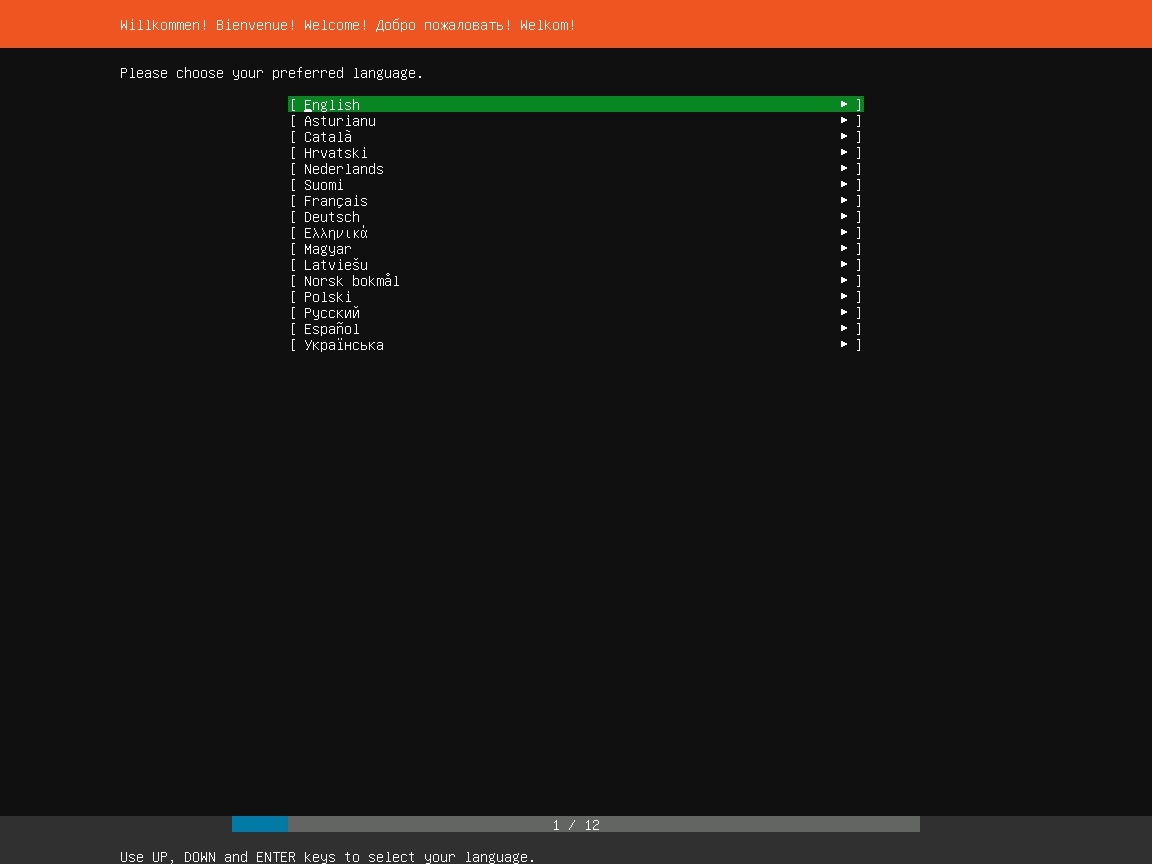
Step 12 – Select Language preference
After sometime you will see a windows asking for your language preference. Make your choice by up and down arrow and press enter.
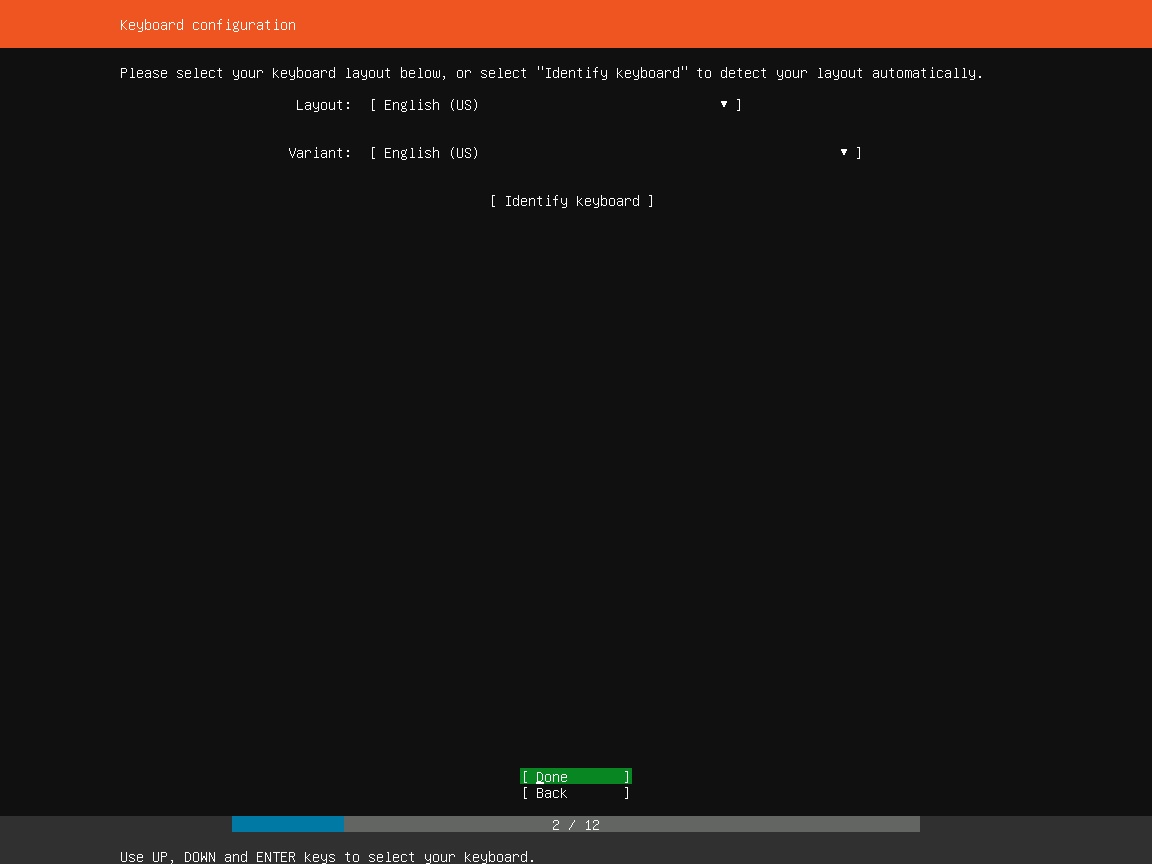
Step 13 – Select Keyboard preference
Here you will be asked to set your keyboard preference. I normally leave it as default. If you want to change it, use the up and down arrow key and press enter to see the list of available options. Once done press the enter key to select and use the up and down arrow key to go to done square box at the bottom of the screen and press enter.
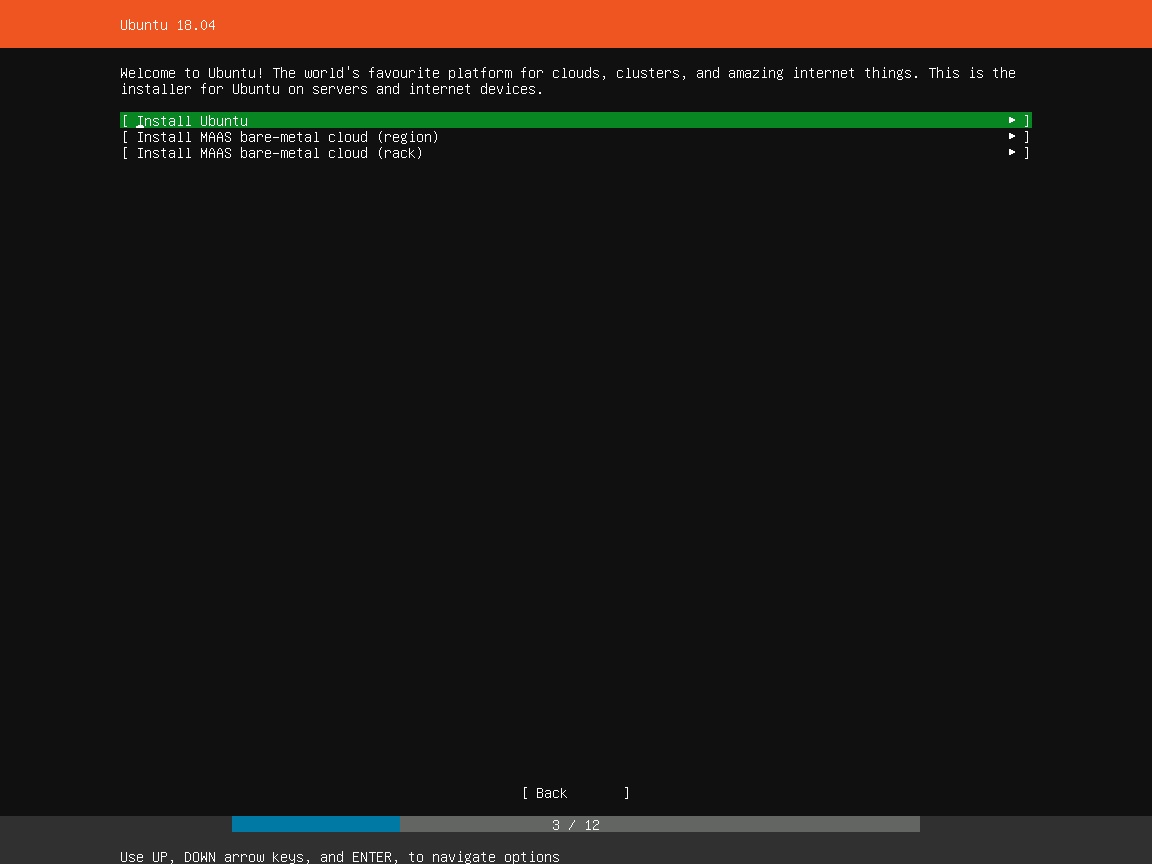
Step 14 – Select how you want to install Ubuntu Server
Here you will see the option to install Ubuntu using MAAS, which stands for Metal as a Service. Since we are installing Ubuntu Server on Hyper-V, We wont go into the details of it. If you are interested, please visit the official MAAS site.
Select the default option Install Ubuntu and hit enter.
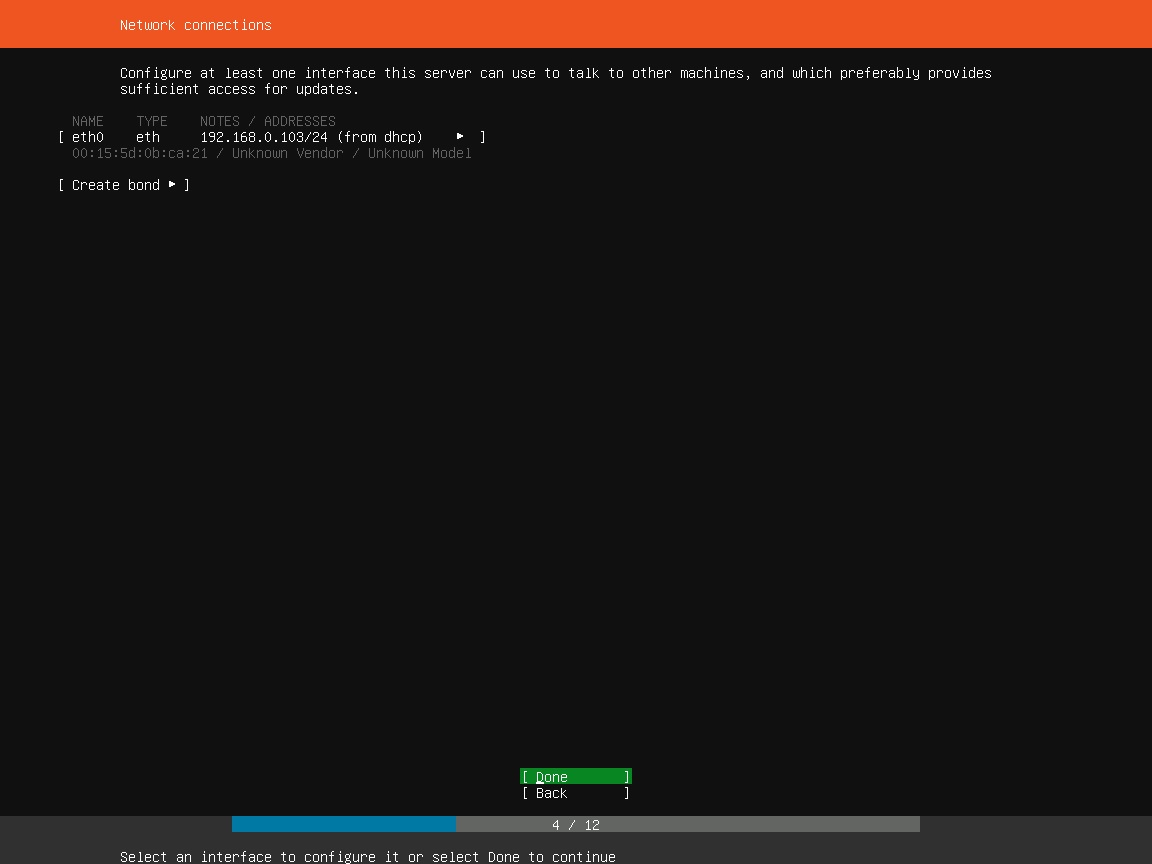
Step 15 – Select Network Connections
Here you will be asked to specify the network connection. You can use the arrow keys to move up and down and hit enter to change the configuration. Press ESC key to go back to the previous screen.
I normally leave these as the default. Use the arrow key to go to the Done at the bottom of the screen and hit enter.
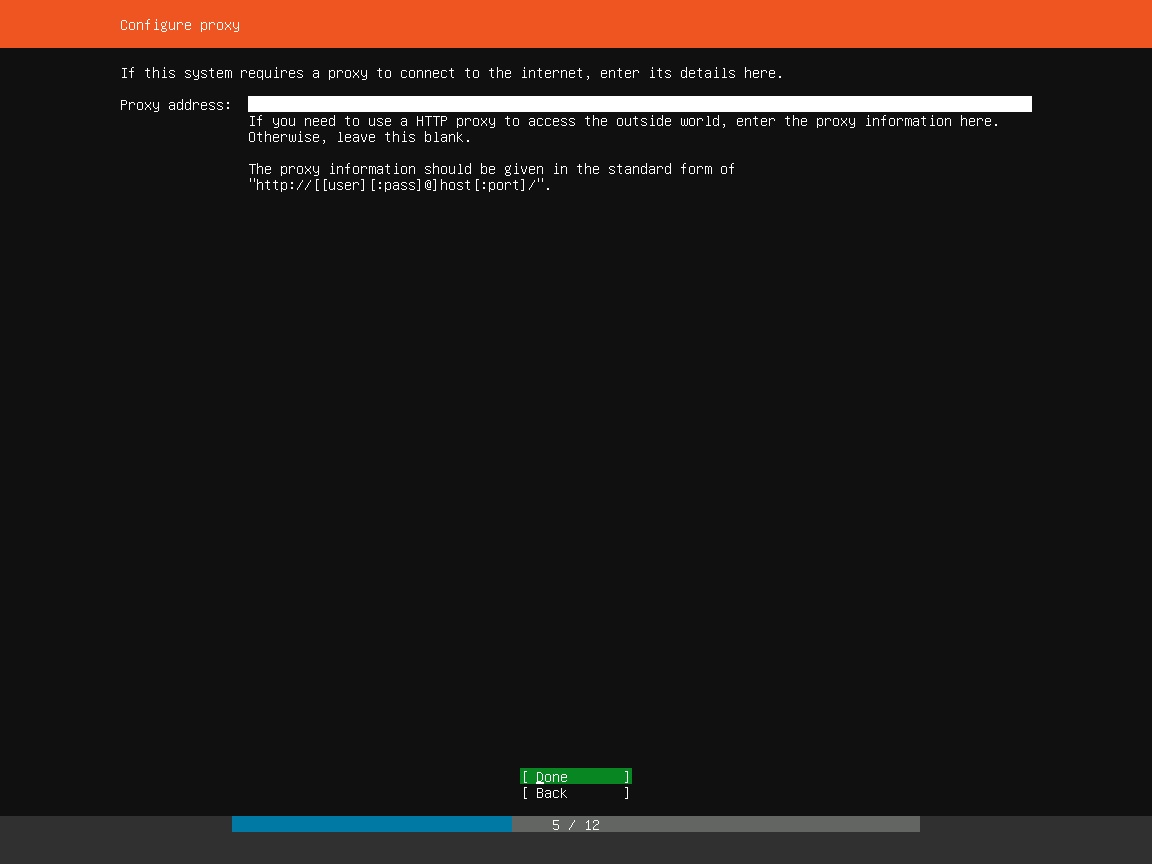
Step 16 – Configure Proxy
If you use Proxy to connect to the internet, you can provide the details here. This normally happens in restricted environments such as Office. I leave it as blank and go to Done at the bottom of the screen and hit enter.
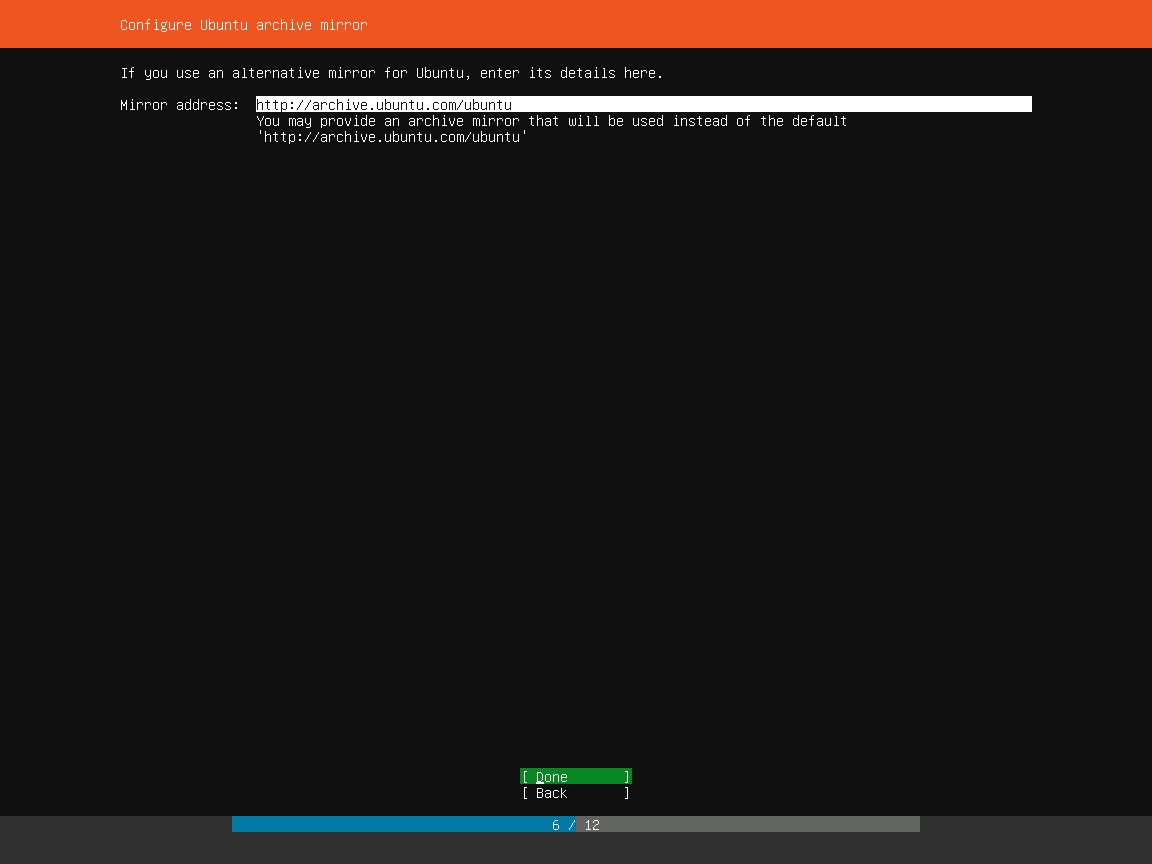
Step 17 – Configure Ubuntu Archive Mirror
Here you can enter the alternate Ubuntu Archive Mirror. I leave it as it is, that is the default Ubuntu Mirror.
Hit enter to continue.
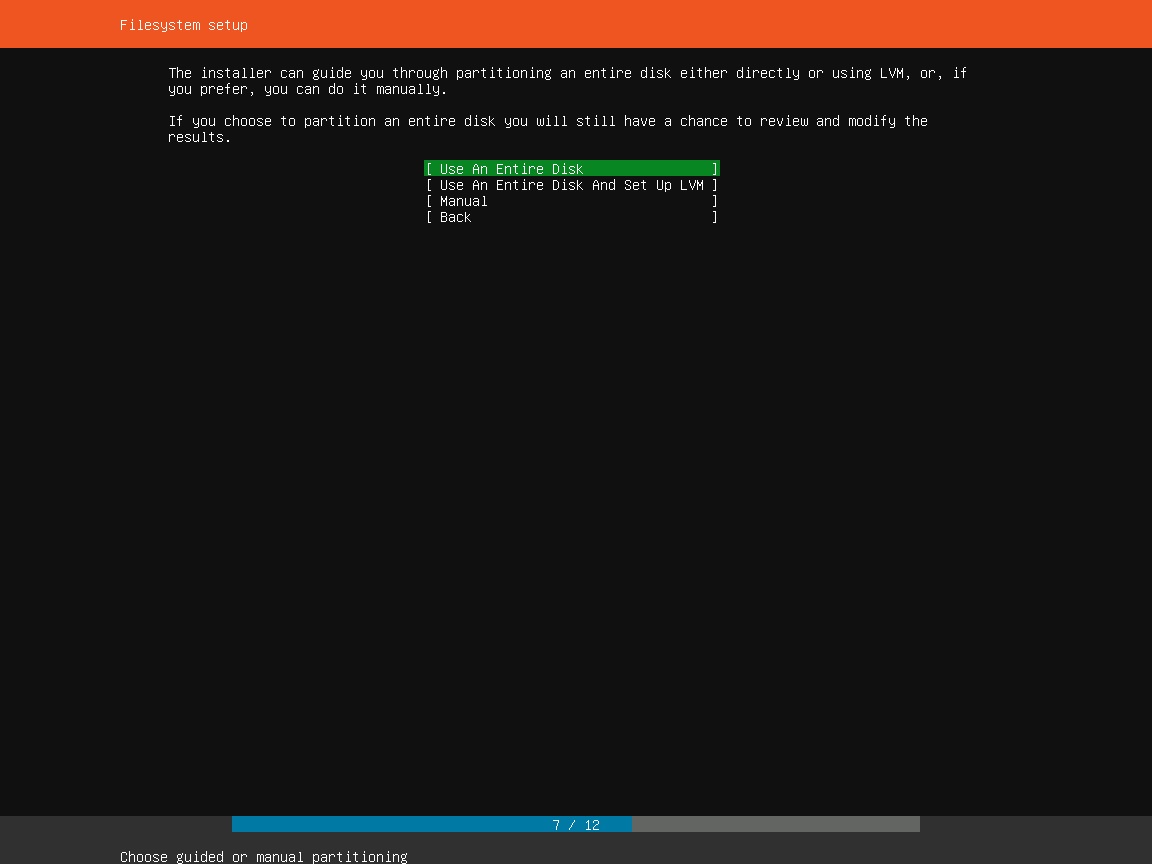
Step 18 – File System setup
Here you will have to specify how the file system should be used. I use the default option which is Use the Entire disk. I suggest you should use this also. Hit enter to continue.
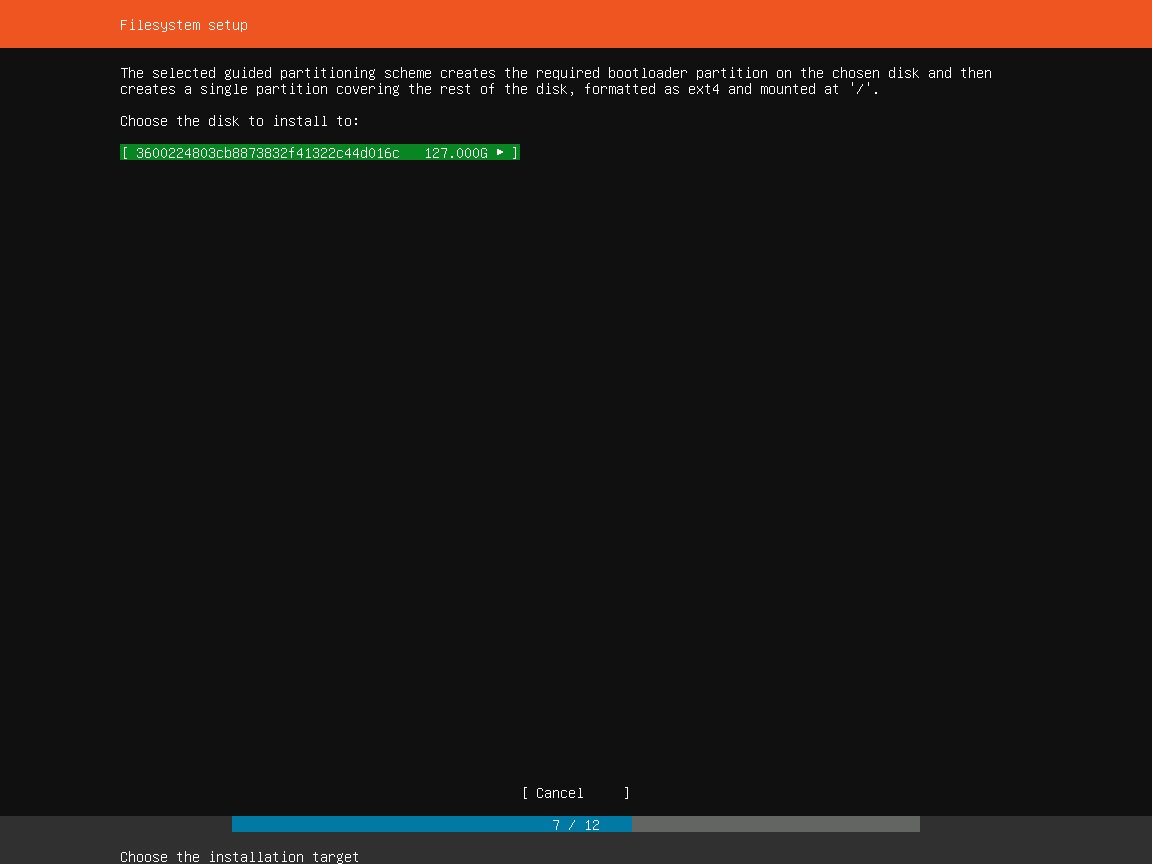
Step 19 – File System setup – Choose disk to install
Now you will be asked to choose the disk to install Ubuntu Server. Choose the default and hit enter.
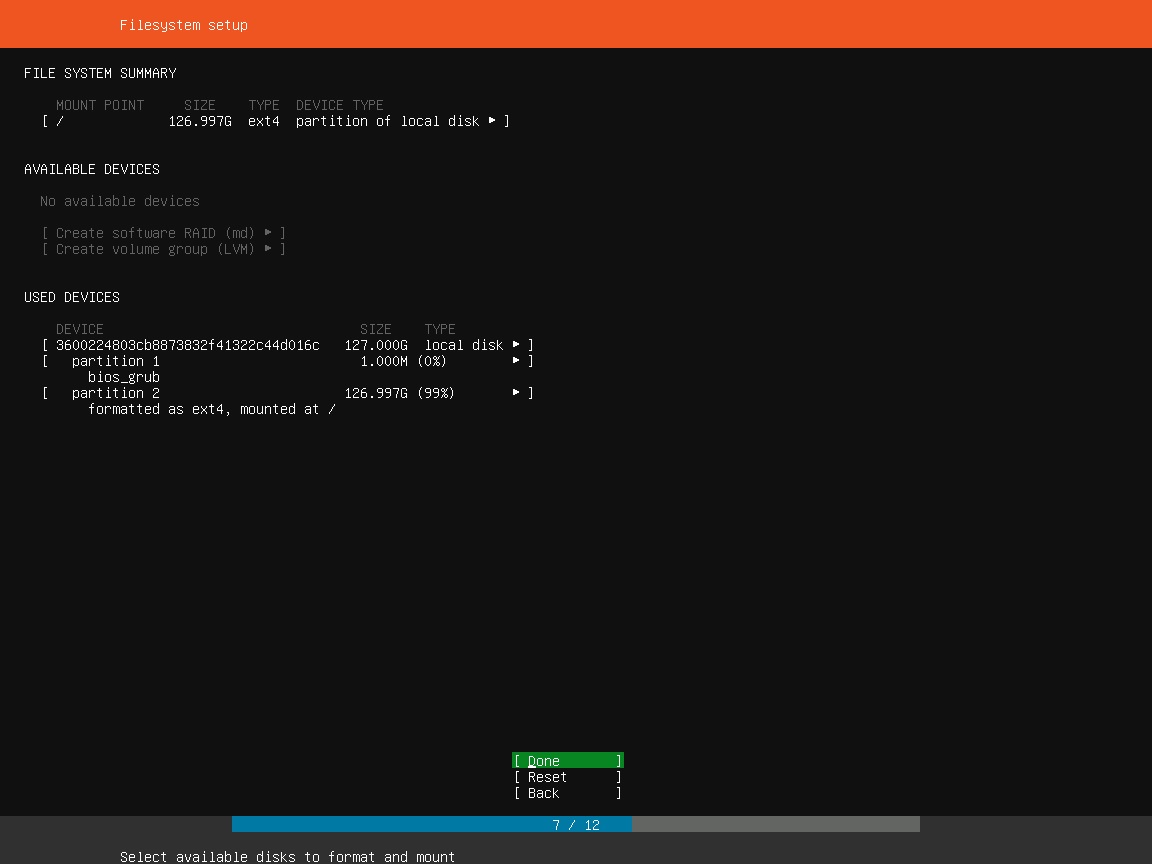
Step 20 – File System setup – Verify File system information
Here you will see the summary of file system information that we can setup in previous steps. Leave it as it is and hit enter to continue.
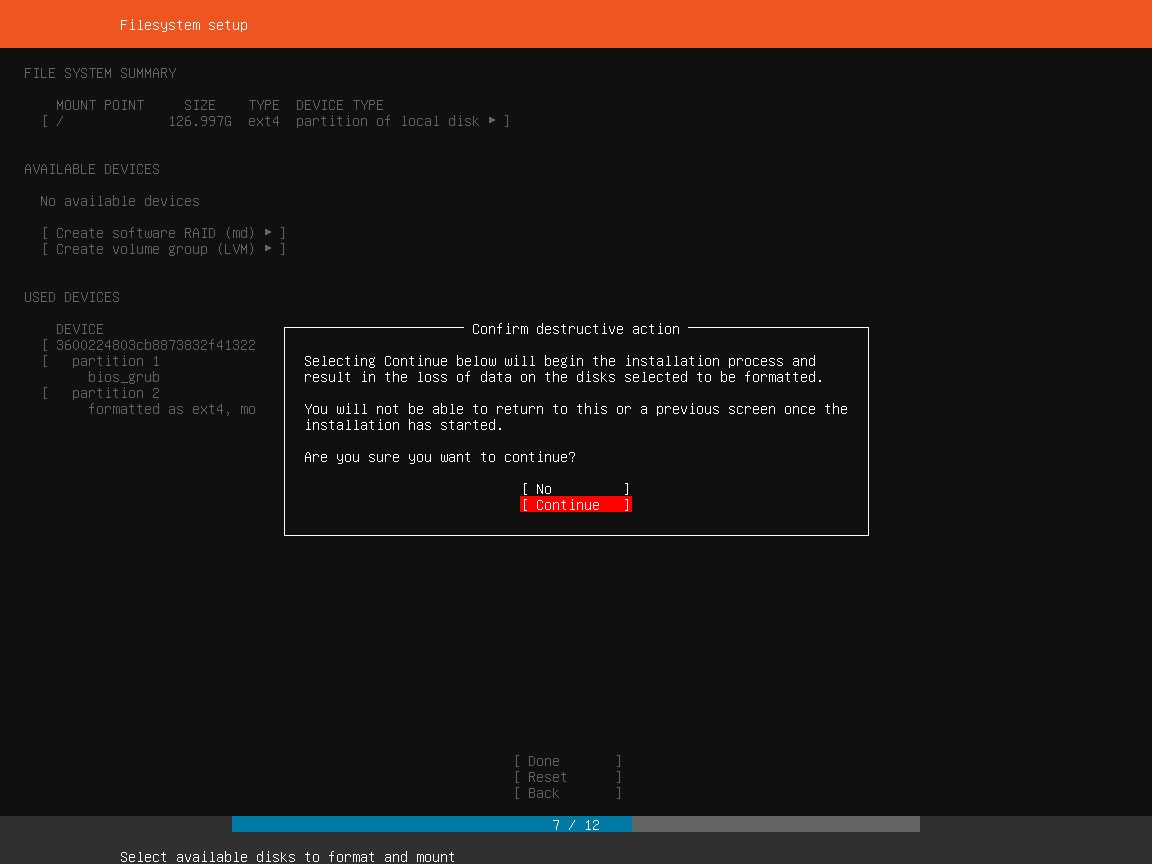
Step 21 – Confirm to continue with installation
Now you will see a warning, asked to confirm if you want to proceed with the installation. Use the arrow key to select confirm and hit enter to begin the installation process. Installation progress you can see at the bottom. Installation will progress from here but you will have to configure profiles etc. in the next steps. So lets continue.
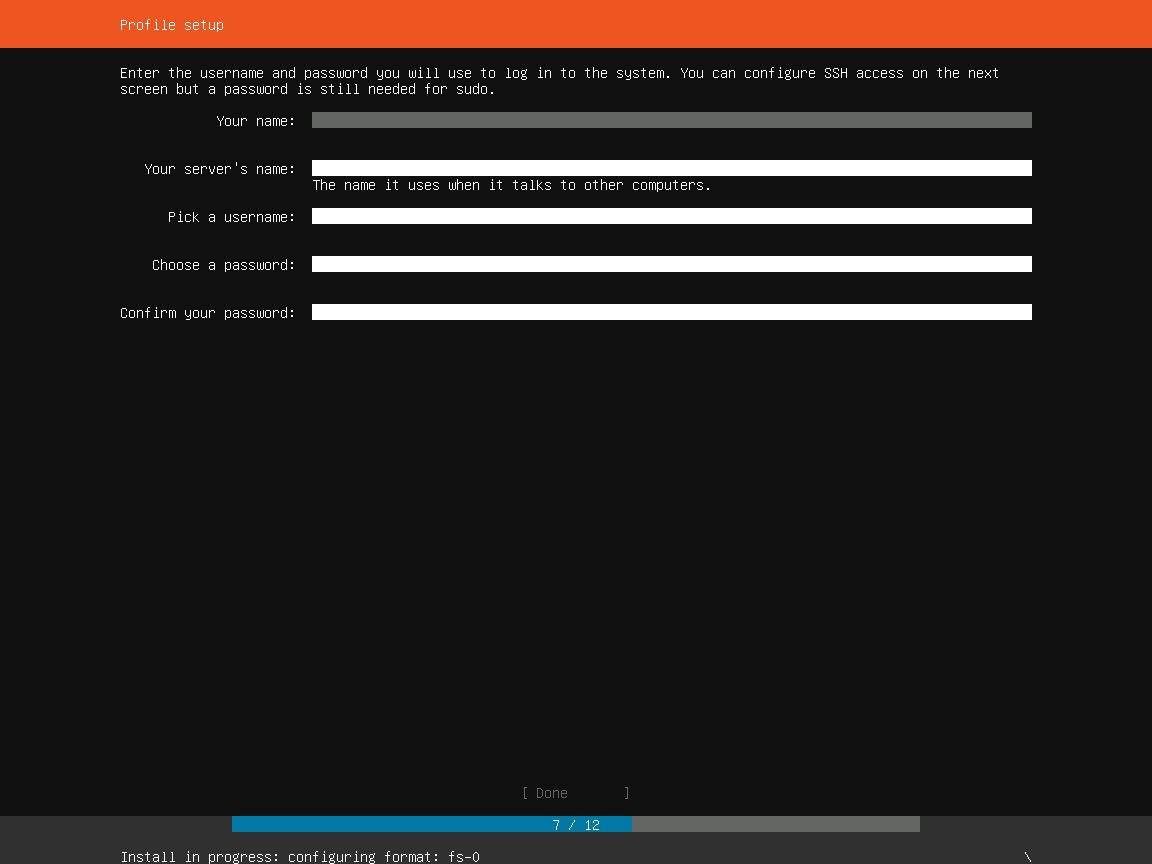
Step 22 – Setup profile
Here you will be asked to enter your profile details such as password, username, server name and so on. Use the up and down arrow key to enter the values and hit enter.
Step 23 – Setup OpenSSH server
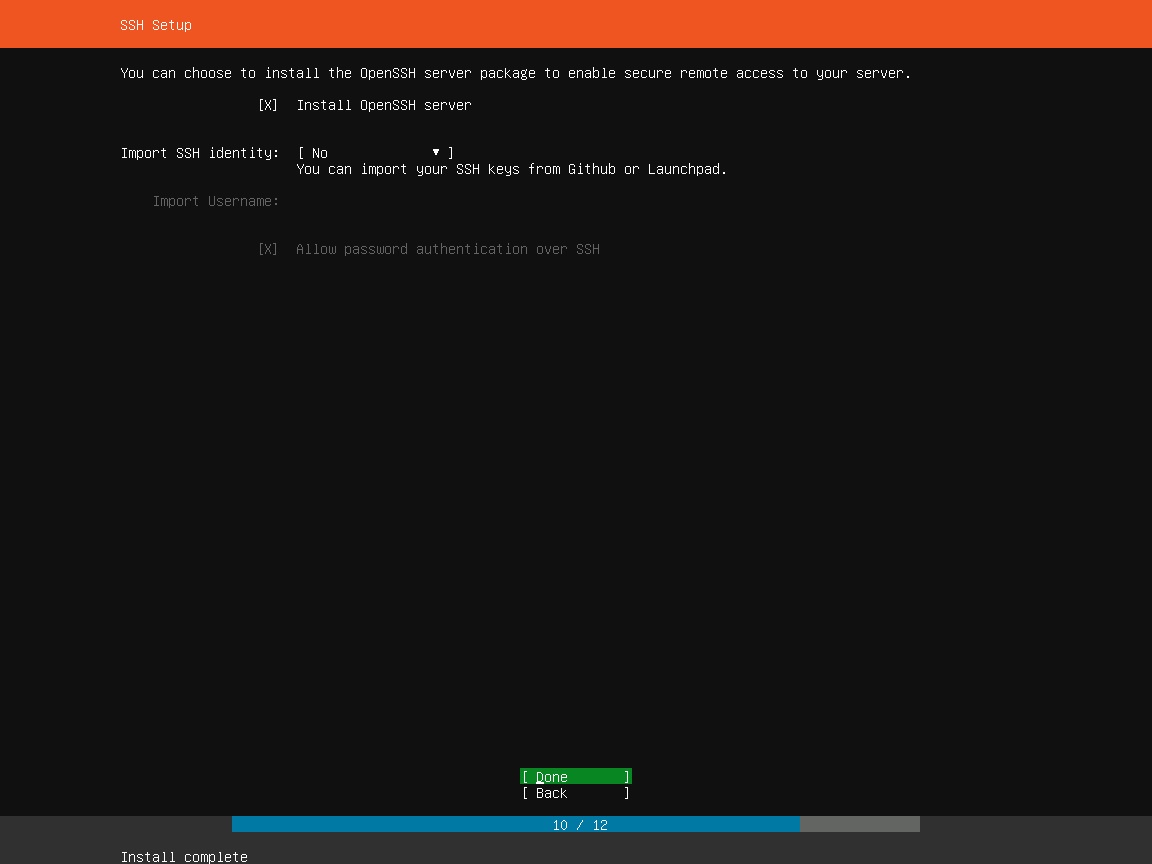
Here you will be asked if you want to setup openSSH server. This will allow you to access your server from SSH client such as Putty. It is recommended that you install OpenSSH server. Hit enter to select install OpenSSH server. Import SSH identity, leave it as no and hit enter to continue.
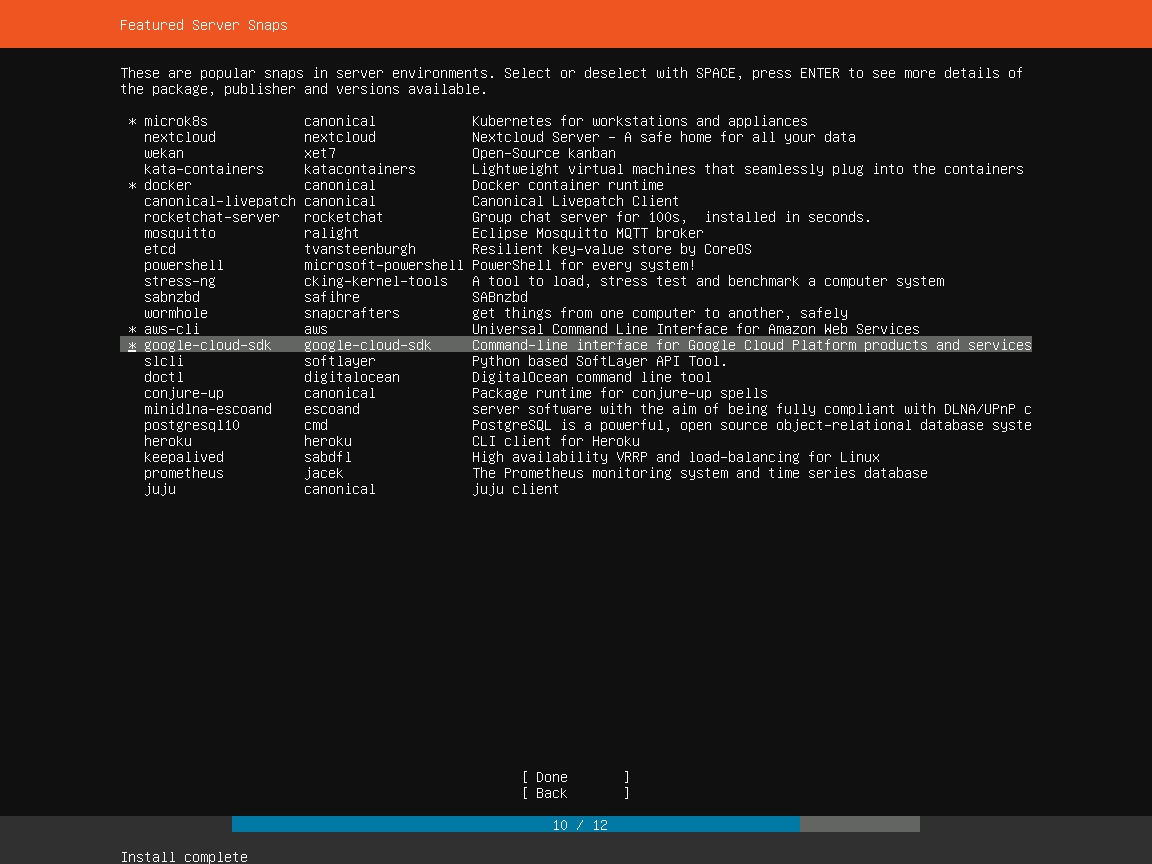
Step 24 – Feature and Server Snaps
here you will asked to select what server features or software you want to install. Hit spacebar to select/deselect and up and down arrow key to go up and down. Once done go to done at the bottom and hit enter to continue.
Make sure that you provide sufficient memory(at least 8 GB) if you wish to install Docker and Kubernetes. Else the performance will be too bad.
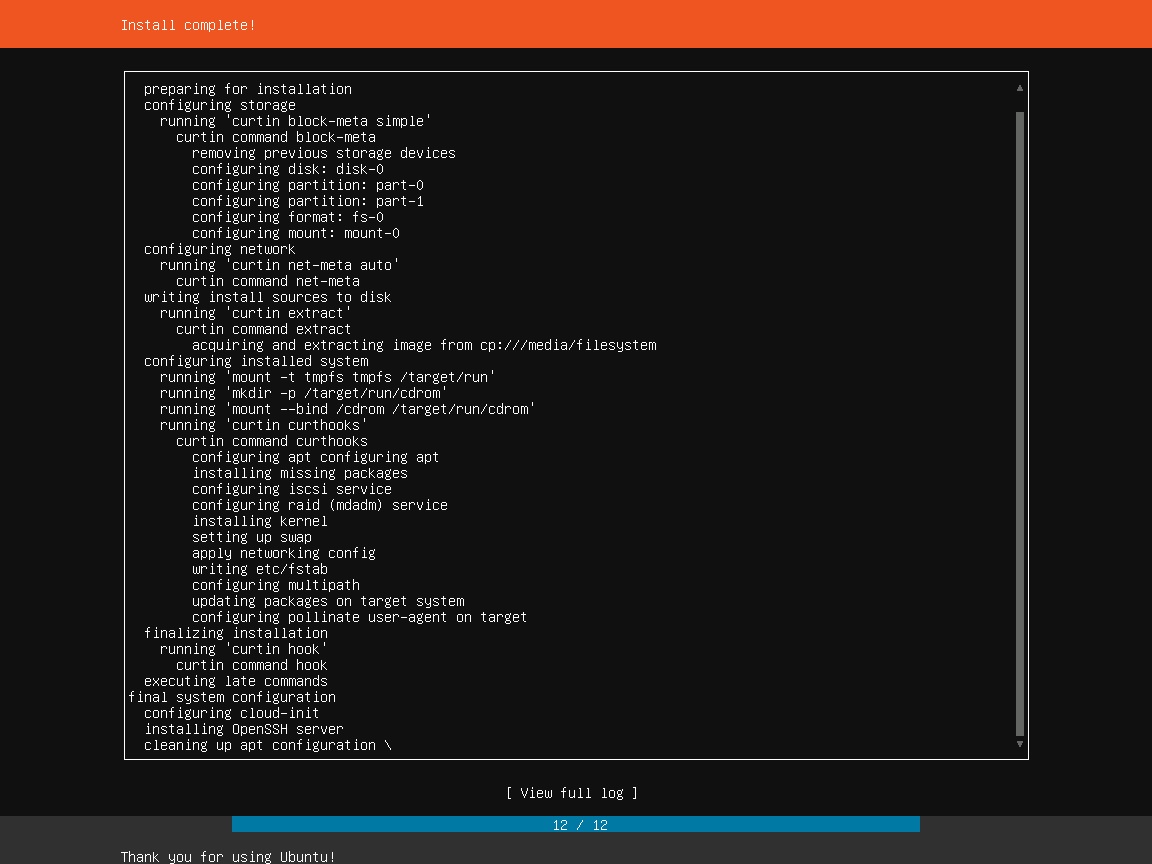
Step 25 – Installation Complete
Installation will continue and you will see installation complete window. You are done.
Scroll down using down arrow key and you will see Reboot now option. Select that and hit enter to complete the process.
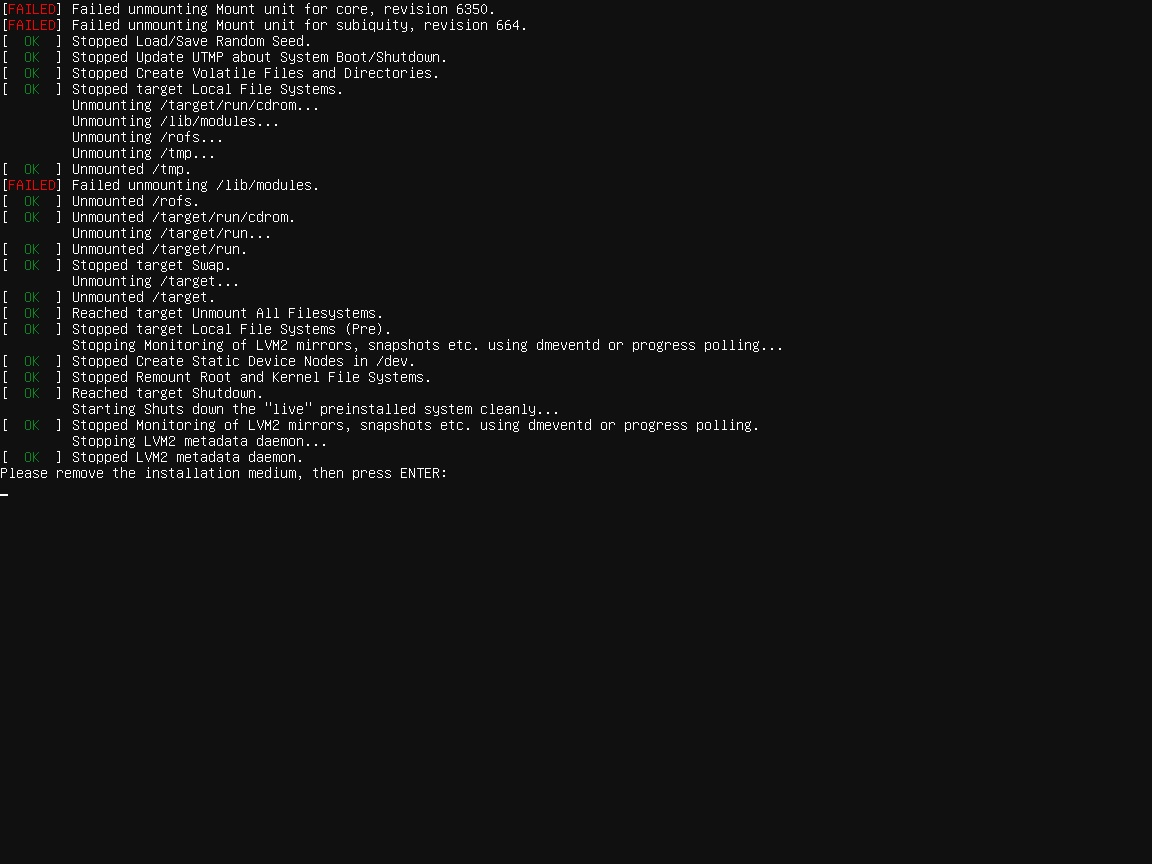
The VM will restart and you will be asked to remove media. You can double check if there any installation ISO by going to Media->DVD drive.
In y case there was not media after reboot. Hit enter to continue.
Wait for VM to restart.
You will see login screen, enter username and password you setup during installation in the previous steps to login.
That’s it you are done.


I believe I followed the directions pretty precisely, but when I started the vm, ubuntu failed to start the installation process. Any recommendations?
You MUST mount the iso image to have it boot.
This can be done when creating the new VM or,
if you chose not to install (as per the images in this tutorial (should always read the text too)),
you can go to settings before starting the vm and mount the iso.
Then start the vm and all should be good to go.
Hope this helps.
Regards
Alpha2ka
A.K.A. Bored Administrator….. Yawn… 🙂
Thanks a lot for your reply. Certainly there are two ways for creating a new VM. One is to create the VM, first mount the ISO from settings and start and other is to mount it during the VM creation process.
Thanks for pointing it out.
Thanks,
Shailesh